
Modifying a parent theme directly is a recipe for disaster. If you update the main theme to get security patches or new features, all your hard-coded customizations will vanish instantly. The professional standard to solve this is to create WordPress child theme. This approach allows you to inherit all the functionality and styling of your parent theme while making safe, upgrade-proof customizations.
Whether you are a seasoned developer or a site owner looking to tweak CSS, knowing how to create WordPress child theme is a fundamental skill. In this guide, we will walk through the file structure, the required code, and advanced overriding techniques to ensure your site remains robust and maintainable.
Prerequisites
Before we dive into the code, ensure you have the following environment and access levels ready. This process requires direct access to your server files.
- PHP 7.4 or higher: While WordPress runs on older versions, PHP 8.0+ is recommended for security.
- FTP/SFTP or cPanel Access: You need to create folders and upload files to your server.
- A Text Editor: VS Code, Sublime Text, or Notepad++ are ideal for editing PHP and CSS.
- Full Backup: Always backup your site (database and files) before altering themes.
- Active Parent Theme: Ensure the theme you want to modify is installed and updated.
Backup Required
Why You Must Create WordPress Child Theme
A child theme is a theme that inherits the functionality and styling of another theme, called the parent theme. It is the recommended way to modify an existing theme. When you create WordPress child theme, you establish a separate directory that WordPress checks first for specific files. If the file exists in the child theme, WordPress uses it; if not, it falls back to the parent theme.
This hierarchy is crucial for long-term maintenance. Many developers make the mistake of adding custom CSS to the theme settings or, worse, editing the parent theme’s style.css directly. By taking the time to create WordPress child theme properly, you ensure that when the theme developer releases an update (v2.0, v3.0, etc.), you can click “Update” without fear of losing your changes. It separates your logic from the core theme logic.
Step 1: Create the Child Theme Folder
The first physical step to create WordPress child theme is establishing the directory structure. WordPress looks for themes in the wp-content/themes/ directory. You must create a new folder here that effectively “houses” your new child theme.
Naming Conventions
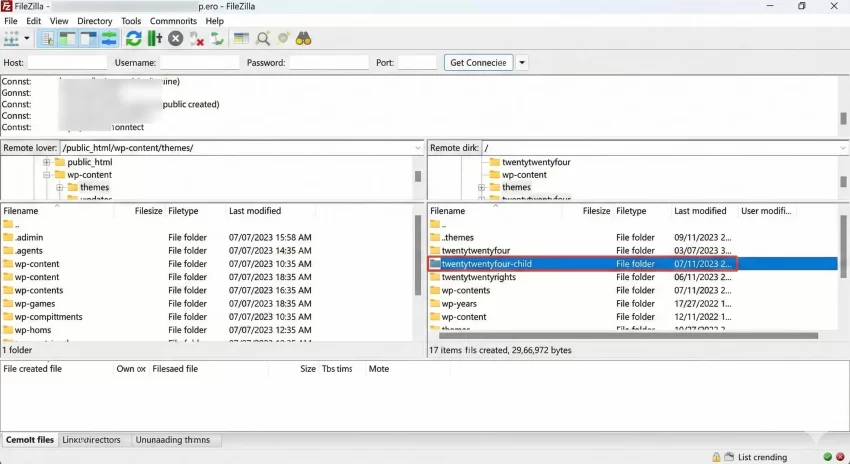
While you can name this folder anything, standard coding practice suggests using the parent theme’s name suffixed with -child. For example, if you are using the popular “Twenty Twenty-Four” theme (folder name twentytwentyfour), your child theme folder should be named twentytwentyfour-child. This keeps your directory organized and makes the relationship between themes obvious to any other developer working on the site.
Accessing the Server
Connect to your site via FTP or open your hosting File Manager. Navigate to:
/public_html/wp-content/themes/
Create your new folder here. Do not include spaces in the folder name; use hyphens or underscores.
You might also like: Hide Price In WooCommerce: Boost Sales by Requiring Login
Step 2: Create the Stylesheet (style.css)
The most critical file required to create WordPress child theme is the style.css file. This file not only holds your custom CSS but also contains the metadata that tells WordPress, “I am a child of this specific parent theme.” Without this header information, WordPress will not recognize your folder as a valid theme.
The Required Header
Create a file named style.css inside your new child theme folder. Paste the following code block into it. You must edit the “Template” line to match the folder name of your parent theme exactly.
/*
 Theme Name:   Twenty Twenty-Four Child
 Theme URI:    https://example.com/twenty-twenty-four-child/
 Description:  Twenty Twenty-Four Child Theme
 Author:       Your Name
 Author URI:   https://example.com
 Template:     twentytwentyfour
 Version:      1.0.0
 License:      GNU General Public License v2 or later
 License URI:  http://www.gnu.org/licenses/gpl-2.0.html
 Tags:         light, dark, two-columns, right-sidebar, responsive-layout, accessibility-ready
 Text Domain:  twentytwentyfour-child
*/

/* Add your custom CSS below this line */
body {
    background-color: #f0f0f0; /* Example customization */
}
The Template: line is the most important part when you create WordPress child theme. It acts as the bridge. If your parent theme folder is named astra, this line must say astra. It is case-sensitive regarding the folder name.
Pro Tip
Step 3: Create Functions.php to Enqueue Styles
In the past, developers used the @import rule in CSS to load parent styles. This is no longer best practice due to performance drag. To properly create WordPress child theme in a modern environment, you should use a functions.php file to enqueue the styles. This ensures the parent styles load first, followed by your child styles.
The Enqueue Logic
Create a file named functions.php in your child theme folder. This file allows you to add PHP logic to your site. We will use the wp_enqueue_scripts hook to load the stylesheets in the correct order.
<?php
/**
 * Enqueue parent and child theme styles.
 */
function pnet_enqueue_styles() {
    $parent_style = 'parent-style'; // This is a handle, not a filename.

    // Load the parent theme's style.css
    wp_enqueue_style( $parent_style, get_template_directory_uri() . '/style.css' );

    // Load the child theme's style.css, setting the parent as a dependency
    wp_enqueue_style( 'child-style',
        get_stylesheet_directory_uri() . '/style.css',
        array( $parent_style ),
        wp_get_theme()->get('Version')
    );
}
add_action( 'wp_enqueue_scripts', 'pnet_enqueue_styles' );
This code tells WordPress to look up the parent theme directory (get_template_directory_uri) and load its style file. Then, it loads the child theme style (get_stylesheet_directory_uri). By setting array( $parent_style ), we explicitly tell WordPress to load the child theme after the parent, ensuring your CSS overrides actually work.
Step 4: Activate Your Child Theme
Now that the files are in place, you are ready to activate the theme. At this stage, you have successfully completed the file setup required to create WordPress child theme.
Dashboard Activation
Log in to your WordPress Dashboard and navigate to Appearance > Themes. You should see your new child theme listed there, likely without a preview image (unless you added a screenshot.png to the folder, which is optional but recommended for polish).
Hover over your new child theme and click Activate.
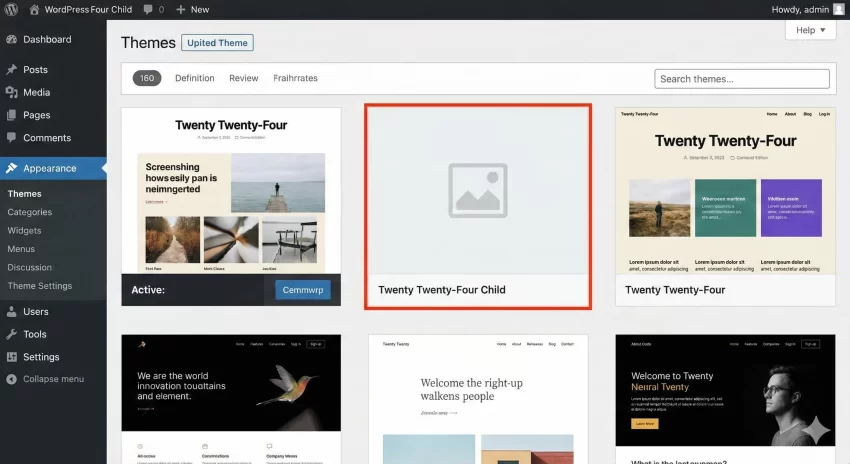
Check your website’s front end. It should look exactly like the parent theme, but now it is loading from your child directory. If the layout looks broken, revisit Step 3 to ensure the parent stylesheet is enqueued correctly.
You might also like: Ultimate Guide to Correct Cloudflare SSL Settings for WordPress
Step 5: Overriding Template Files
The true power when you create WordPress child theme comes from overriding PHP templates. Let’s say you want to change the footer layout. You do not need to rewrite the entire theme. You simply copy the specific file you want to change from the parent theme to the child theme.
The Copy-Paste Method
1. Locate footer.php in the parent theme folder.
2. Download it to your computer.
3. Upload it to your child theme folder.
4. Edit the footer.php in your child theme folder.
WordPress is smart enough to see that footer.php exists in the child folder and will use that file instead of the parent’s file. This allows you to completely restructure HTML output while leaving the core parent theme untouched.
Intermediate
Step 6: Adding Custom Functions
Unlike style.css or footer.php where the child theme replaces the parent, functions.php is different. When you create WordPress child theme, the child’s functions.php is loaded in addition to the parent’s, and it is loaded before the parent’s file.
Using Hooks and Filters
Because the child functions load first, you can use WordPress hooks to modify the parent’s behavior. If the parent theme developers were savvy, they wrapped their functions in if ( ! function_exists( 'function_name' ) ) checks. This allows you to define a function with the same name in your child theme, effectively “pluggable” functionality.
Here is an example of adding a custom Google Font via the child theme:
function pnet_add_google_fonts() {
    wp_enqueue_style( 'pnet-google-fonts', 'https://fonts.googleapis.com/css2?family=Roboto:wght@400;700&display=swap', false );
}
add_action( 'wp_enqueue_scripts', 'pnet_add_google_fonts' );
Common Errors & Troubleshooting
Even experienced developers encounter issues when they create WordPress child theme. Here are the most common pitfalls and how to fix them.
1. Stylesheet Not Loading / Broken Layout
If your site looks unstyled, the enqueue function in Step 3 is likely incorrect. Double-check that you are using get_template_directory_uri() for the parent and get_stylesheet_directory_uri() for the child. Also, inspect the page source (Ctrl+U) to see if the CSS file paths are correct.
2. “The parent theme is missing” Error
This error occurs during activation if the Template: line in your style.css does not match the folder name of the parent theme. Note that the folder name might differ from the visible name of the theme. Always check the FTP directory name.
3. Functions Fatal Error
If you copy a function from the parent theme to your child theme’s functions.php, you might get a “Cannot redeclare function” error. You cannot have two functions with the exact same name. You must either rename your function or, if you are trying to override a pluggable function, ensure the parent theme supports it.
Summary
Learning how to create WordPress child theme is an essential workflow for maintaining a healthy, updatable WordPress site. By separating your customizations from the core theme files, you ensure that your site can evolve with security updates without breaking your design.
We have covered the creation of the directory, the mandatory style.css configuration, the modern way to enqueue scripts via functions.php, and how to override templates. With this structure in place, you have a safe sandbox to experiment with code, refine your design, and build a professional-grade website.
You might also like: Easily Create Custom Taxonomy in WordPress: The Ultimate Code vs. Plugin Guide


