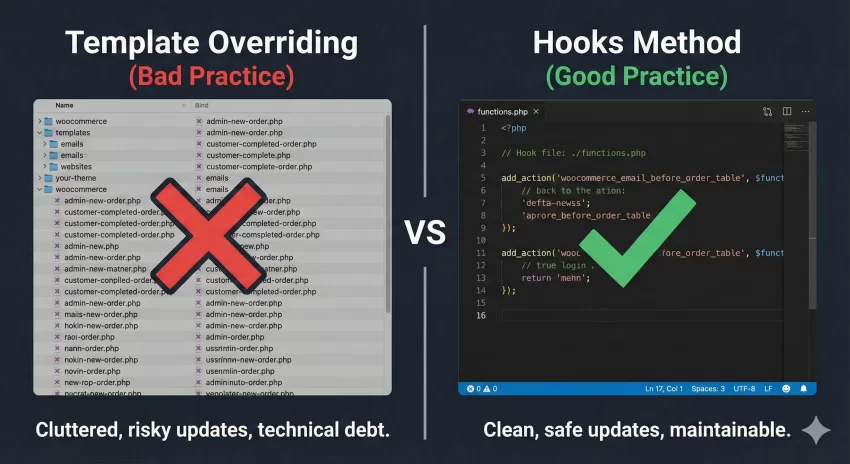
If you run an online store, you know how important it is to customize WooCommerce emails to match your brand identity. The default emails are functional, but they lack that unique touch that keeps customers coming back. However, many store owners make a critical mistake when trying to change them: they override the core template files.
In this guide, we are going to stop copying files to your theme folder and start doing things the developer way. We will look at how to customize WooCommerce emails using hooks (actions and filters). This method is cleaner, safer, and ensures your changes won’t disappear or break when WooCommerce releases an update.
Customize WooCommerce Emails: Why You Should Avoid Overriding Templates
The standard advice found on many forums is to copy the template file from /woocommerce/templates/emails/ to /your-theme/woocommerce/emails/. While this works, it introduces a “technical debt.”
When WooCommerce updates their core plugin, they often change the code inside those template files to fix bugs or add security features. If you have a hard-coded copy in your theme, you miss out on those updates. Your site might eventually break, or you’ll see that dreaded “Your template files are outdated” notice in your dashboard.
By using hooks to customize WooCommerce emails, you inject your code only where needed, leaving the core structure intact. It is future-proof and much easier to manage.
Understanding the WooCommerce Email Structure
Before we write any code, we need to visualize where we can inject our content. WooCommerce emails are built with a series of “Action Hooks.” Think of these as little anchor points scattered throughout the email where you can attach your own text, images, or code.
Here are the most common hooks you will use:
woocommerce_email_header: Fires at the very top, before the main content.woocommerce_email_before_order_table: Fires after the greeting but before the product list.woocommerce_email_after_order_table: Fires immediately after the product list.woocommerce_email_footer: Fires at the bottom of the email.
You might also like:
Step 1: Adding Custom Content Before the Order Table
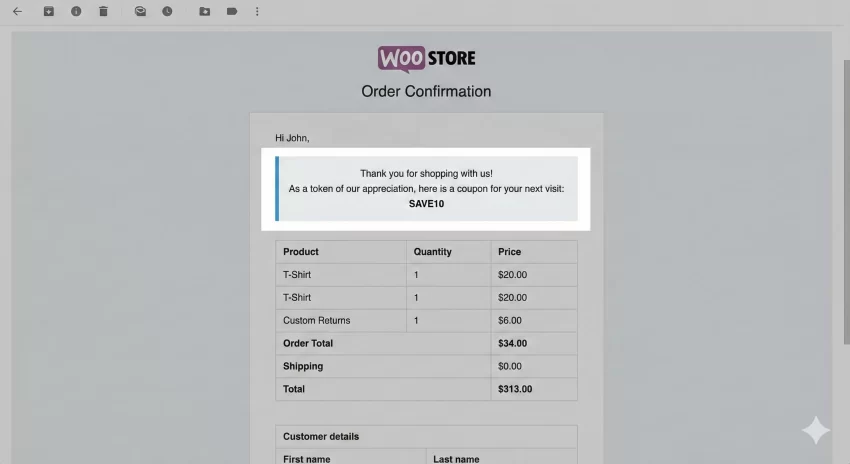
Let’s say you want to add a special “Thank You” banner or an important announcement right before the order details. This is a prime spot to customize WooCommerce emails because it catches the customer’s eye immediately.
Add the following code to your theme’s functions.php file or a custom plugin:
/**
 * Add a custom message before the order table in emails.
 */
function pnet_add_content_before_order_table( $order, $sent_to_admin, $plain_text, $email ) {
   // 1. Ensure we only modify HTML emails, not plain text ones
   if ( $plain_text ) {
      return;
   }

   // 2. Output the custom content with inline styles
   echo '<div style="background-color: #f0f0f1; padding: 20px; text-align: center; margin-bottom: 20px; border-left: 5px solid #007cba;">
      <h3 style="margin: 0 0 10px;">Thank you for shopping with us!</h3>
      <p style="margin: 0;">As a token of our appreciation, here is a coupon for your next visit: <strong>SAVE10</strong></p>
   </div>';
}
add_action( 'woocommerce_email_before_order_table', 'pnet_add_content_before_order_table', 10, 4 );
Code Breakdown:
- We use the
pnet_prefix to ensure our function name doesn’t clash with other plugins. - We check
if ( $plain_text )to prevent HTML code from appearing in plain-text versions of the email. - We use inline CSS. Gmail and other email clients often strip external stylesheets, so inline styles are mandatory when you customize WooCommerce emails.
Step 2: Targeting Specific Emails
Sometimes, you don’t want your custom content to appear in every email. Perhaps you only want to display instructions in the “Order Processing” email but not in the “Completed Order” email.
The $email object passed to our function allows us to check which email is currently being sent. Here is how to target specific templates:
/**
 * Add content only to the "Customer Processing Order" email.
 */
function pnet_specific_email_content( $order, $sent_to_admin, $plain_text, $email ) {

   // Check if the email ID matches 'customer_processing_order'
   if ( 'customer_processing_order' === $email->id ) {
      echo '<p style="color: #d63638; font-weight: bold;">Note: Your order is currently being packed. You will receive a tracking number shortly.</p>';
   }
}
add_action( 'woocommerce_email_after_order_table', 'pnet_specific_email_content', 10, 4 );
Common Email IDs you can check against include:
new_order(Admin notification)customer_completed_ordercustomer_invoicecustomer_note
You might also like:
Step 3: Modifying the Footer Text
The footer is often neglected, but it’s a great place to add legal disclaimers or links to your support page. While WooCommerce settings allow some footer text changes, using hooks gives you complete programmatic control.
This method uses a filter (woocommerce_email_footer_text) rather than an action, because we are modifying existing text rather than adding new content blocks.
/**
 * Append a support link to the existing footer text.
 */
function pnet_customize_footer_text( $text ) {
   $custom_text = '<br/><br/>Need help? <a href="https://example.com/support" style="color: #007cba; text-decoration: none;">Visit our Support Center</a>.';
   return $text . $custom_text;
}
add_filter( 'woocommerce_email_footer_text', 'pnet_customize_footer_text' );
Best Practices for Styling Email Content
When you customize WooCommerce emails, keep in mind that email clients (Outlook, Gmail, Apple Mail) render HTML differently. Modern web standards often don’t work.
- Use Tables for Layout: If you need columns, use HTML tables. Flexbox and Grid rarely work consistently in emails.
- Inline CSS is King: Always write your styles directly in the HTML tags (e.g.,
style="color: red;"). - Keep it Simple: Avoid complex JavaScript or iframe elements; they will be blocked by email providers.
How to Preview Your Changes
The hardest part about working with emails is testing them. You don’t want to place a real order every time you change a line of code.
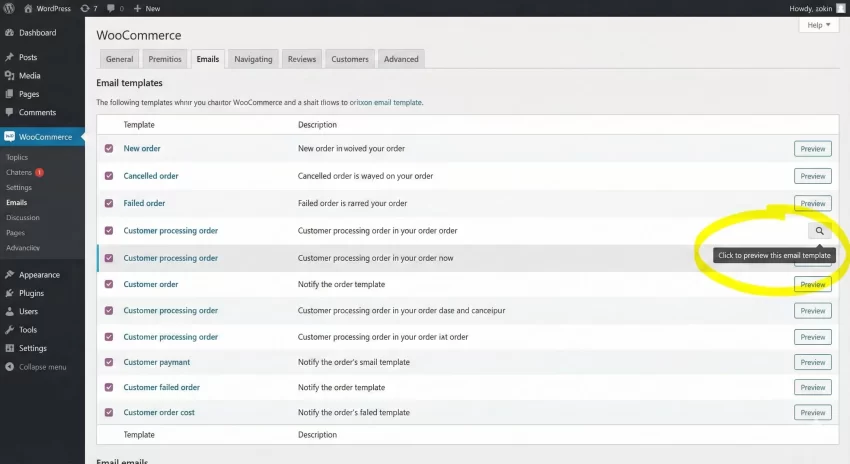
To speed up your workflow, you can use the “Email Preview” feature in WooCommerce (found under Settings > Emails > specific email > “Click to preview this email template“). However, for a more accurate developer experience, I recommend using a plugin like “Preview E-mails for WooCommerce” which lets you see how your hooks render with real order data.
Conclusion
Learning to customize WooCommerce emails via hooks is a superpower for any WordPress and WooCommerce developer. It keeps your theme folder clean, prevents update conflicts, and gives you granular control over what content appears for specific customers.
By using the functions and snippets we covered, you can now inject banners, conditional messages, and custom footers safely. Start small, test your hooks, and transform your transactional emails into a powerful branding tool.