Everyone loves a bargain, but not everyone loves doing mental math while shopping. If you are running an online store, displaying the WooCommerce Sale Percentage explicitly (e.g., “Save 20%”) rather than just the sale price is a proven psychological trigger that drives action. It turns a passive browser into an active buyer by instantly communicating value.
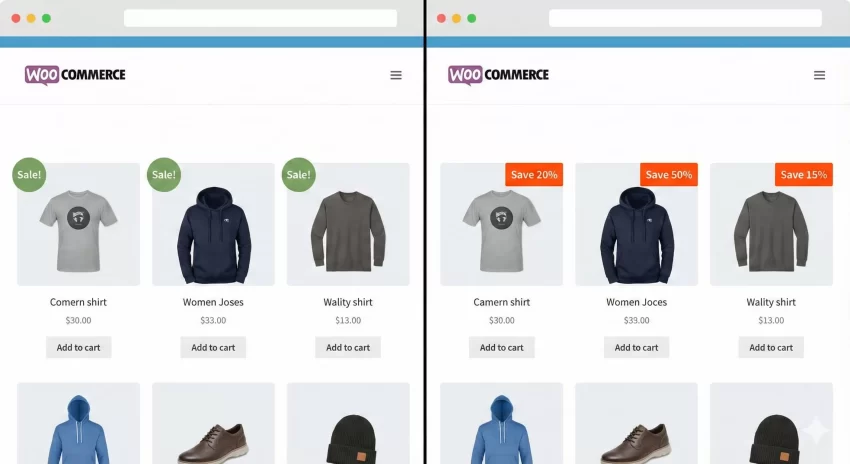
In the default WooCommerce setup, sale products usually display a generic “Sale!” badge. While functional, this badge is vague. It doesn’t tell the customer how good the deal is. Is it a measly $2 off, or a massive 50% clearance? By customizing your theme to calculate and show the specific discount, you remove friction and transparency barriers.
In this comprehensive guide, we will walk through exactly how to implement this feature. Whether you are a beginner looking for a plugin solution or a developer ready to get your hands dirty with code, we have covered it all. We will focus on how to programmatically calculate the WooCommerce Sale Percentage using custom snippets that you can drop right into your site-specific plugin.
WooCommerce Sale Percentage: Why the “Sale!” Badge Isn’t Enough
Before we dive into the code, it is important to understand the strategy behind this change. The standard WooCommerce badge is static. It is a binary indicator: the product is on sale, or it isn’t. However, modern e-commerce giants like Amazon and Myntra rely heavily on specificity.
Displaying the exact WooCommerce Sale Percentage serves three distinct purposes:
- Urgency: A “50% Off” badge creates a stronger “fear of missing out” (FOMO) than a simple sale tag.
- Clarity: It helps users filter deals visually while scanning your archive pages.
- Trust: Showing the math builds trust. You aren’t just saying it’s cheaper; you are proving it.
Let’s look at how we can implement this. We will explore handling simple products first, and then tackle the more complex logic required for variable products.
Prerequisites for the Code Method
While there are plugins available, adding this functionality via code is lightweight and gives you total control over the design. Since you prefer keeping your customizations organized, we will assume you are adding these snippets to a site-specific plugin or your theme’s functions.php file (though a plugin is safer!).
We will be using the woocommerce_sale_flash filter. This is a powerful tool in the WordPress ecosystem that allows us to intercept the HTML of the sale badge before it is rendered on the screen.
You might also like:

Step 1: Calculating Percentage for Simple Products
The logic for a simple product is straightforward math. We need to get the Regular Price and the Sale Price, subtract the sale price from the regular price to find the savings, divide that by the regular price, and multiply by 100.
Here is a robust function to handle this calculation. This snippet checks if the product is simple and on sale, then replaces the text.
/**
 * Display Percentage Saved on Sale Badge for Simple Products
 */
function pnet_custom_sale_flash_percentage( $html, $post, $product ) {
    // Only proceed if the product is on sale and is not a variable product (we treat them differently)
    if ( $product->is_on_sale() && ! $product->is_type( 'variable' ) ) {

        $regular_price = $product->get_regular_price();
        $sale_price    = $product->get_sale_price();

        // Avoid division by zero errors
        if ( empty( $regular_price ) || $regular_price == 0 ) {
            return $html;
        }

        // Calculate the percentage
        $percentage = round( ( ( $regular_price - $sale_price ) / $regular_price ) * 100 );

        // Return the modified badge
        return '<span class="onsale">Save ' . $percentage . '%</span>';
    }

    return $html;
}
add_filter( 'woocommerce_sale_flash', 'pnet_custom_sale_flash_percentage', 10, 3 );
Breaking Down the Code
In the function pnet_custom_sale_flash_percentage, we first ensure we aren’t dealing with a variable product. We then retrieve the raw price data. The round() function is crucial here; nobody wants to see “Save 15.234%”. We round it to the nearest whole number for a clean aesthetic.
Step 2: Handling Variable Products
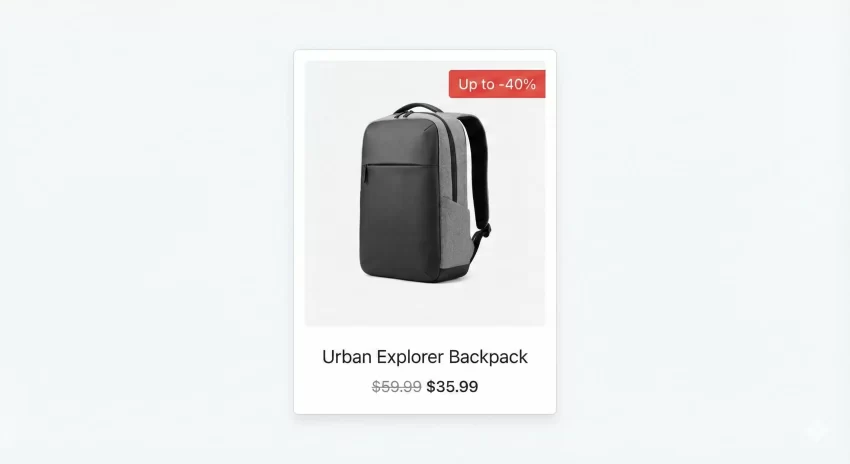
Variable products (like T-shirts with different sizes or colors) are tricky because they don’t have a single price. They have a minimum price and a maximum price. Consequently, the WooCommerce Sale Percentage can vary between variations.
For variable products, the best practice is usually to display the maximum possible saving to entice the click. We need to loop through the variations to find the best deal.
Here is the updated code that handles both Simple and Variable products:
/**
 * Display Percentage Saved on Sale Badge for All Product Types
 */
function pnet_display_advanced_sale_flash( $html, $post, $product ) {

    // Safety check for product object
    if ( ! $product ) {
        return $html;
    }

    // Check if product is on sale
    if ( $product->is_on_sale() ) {

        $percentage = 0;

        // Logic for Variable Products
        if ( $product->is_type( 'variable' ) ) {
            $available_variations = $product->get_available_variations();
            $max_percentage = 0;

            foreach ( $available_variations as $variation ) {
                $variation_obj = wc_get_product( $variation['variation_id'] );

                $reg_price = $variation_obj->get_regular_price();
                $sal_price = $variation_obj->get_sale_price();

                if ( $reg_price > 0 && $sal_price ) {
                    $perc = round( ( ( $reg_price - $sal_price ) / $reg_price ) * 100 );
                    if ( $perc > $max_percentage ) {
                        $max_percentage = $perc;
                    }
                }
            }
            $percentage = $max_percentage;
            $text = 'Up to -' . $percentage . '%';

        }
        // Logic for Simple/External/Grouped Products
        else {
            $regular_price = $product->get_regular_price();
            $sale_price    = $product->get_sale_price();

            if ( $regular_price > 0 ) {
                 $percentage = round( ( ( $regular_price - $sale_price ) / $regular_price ) * 100 );
            }
            $text = '-' . $percentage . '%';
        }

        // Only return the custom badge if we actually calculated a percentage
        if ( $percentage > 0 ) {
            return '<span class="onsale">' . $text . '</span>';
        }
    }

    return $html;
}
add_filter( 'woocommerce_sale_flash', 'pnet_display_advanced_sale_flash', 10, 3 );
Notice how we changed the output text for variable products to “Up to -X%”. This is vital for legal compliance in many regions. You cannot claim a flat 50% discount if only the Small Red Shirt is 50% off while the Large Blue one is only 10% off.
You might also like:

Step 3: Styling the Badge
Now that we have the logic to display the WooCommerce Sale Percentage, we need to ensure it looks good. The default WooCommerce circle might be too small for text like “Save 20%”.
You can add the following CSS to your Customizer or style.css file to make the badge a rectangle or a larger circle.
/* Make the badge rectangular and modern */
.woocommerce span.onsale {
    border-radius: 4px; /* Slight curve, flat design */
    width: auto; /* Allow width to expand for text */
    height: auto;
    padding: 5px 10px;
    line-height: 1.2;
    min-height: 0;
    background-color: #e74c3c; /* Urgent Red */
    font-weight: 600;
    font-size: 14px;
    position: absolute;
    top: 10px;
    right: 10px; /* Position to the right */
    left: auto;
}
Troubleshooting Common Issues
Even for experienced developers, calculating the WooCommerce Sale Percentage can throw up edge cases. Here are a few things to watch out for:
1. The Badge Disappears
If you implement the code and the badge disappears entirely, check your return statements. In the pnet_display_advanced_sale_flash function, we return $html (the default badge) if the product isn’t on sale or if the math fails. If you return null or nothing, the badge vanishes.
2. Division by Zero
Always check if the regular price is greater than zero before performing division. Sometimes, free products or data-entry errors result in a regular price of 0, which breaks PHP execution with a fatal error.
3. Caching
If you update your code but still see “Sale!”, clear your server cache and any caching plugins like WP Rocket or Autoptimize. HTML output is often cached heavily on archive pages.
Alternative: Using Plugins
If you prefer not to touch the code, there are free plugins available in the repository. “WooCommerce Advanced Percentages” is a popular choice. However, using the code method above reduces bloat. Plugins often load extra JavaScript and CSS files that can slow down your site’s Core Web Vitals. By using the snippets provided, you ensure your WooCommerce Sale Percentage logic runs on the server side with zero impact on frontend loading speeds.
Conclusion
Customizing your store to display the WooCommerce Sale Percentage is a small change with a massive impact. It respects your customer’s intelligence by giving them clear data, and it utilizes basic psychology to increase the perceived value of your products.
Whether you use the simple snippet for standard products or the advanced loop for variable inventories, ensure you test the display on mobile devices. A badge that covers the product image can hurt user experience. Try implementing the functionality today and watch your click-through rates on archive pages improve.
Have you already implemented this WooCommerce Sale Percentage badge on your site? Le me know in the comment below.