Have you ever landed on a form that already knew your name? It feels magical, doesn’t it? It removes friction, saves time, and significantly boosts conversion rates. As a WordPress developer, mastering Gravity Forms Dynamic Population is one of the most powerful skills you can add to your toolkit.
Whether you are building a lead generation page, a user profile update form, or a complex application, knowing how to pre-fill form fields dynamically is essential. In this guide, we will dive deep into Gravity Forms Dynamic Population, exploring how to manipulate field values using URL parameters and, more importantly, robust PHP hooks.
By the end of this tutorial, you will be able to programmatically populate any field based on logged-in user meta, query strings, or custom logic, creating a seamless experience for your visitors.
What is Gravity Forms Dynamic Population?
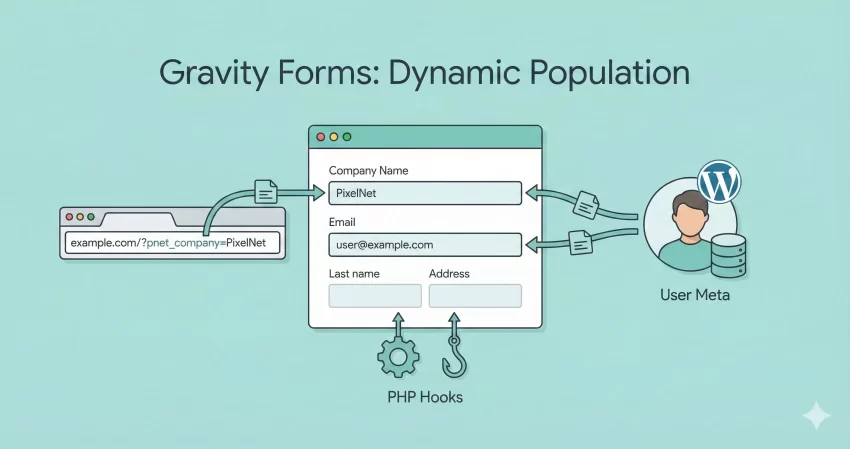
Gravity Forms Dynamic Population is a feature that allows you to pre-fill a field with a specific value when the form is rendered. Instead of the user typing out every detail, you provide the data for them.
This creates a “sticky” form experience. It is particularly useful for:
- Membership Sites: Auto-filling the user’s name and email if they are logged in.
- Campaign Tracking: capturing UTM sources hiddenly in the form.
- Multi-step Workflows: Passing data from one page (or form) to another.
While Gravity Forms offers some basic UI settings for this, the real power lies in using PHP hooks to handle complex data retrieval.
Step 1: Preparing Your Form
Before we touch any code, we need to tell Gravity Forms that a specific field can be populated dynamically.
- Open your form in the Gravity Forms Editor.
- Click on the field you want to pre-fill (e.g., a Single Line Text field for “Company Name”).
- Navigate to the Advanced tab in the field settings.
- Check the box labeled Allow field to be populated dynamically.
- Crucial Step: Enter a unique Parameter Name.
For this tutorial, let’s assume we are creating a “Support Request” form. We want to auto-fill the user’s Company Name. Let’s set the Parameter Name to pnet_company.
Note: While you can use generic names like
company, using a prefix likepnet_ensures you don’t accidentally conflict with other plugins or theme parameters.
You might also like:

Method 1: Dynamic Population via URL Parameters
The simplest way to use Gravity Forms Dynamic Population is via the URL (Query String). This requires zero code but is highly effective for landing pages.
If your form is on a page with the URL https://pixelnet.in/contact/, you can pre-fill the field by appending the parameter name and value.
Example URL: https://pixelnet.in/contact/?pnet_company=PixelNet
When a user visits this link, the field associated with pnet_company will automatically display “PixelNet”.
When to use this method:
- Sending users to a form from an email newsletter.
- Linking from one page to another.
- Simple data passing that doesn’t require security checks.
However, for professional WordPress development, we often need to pull data that isn’t in the URL – like data from the database or the current user’s profile. That is where PHP hooks come in.
Method 2: Dynamic Population using PHP Hooks
This is where Gravity Forms Dynamic Population truly shines. We can use the gform_field_value_$parameter_name filter to inject data programmatically.
The structure of the filter is: gform_field_value_PARAMETER_NAME
Since we named our parameter pnet_company, our filter name will be gform_field_value_pnet_company.
Scenario: Pre-filling User Meta
Let’s say we want to populate the “Company” field with data stored in the logged-in user’s meta (perhaps added by a plugin like ACF or WooCommerce).
Add the following code to your theme’s functions.php file or a custom functionality plugin.
/**
 * Dynamically populate the 'pnet_company' field with User Meta.
 * * Target Parameter: pnet_company
 */
add_filter( 'gform_field_value_pnet_company', 'pnet_populate_company_field' );

function pnet_populate_company_field( $value ) {

    // Check if the user is logged in
    if ( is_user_logged_in() ) {

        // Get the current user's ID
        $current_user_id = get_current_user_id();

        // Retrieve the company name from user meta
        // Assuming the meta key in the database is 'billing_company' (common in WooCommerce)
        $company_name = get_user_meta( $current_user_id, 'billing_company', true );

        // If a company name exists, return it to populate the field
        if ( ! empty( $company_name ) ) {
            return $company_name;
        }
    }

    // If user is not logged in or no company is set, return the default value (empty)
    return $value;
}
How It Works:
- The Hook: We intercept the field rendering specifically for the pnet_company parameter.
- The Check: We ensure the user is logged in (
is_user_logged_in()) to avoid errors. - The Data: We pull the
billing_companymeta field using standard WordPress functions. - The Result: Gravity Forms renders the input field with the company name already typed inside.
You might also like:

Advanced Gravity Forms Dynamic Population: Complex Logic
Let’s take it a step further. What if you want to populate a “Priority” dropdown field based on the user’s role? If the user is an “Administrator” or “Editor”, we want the priority to default to “High”.
- In your form, set the “Priority” dropdown’s Dynamic Population Parameter Name to
pnet_priority. - Ensure your dropdown values include an option with the value “High”.
/**
 * Dynamically populate priority based on User Role.
 * * Target Parameter: pnet_priority
 */
add_filter( 'gform_field_value_pnet_priority', 'pnet_set_priority_by_role' );

function pnet_set_priority_by_role( $value ) {

    if ( is_user_logged_in() ) {

        $user = wp_get_current_user();

        // Check if user has specific roles
        if ( in_array( 'administrator', (array) $user->roles ) || in_array( 'editor', (array) $user->roles ) ) {
            // Return the *value* of the dropdown option, not the label
            return 'High';
        }
    }

    // Default to 'Normal' if not an admin/editor
    return 'Normal';
}
This example demonstrates how Gravity Forms Dynamic Population isn’t just for text; it works for Dropdowns, Radio Buttons, and Checkboxes as well. You simply need to return the value that matches one of your choices.
Troubleshooting Common Issues
Even experienced developers run into snags. Here are common reasons why Gravity Forms Dynamic Population might fail:
Caching Issues
This is the #1 culprit. If you are using page caching (like WP Rocket or server-side caching), the form might be served as a static HTML file. This means your PHP hook never runs for the specific visitor.
- Fix: Enable “AJAX” in your Gravity Form settings (embedding via shortcode
[gravityform id="1" ajax="true"]). - Fix: Exclude the specific page from caching.
Parameter Name Mismatch
The parameter name in the Gravity Forms editor (Advanced Tab) must match the filter name exactly.
- Editor:
pnet_company - Code:
gform_field_value_pnet_company
Note: These are case-sensitive!
Returning Labels instead of Values
For “Select” or “Radio” fields, you must return the underlying Value, not the visible Label, unless they are identical.
Best Practices for Developers
When implementing Gravity Forms Dynamic Population, keep these standards in mind:
- Sanitization: If you are grabbing data from a URL (
$_GET), always sanitize it before returning it, although Gravity Forms handles output escaping, it is good practice. - Prefixing: As mentioned, always prefix your parameter names (e.g.,
pnet_) to avoid conflicts with other plugins that might be listening for generic terms like email or name. - Fallbacks: Always ensure your code returns the original
$valueif your custom logic doesn’t find any data.
Conclusion
Mastering Gravity Forms Dynamic Population separates the beginners from the pros. It allows you to build smarter, context-aware forms that respect your user’s time. Whether you are pre-filling data via simple URL parameters for a marketing campaign or writing custom PHP functions to pull complex user meta, the flexibility is unmatched.
By using the gform_field_value_ hooks and following the examples above, you can significantly improve the User Experience (UX) of your WordPress site.
Try implementing the code examples on your next project and watch your form completion rates soar. Do you have a creative use case for Gravity Forms Dynamic Population? Let me know in the comments below!


