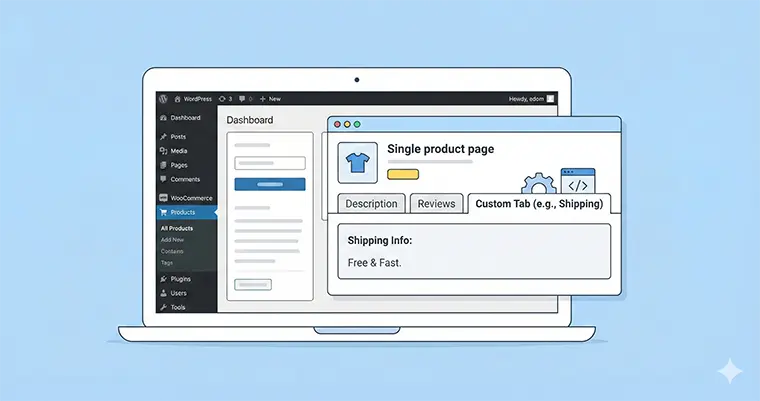
When you are running a WooCommerce store, the default layout is great, but it’s rarely enough. You get your standard Description, Reviews, and Additional Information tabs. But what if you need more? What if your customers are hesitating to buy because they can’t easily find your “Shipping & Returns” policy or specific “Product Specifications” right there on the product page?
Adding WooCommerce custom tabs is one of the most effective ways to declutter your product description while keeping critical information accessible.
While there are dozens of heavy plugins that can achieve this, adding them programmatically is cleaner, faster, and gives you total control. In this guide, I will show you exactly how to add a custom “Shipping Info” tab to your single product page using a simple code snippet. No bloat, just results.
☰Why You Should Add WooCommerce Custom Tabs Programmatically
You might be tempted to grab the first “Custom Tabs” plugin you see in the repository. Here is why you should resist that urge:
- Performance: Plugins often load extra CSS and JS files on every page, slowing down your site.
- Control: When you code it yourself, you decide exactly where the tab sits and what it displays.
- Cost: Why pay for a premium plugin when 10 lines of code can do the job?
Prerequisites
Before we dive into the code, make sure you are adding this safely. You should add the following code snippets to your child theme’s functions.php file or use a code snippets plugin like WPCode.
Note: We will be using the prefix
pnet_for all our custom functions to avoid conflicts with other plugins.
Step 1: The Magic Filter
The core of this functionality lies in the woocommerce_product_tabs filter. This filter allows us to modify the array of tabs that WooCommerce displays on the single product page. We can add new tabs, remove old ones, or reorder them completely.
Step 2: Adding a Static “Shipping Info” Tab
Let’s start with the most common request: adding a tab that displays the same information for every product, such as your shipping policy.
Here is the code to add a “Shipping & Returns” tab to your WooCommerce custom tabs array.
/**
* Add a custom Shipping & Returns tab to WooCommerce products
*/
add_filter( 'woocommerce_product_tabs', 'pnet_add_shipping_tab' );
function pnet_add_shipping_tab( $tabs ) {
// Add the new tab to the $tabs array
$tabs['pnet_shipping_tab'] = array(
'title' => __( 'Shipping & Returns', 'your-text-domain' ),
'priority' => 50, // This controls the order (Description is usually 10)
'callback' => 'pnet_shipping_tab_content' // The function that prints the content
);
return $tabs;
}
/**
* The content for the Shipping & Returns tab
*/
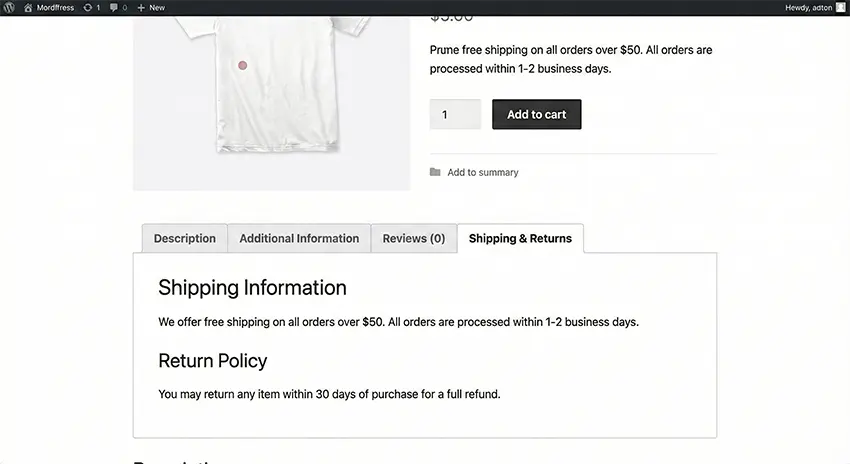
function pnet_shipping_tab_content() {
echo '<h2>Shipping Information</h2>';
echo '
We offer free shipping on all orders over $50. All orders are processed within 1-2 business days.
';
echo '<h3>Return Policy</h3>';
echo '
You may return any item within 30 days of purchase for a full refund.
';
}
How it works:
pnet_add_shipping_tab: This function hooks into WooCommerce and injects a new key into the$tabsarray.priority: This determines the position. A priority of 50 usually places it after the “Description” and “Additional Information” tabs.callback: This tells WooCommerce which function to run to display the actual text inside the tab.
Step 3: Adding a Dynamic “Specifications” Tab
Static text is great for policies, but what if you need unique data for each product? For example, a “Specifications” tab that pulls data from a custom field.
For this example, we assume you have created a custom field (using ACF or standard WordPress custom fields) named pnet_product_specs.
Here is how you create dynamic WooCommerce custom tabs:
/**
 * Add a custom Specifications tab only if data exists
 */
add_filter( 'woocommerce_product_tabs', 'pnet_add_specs_tab' );

function pnet_add_specs_tab( $tabs ) {
    global $post;

    // Retrieve the custom field value
    $specs_content = get_post_meta( $post->ID, 'pnet_product_specs', true );

    // Only add the tab if the custom field is not empty
    if ( ! empty( $specs_content ) ) {
        $tabs['pnet_specs_tab'] = array(
            'title'    => __( 'Specifications', 'your-text-domain' ),
            'priority' => 20, // Places it right after Description
            'callback' => 'pnet_specs_tab_content'
        );
    }

    return $tabs;
}

/**
 * The content for the Specifications tab
 */
function pnet_specs_tab_content() {
    global $post;

    // Get the data again to display it
    $specs = get_post_meta( $post->ID, 'pnet_product_specs', true );

    echo '<h2>Product Specifications</h2>';
    echo '<div class="pnet-specs-content">' . apply_filters( 'the_content', $specs ) . '</div>';
}
This ensures that the “Specifications” tab only appears on products where you have actually entered specification data. This keeps your product pages clean and relevant.
You might also like:

Reordering Your Tabs
Sometimes, you don’t need to add new WooCommerce custom tabs, but you simply want to change the order. Perhaps you want your Reviews to be the very first thing customers see.
You can easily adjust the priority in the array:
add_filter( 'woocommerce_product_tabs', 'pnet_reorder_tabs', 98 );

function pnet_reorder_tabs( $tabs ) {
    // Move Reviews to first position
    if ( isset( $tabs['reviews'] ) ) {
        $tabs['reviews']['priority'] = 5;
    }

    // Move Description to second position
    if ( isset( $tabs['description'] ) ) {
        $tabs['description']['priority'] = 10;
    }

    return $tabs;
}
Troubleshooting Common Issues
If your WooCommerce custom tabs aren’t showing up, check these common culprits:
- Caching: Clear your site cache and browser cache.
- Priority Conflicts: If you set the priority to the exact same number as an existing tab, WooCommerce might get confused. Try changing the priority by increments of 5 (e.g., use 15 instead of 10).
- Empty Content: If you used the dynamic method above, ensure the product you are testing actually has data in the custom field.
Conclusion
Creating WooCommerce custom tabs programmatically is a powerful way to enhance your product pages without relying on heavy plugins. Whether you are adding global shipping info or specific product technical data, the woocommerce_product_tabs filter gives you the flexibility you need.
By implementing these tabs, you improve the user experience, keep your site fast, and ensure your customers have all the information they need to hit that “Add to Cart” button.