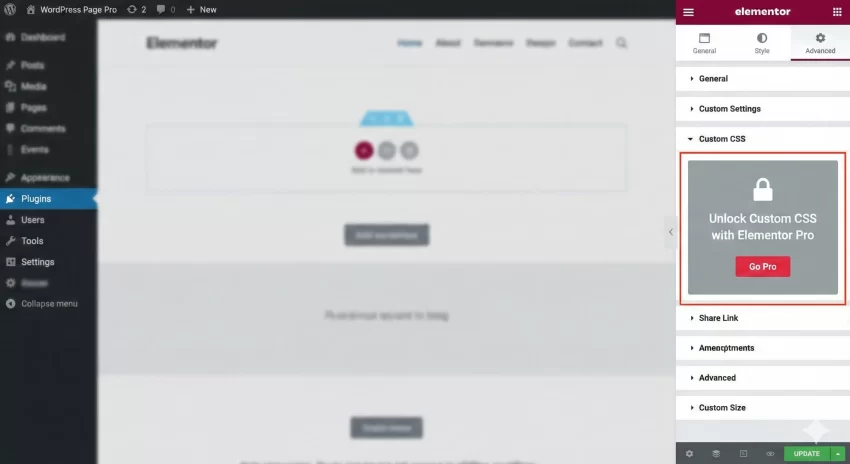
Building a website with the free version of Elementor is often a joy, but it comes with a specific frustration that every developer hits eventually: the locked “Custom CSS” tab. You have likely stared at that “Go Pro” padlock while just wanting to add a simple shadow or a specific hover effect. The good news is that you do not need to upgrade to Pro just to style your elements. Mastering Elementor custom CSS in the free version is completely possible, and frankly, it is a skill that gives you far more control over your site’s performance and structure.
In this guide, we are going to bypass those restrictions. Whether you are a beginner tweaking a button or a developer building a complex layout, I will show you exactly how to implement Elementor custom CSS using three distinct methods. We will move from the simplest tweaks to robust, developer-friendly solutions that keep your code clean. By the end of this post, you will have the power to style any widget exactly how you envision it.
Why You Need Custom CSS in Elementor Free
Elementor Free provides a fantastic array of controls for margins, padding, and basic typography. However, it inevitably hits a ceiling. Perhaps you want to target a specific child element within a widget, add a complex CSS grid layout, or apply a specific animation that the default controls do not support. This is where Elementor custom CSS becomes essential.
Relying solely on visual builders can sometimes lead to “divitis”—an excessive nesting of elements just to achieve a visual look. By applying clean CSS, you can often reduce the number of DOM elements, keeping your page lighter and faster. Furthermore, learning how to inject Elementor custom CSS manually ensures that your styling remains portable and easier to debug than settings buried deep within visual menus.
Method 1: The Theme Customizer (The Global Approach)
The most accessible way to add Elementor custom CSS without installing extra plugins is via the native WordPress Theme Customizer. This method is best for styles you might want to reuse across multiple pages, such as button styles or specific typography tweaks.
Step-by-Step Implementation
- Assign a CSS Class: Open your page in Elementor. Click on the widget you wish to style. Go to the Advanced tab and look for the CSS Classes field. Enter a unique class name, for example,
pnet-custom-btn. - Publish/Update: Save your changes in Elementor.
- Open Customizer: Go to your WordPress Dashboard, navigate to Appearance > Customize, and click on Additional CSS.
- Write Your CSS: Target the class you just created.
Here is how the code might look if you were styling a button to have a gradient border, which is hard to do with default settings:
/* Targeting the custom class added in Elementor */
.pnet-custom-btn .elementor-button {
    border: 2px solid transparent;
    background-image: linear-gradient(white, white), linear-gradient(to right, #f06, #4a90e2);
    background-origin: border-box;
    background-clip: content-box, border-box;
    box-shadow: 0px 4px 15px rgba(0,0,0,0.1);
    transition: all 0.3s ease;
}

.pnet-custom-btn .elementor-button:hover {
    transform: translateY(-3px);
    box-shadow: 0px 6px 20px rgba(0,0,0,0.15);
}
This method works perfectly for Elementor custom CSS because it loads the styles in the head of your document, ensuring they render immediately. However, if you have hundreds of lines of CSS here, it can become unmanageable.
You might also like:

Method 2: The HTML Widget “Hack” (The Page-Level Solution)
Sometimes you only need CSS for a single page. Loading that CSS globally (as done in Method 1) is bad for performance. For page-specific needs, you can use the Elementor HTML widget to inject Elementor custom CSS directly into the page content.
While this is technically a “hack,” it is widely used because it allows you to see your changes live in the editor, just like the Pro version features.
How to do it:
- Drag an HTML Widget onto your page. Place it at the very bottom or top of the page structure so it does not interfere with the layout.
- Open the HTML widget code area.
- Wrap your CSS inside standard
<style>tags.
<style>
    /* Page specific Elementor custom CSS */
    .pnet-feature-card {
        background: #ffffff;
        border-radius: 15px;
        padding: 20px;
        border-left: 5px solid #ff0050;
    }

    /* targeting mobile specifically */
    @media (max-width: 767px) {
        .pnet-feature-card {
            padding: 10px;
            border-left: 3px solid #ff0050;
        }
    }
</style>
The beauty of this method is the live preview. As you type inside the HTML widget, Elementor renders the Elementor custom CSS instantly. This mimics the Pro experience almost perfectly. However, be cautious: having too many style blocks scattered around your page can make maintenance a nightmare later on.
Tip: How to Add Custom Fonts to WordPress (The Performance-First Guide)
Method 3: The Developer Way (Using Functions.php)
For those of us who prefer a more structured, code-centric approach, using the functions.php file (preferably in a child theme) is the gold standard. This keeps your Elementor custom CSS separate from the database content and version-controlled. This is the method I recommend for professional workflows.
We can create a function that conditionally loads our CSS only when specific conditions are met, or simply enqueues a dedicated stylesheet. To do this, we hook into wp_enqueue_scripts, which is the standard WordPress hook for loading styles and scripts.
Scenario A: Enqueuing a Separate Stylesheet
First, create a file named pnet-elementor-styles.css in your theme’s directory. Then, add the following PHP to your functions.php file:
function pnet_enqueue_elementor_custom_styles() {
    // Enqueue the custom CSS file
    wp_enqueue_style(
        'pnet-elementor-custom',
        get_stylesheet_directory_uri() . '/pnet-elementor-styles.css',
        array(),
        '1.0.0',
        'all'
    );
}
add_action( 'wp_enqueue_scripts', 'pnet_enqueue_elementor_custom_styles' );
Scenario B: Adding Inline CSS for Specific Pages
If you want to inject Elementor custom CSS strictly for a specific page ID (for example, a landing page with ID 45) without creating a new file, you can use `wp_add_inline_style`. This is cleaner than the HTML widget method.
function pnet_add_specific_page_css() {
    // Only run this on page ID 45
    if ( is_page( 45 ) ) {
        $custom_css = "
            .pnet-hero-section h1 {
                color: #2c3e50;
                text-shadow: 2px 2px 0px #eee;
                font-size: 3.5rem;
            }
            .pnet-hero-section p {
                font-weight: 300;
                line-height: 1.6;
            }
        ";

        // Append this CSS to the main theme stylesheet
        wp_add_inline_style( 'generatepress-style', $custom_css );
        // Note: Change 'generatepress-style' to your active theme's main stylesheet handle
    }
}
add_action( 'wp_enqueue_scripts', 'pnet_add_specific_page_css' );
This approach gives you total control. You can use PHP logic to determine exactly when and where your Elementor custom CSS loads, optimizing your site’s performance significantly.
You might also like:
Advanced Styling Techniques
Once you have chosen your method, the real magic happens in how you write your CSS. When working with Elementor, you are often fighting against specific styles set by the builder. Here is how to win that battle.
Understanding Specificity
Elementor wraps elements in several containers. A button is not just a <button>; it is a wrapper inside a column, inside a section. To ensure your Elementor custom CSS takes effect, you need to be specific with your selectors.
Instead of just writing:
/* Too generic, might not work */
h2 {
    color: red;
}
You should use the custom class you added to the widget:
/* Much better specificity */
.pnet-custom-heading .elementor-heading-title {
    color: red;
}
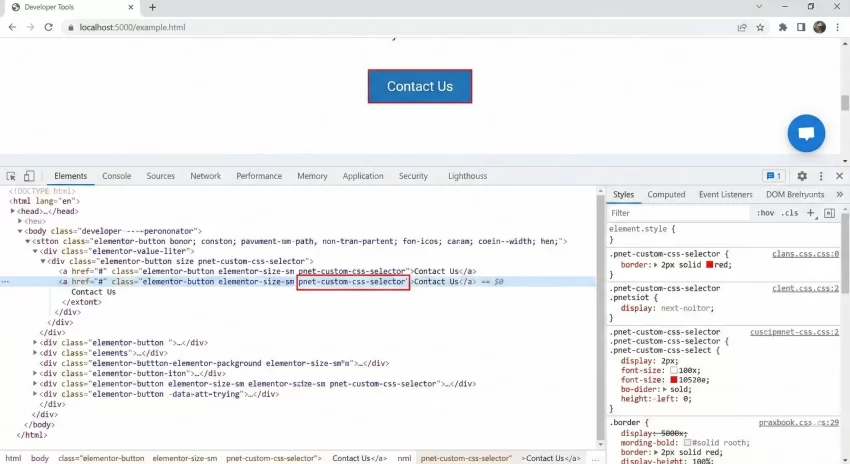
Using Browser DevTools to Find Selectors
If you are struggling to find the right class to target, your browser’s Developer Tools are your best friend. Right-click on the Elementor element you want to style and select “Inspect”. Look for the classes starting with elementor-.
Common selectors you will often target include:
.elementor-widget-container– The inner wrapper of any widget..elementor-heading-title– The actual text in a heading widget..elementor-button– The anchor tag or button element..elementor-image img– The actual image tag within an image widget.
Common Mistakes to Avoid
When adding Elementor custom CSS manually, things can break if you aren’t careful. Here are a few pitfalls to avoid:
1. Overusing !important
It is tempting to slap !important on every rule to force it to work. Try to avoid this. It makes future changes incredibly difficult. Instead, increase your selector specificity (e.g., add the parent ID or class).
2. Forgetting Mobile Responsiveness
Elementor handles responsiveness well natively, but your custom CSS might break it. Always wrap your custom styles in media queries if they differ for mobile devices.
.pnet-box {
    width: 50%;
}

@media (max-width: 768px) {
    .pnet-box {
        width: 100%; /* Stack on mobile */
    }
}
3. Breaking the Visual Editor
Sometimes, aggressive CSS (like `position: absolute` or negative margins) can make it impossible to click the “Edit” handles in Elementor. If this happens, use the Navigator (Ctrl/Cmd + I) to select your elements, or temporarily comment out your CSS in the HTML widget/Customizer.
Conclusion
The absence of the “Custom CSS” tab in the free version of Elementor is not a roadblock; it is merely a speed bump. By utilizing the WordPress Customizer, the HTML widget trick, or the robust functions.php method, you can implement sophisticated Elementor custom CSS without spending a dime.
For developers and power users, I highly recommend Method 3 using the functions. It keeps your code organized, scalable, and separate from the content builder. Whichever path you choose, you now possess the knowledge to break free from the default styling constraints and build truly unique WordPress sites.
Do you have a favorite trick for styling Elementor Free widgets? Let me know in the comments below!