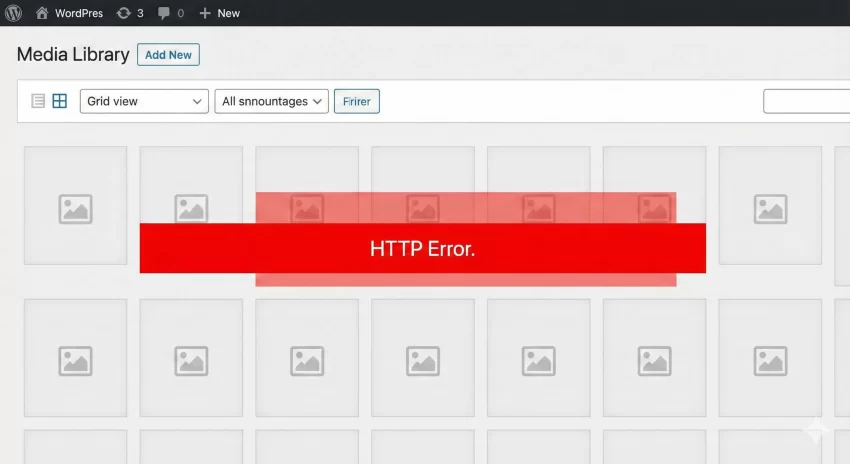
There is nothing quite as frustrating as crafting the perfect article, designing a beautiful featured image, and then hitting a brick wall when you try to add it to your Media Library. Instead of your crisp graphic, you are greeted by a vague, generic message or a spinning wheel that never stops. You are dealing with the dreaded WordPress image upload error.
This issue can manifest in several ways—sometimes as a visible “HTTP Error” red box, and other times as a silent failure where the upload simply times out. Regardless of how it appears, the result is the same: your workflow is broken. If you are seeing a WordPress image upload error right now, take a deep breath. It is rarely a permanent server failure. In 90% of cases, this is a minor configuration hiccup that we can resolve in minutes.
In this guide, we will walk through the most effective methods to troubleshoot and fix this common issue, ensuring you never have to face a WordPress image upload error again.
1. The Quickest Fix: Check Your File Name and Size
Before we dive into code and server configurations, let’s rule out the obvious. Sometimes a WordPress image upload error is triggered simply because the file itself is problematic.
WordPress can struggle with special characters in file names. If your image is named my-image-100%_final?.jpg, the server might reject it. Rename the file using only letters, numbers, and hyphens (e.g., my-image-final.jpg). Additionally, check the file size. If you are trying to upload a 5MB unoptimized photo, your server might time out before the process completes. Resize and compress your images locally before uploading.
Tip: Check our Free Online WebP converter to make your images web-safe and reduce the file size keeping the quality intact.
2. Increase PHP Memory Limit
The most common technical culprit behind a WordPress image upload error is a lack of available memory. When WordPress processes an image, it needs memory to unzip it, resize it, and create thumbnails. If your server allocation is too low, the process kills itself halfway through.
You can increase this limit by editing your wp-config.php file. You will need FTP access or use the File Manager in your hosting control panel.
- Connect to your site via FTP.
- Locate the
wp-config.phpfile in the root directory. - Add the following code snippet just before the line that says “That’s all, stop editing! Happy publishing.”
define( 'WP_MEMORY_LIMIT', '256M' );
Save the file and try uploading again. This gives WordPress 256MB of memory to work with, which is usually sufficient to bypass the WordPress image upload error.
You might also like:
3. Switch Image Editor Library using PHP
WordPress uses two PHP modules to handle image processing: GD Library and ImageMagick. WordPress usually prioritizes ImageMagick because it produces better quality images. However, ImageMagick allows multi-threading, which can sometimes cause HTTP errors on shared hosting environments due to resource limits.
We can force WordPress to use the GD Library instead. This is often a “magic bullet” for the WordPress image upload error. To do this, we will add a custom function to your theme’s functions.php file. As per best practices, we will prefix our function with pnet_ to avoid conflicts.
/**
 * Fix WordPress image upload error by prioritizing GD Library
 */
function pnet_change_graphic_lib( $array ) {
    return array( 'WP_Image_Editor_GD', 'WP_Image_Editor_Imagick' );
}
add_filter( 'wp_image_editors', 'pnet_change_graphic_lib' );
By using the wp_image_editors filter, we are telling WordPress to try GD first. If GD is available, it will be used, often bypassing the specific server configuration causing the HTTP error.
4. Fix the Issue via .htaccess
If the WordPress image upload error persists, the issue might be related to how your server handles API requests or threading. The .htaccess file sits in your WordPress root directory and controls how the server handles requests.
Note: Always back up your .htaccess file before editing it.
Open your .htaccess file and add the following line at the very top:
SetEnv MAGICK_THREAD_LIMIT 1
This code restricts ImageMagick to use a single thread for processing images. This prevents the server from maxing out its resources on a single upload task, effectively stopping the WordPress image upload error in shared hosting environments.
You might also like:
5. Check File Permissions
Sometimes, the door is simply locked. If your upload folder doesn’t have the right permissions, WordPress cannot write files to the disk, resulting in a WordPress image upload error.
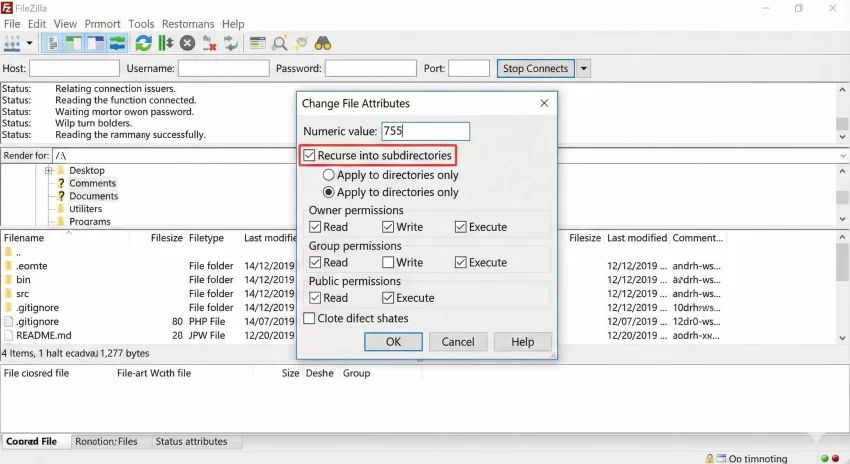
Using your FTP client (like FileZilla), navigate to /wp-content/.
- Right-click on the
uploadsfolder. - Select File permissions.
- Ensure the Numeric value is set to
755. - Check the box Recurse into subdirectories and select Apply to directories only.
After clicking OK, repeat the process for files:
- Right-click
uploadsagain. - Set Numeric value to
644. - Check Recurse into subdirectories and select Apply to files only.
This ensures your folders are accessible and your files are secure, clearing up any permission-based WordPress image upload error.
6. Clear Caches and Check Plugins
Are you still seeing the error? It is time to look at conflicts. Security plugins, image optimization plugins, and caching plugins are notorious for interfering with the Media Library.
If you have cleared your browser cache and the WordPress image upload error remains, try temporarily deactivating your plugins. If the upload works with plugins off, reactivate them one by one to find the culprit.
Summary
Dealing with a WordPress image upload error is a rite of passage for every site owner. Whether it is a simple memory tweak or a switch to the GD Library, one of the methods above will resolve the issue. By increasing your memory limit and ensuring your file permissions are correct, you are not just fixing the current error—you are fortifying your site against future media library failures.