
WooCommerce Product Data Tabs are those where you enter information while creating a product in admin. These data tabs come really handy when you want to store some product specific information to display front-end or calculation on back-end. The data is stored as product meta; therefore, the use case is unlimited.
The process requires three steps; adding the tab label and the panel, add the form fields in panel and lastly save them. Let’s go through the steps one by one.
1. Add Custom WooCommerce Product Data Tabs
function pixelnet_custom_woo_data_tab( $tabs ) {

	$tabs['pixelnet_custom_tab'] = array(
        'label' 	=> __( 'Custom Tab', 'pixelnet' ), //Navigation Label Name
        'target'	=> 'pixelnet_custom_tab_content', //The HTML ID of the tab content wrapper
		'class' => array( 'show_if_simple' ), //Show if the product type is simple
		'priority' => 99,
    );

    return $tabs;
}
add_filter( 'woocommerce_product_data_tabs', 'pixelnet_custom_woo_data_tab' );
The parameter target is required and the value should be same as the HTML id of the tab panel containing the form fields. Priority controls the order of the tabs, the higher the value, the lower the tab appears in HTML. Conditional display of the tab can be controlled by the class parameter. WooCommerce provides classes needed for this. Here is the list.
//Show Classes 'show_if_{product_type}'
show_if_simple
show_if_variable
show_if_grouped
show_if_external

//Hide Classes 'hide_if_{product_type}'
hide_if_simple
hide_if_variable
hide_if_grouped
hide_if_external
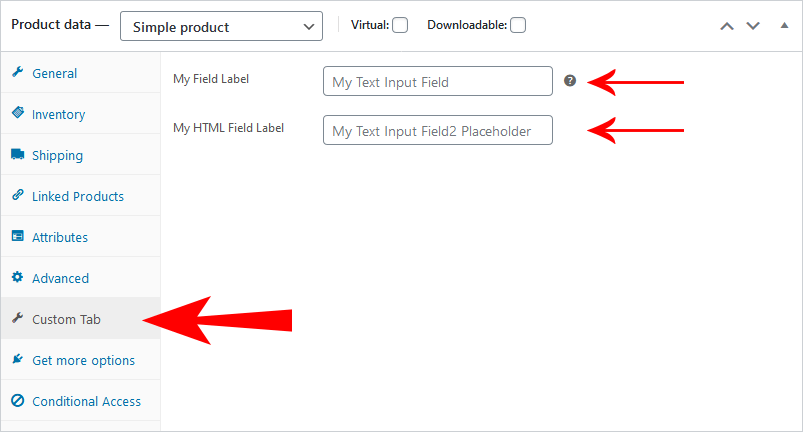
2. Add Form Fields in Tab Panel
function pixelnet_custom_tab_content() {
	global $post;
	$field_value = metadata_exists( 'post', $post->ID, '_my_custom_field_text' ) ? get_post_meta( $post->ID, '_my_custom_field_text', true ) : '';
	$field2_value = metadata_exists( 'post', $post->ID, '_my_custom_field2_text' ) ? get_post_meta( $post->ID, '_my_custom_field2_text', true ) : '';
	?>

	<div id="pixelnet_custom_tab_content" class="panel woocommerce_options_panel">

		<?php
			//Create some fields
			woocommerce_wp_text_input( array(
				'id' => 'my_custom_field_text',
				'name' => 'my_input_field_name', //Defaults to id
				'value' => $field_value,
				'label' => __('My Field Label', 'pixelnet'),
				'placeholder' => __('My Text Input Field', 'pixelnet'),
				'description' => __('Describe what this field does in short.', 'pixelnet'),
				'desc_tip' => true, //true: Description as Tootip - false: Description as Text
			) );
		?>

		<!-- Custom HTML Form Field -->
		<p class="form-field my_custom_field2_text_field ">
			<label for="my_custom_field_text">My HTML Field Label</label>
			<input type="text" class="short" style="" name="my_input_field2_name" id="my_custom_field2_text" value="<?php esc_html_e($field2_value);?>" placeholder="My Text Input Field2 Placeholder">
		</p>

	</div>
	<?php
}
add_action( 'woocommerce_product_data_panels', 'pixelnet_custom_tab_content' );
Notice the id attribute of the tab panel, it is the same we declared while adding the tab. Here is the list of WooCommerce helper functions to output form fields in meta boxes.
3. Save The Fields on Publish/Update
The submitted fields can be saved in native WordPress using save_post or save_post_product hooks, but WooCommerce provides a simpler way to handle product meta using woocommerce_process_product_meta hook.
function pixelnet_save_product_custom_tab( $post_id ) {
	$product = wc_get_product( $post_id );

	$field1 = isset($_POST['my_input_field_name']) && !empty($_POST['my_input_field_name']) ? sanitize_text_field($_POST['my_input_field_name']) : '';
	$field2 = isset($_POST['my_input_field2_name']) && !empty($_POST['my_input_field2_name']) ? sanitize_text_field($_POST['my_input_field2_name']) : '';
	$product->update_meta_data('_my_custom_field_text', $field1 );
	$product->update_meta_data('_my_custom_field2_text', $field2 );

	$product->save();

}
add_action( 'woocommerce_process_product_meta', 'pixelnet_save_product_custom_tab' );
That’s it. That’s how you add WooCommerce Product Data Tabs in admin section. Do let me know in comments if the tutorial helped you in any way.


2 Comments
Rick
Hello Abhik. Thank you for this valuable information.
I would like to ask, in case you could help, if a custom tab that modifies the current price of the product is created, how can we control the priority order in which the data is saved?
I am asking because my custom tab uses something like $product->set_regular_price() and $product->set_price(), and also use $product->set_stock(), but when the product is saved, the modified price won’t be saved. The quantity (stock) does change. It saves ok.
The price does change if the process of updating the product (hitting the “update” button) is somehow interrupted, like for example it happened with a PHP error I had in my code. Such error, did not allow the update process to complete, but it allowed the saving function of my custom tab to run before halting the process. When I refreshed the page after fixing the error, the price was changed. But it does not change if the update process with the update button completes without halting for an error or anything else.
That made me think that the update done in my custom tab worked, but somehow the process was overriden with the “current price” tab because both quantities were in different fields. It is like if it saves my modified price, but then it overrides it with the current price like if it was executed last, overriding it.
I already tried changing the priority of the “add_filter” function from 1 to 1000, but nothing.
Abhik
Hey Rick, extremely sorry for this HUGE late.
You will need to use
save_post_productwhich fires immediately after saving products. Something like below will help.function pnet_update_product_meta( $post_ID, $post, $update ) { //Get Product $product = wc_get_product( $post_ID ); //Get your custom field values $my_custom_price = $product->get_meta('_price_field_name'); $my_custom_stock = $product->get_meta('_stock_field_name'); //Set Values $product->set_price($my_custom_price); $product->set_stock($my_custom_stock); $product->save(); } add_action( 'save_post_product', 'pnet_update_product_meta', 10, 3 );Don’t forget to escape/sanitize the values.
Join PixelNet Community
Join our mailing list and get exiting WordPress resources and offers directly in your Inbox.No SPAM Promise
SUBSCRIBE NOW