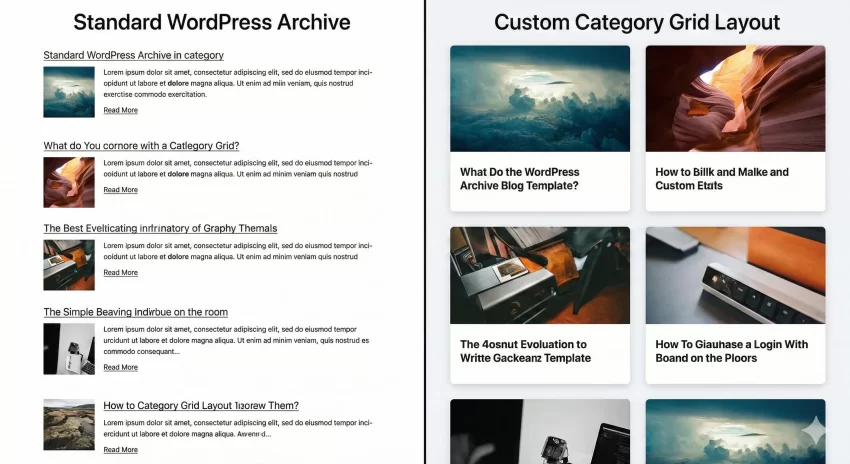
Every WordPress developer eventually hits a wall where the default archive.php just doesn’t cut it. You have a “News” section that needs a grid layout, but your “Opinion” pieces need a classic list view. The solution isn’t a new theme; it is a WordPress custom category template. By leveraging the native template hierarchy, you can assign unique layouts to specific content silos, drastically improving user experience and time-on-site metrics. In this comprehensive guide, we will walk you through exactly how to build these templates using standard coding practices.
Understanding the WordPress Template Hierarchy
Before writing a single line of code, it is crucial to understand how WordPress decides which file to load when a visitor clicks on a category link. This decision-making process is known as the Template Hierarchy. It is the backbone of theme development, allowing you to override general templates with specific ones without touching the core files.
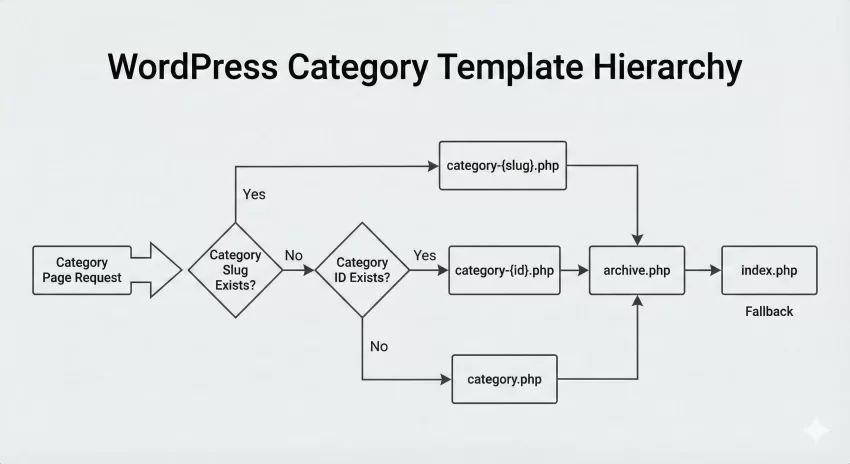
When a user visits a category page, WordPress looks for files in your theme folder in a specific order. If it finds the first one, it uses it. If not, it moves to the next. The hierarchy for categories generally looks like this:
category-{slug}.php(Targeting a specific category by its URL slug)category-{id}.php(Targeting a specific category by its numeric ID)category.php(The generic template for all categories)archive.php(The generic template for all archives, including dates and tags)index.php(The fallback file if nothing else exists)
Understanding this order gives you immense power. It means you can create a WordPress custom category template simply by naming a file correctly. We will explore this method first, as it is often the most efficient route for targeting single categories.
Why You Should Avoid Plugin Solutions
You might be tempted to use a plugin to manage these templates, and while that is valid for non-coders, it creates technical debt. Plugins add database queries and potential security vulnerabilities. Hard-coding your templates ensures your theme remains lightweight and lightning-fast. Furthermore, relying on code gives you total control over the HTML structure, allowing for semantic markup that page builders often fail to generate.
You might also like:

Method 1: The File Naming Technique (The Standard Approach)
The cleanest way to create a distinct layout for a specific category is by utilizing the slug-based naming convention. This method requires zero PHP functions to register; WordPress recognizes it automatically.
Let’s say you have a category named “Tutorials” with the slug tutorials. To create a unique design for this archive, follow these steps:
- Connect to your site via FTP or use your local development environment.
- Navigate to your current theme folder (usually
/wp-content/themes/your-theme/). - Locate your existing
archive.phporcategory.phpfile. - Duplicate this file and rename it to
category-tutorials.php.
Once this file exists, WordPress will prioritize it whenever someone views the “Tutorials” category. You can now open this file and strip out the sidebar, change the grid structure, or add a custom header specifically for your tutorials.
Finding the Category ID
Sometimes, slugs change. Clients might rename “Tutorials” to “Guides,” breaking your file association. If you want a more permanent link, use the Category ID. To find this, go to your WordPress Dashboard > Posts > Categories. Hover over the category name, and look at the URL in the bottom of your browser. You will see something like tag_ID=45. In this case, your filename would be category-45.php.
Method 2: The Conditional Logic Approach (Advanced)
While file naming is great for one or two categories, what if you want to apply a WordPress custom category template to a group of unrelated categories? Or perhaps you want to conditionally load a template based on complex logic, like whether the user is logged in?
For this, we use the template_include filter. This is a powerful hook that intercepts the template decision and allows us to inject our own logic.
First, create your custom template file. Let’s call it custom-cat-layout.php and save it in your theme folder. Then, add the following code to your theme’s functions.php file:
function pnet_load_custom_category_template( $template ) {
    // Check if we are on a category page
    if ( is_category() ) {
        // Get the current category object
        $cat = get_queried_object();

        // Define an array of category slugs that should use the new layout
        $target_categories = array( 'development', 'design', 'marketing' );

        // Check if current category is in our target list
        if ( in_array( $cat->slug, $target_categories ) ) {
            $new_template = locate_template( array( 'custom-cat-layout.php' ) );

            if ( ! empty( $new_template ) ) {
                return $new_template;
            }
        }
    }

    return $template;
}
add_filter( 'template_include', 'pnet_load_custom_category_template' );
In the code above, we define a function using the prefix pnet_ to avoid conflicts. We check if the current page is a category archive and if it matches our specific slugs. If it does, we force WordPress to load our custom file instead of the default.
For deeper technical details on how the template hierarchy interacts with filters, you can consult the official documentation on the WordPress Developer Handbook regarding Template Hierarchy.
Coding the Custom Template Structure
Now that you have your file (whether it is category-slug.php or a custom file loaded via filter), you need to structure the content. A standard category template typically includes a header, a loop to display posts, and a footer.
Here is a robust example of what your custom template file might look like. This example removes the sidebar to create a full-width experience, perfect for portfolio or gallery categories.
<?php
/**
 * Template Name: Full Width Category
 */

get_header();
?>

<div id="primary" class="content-area pnet-custom-category">
    <main id="main" class="site-main">

        <?php if ( have_posts() ) : ?>

            <header class="page-header">
                <?php
                    // Display the Category Title
                    the_archive_title( '<h1 class="page-title">', '</h1>' );

                    // Display the Category Description
                    the_archive_description( '<div class="archive-description">', '</div>' );
                ?>
            </header>

            <div class="pnet-grid-container">
            <?php
            // Start the Loop
            while ( have_posts() ) :
                the_post();

                // Load a template part for the post content
                get_template_part( 'template-parts/content', 'grid' );

            endwhile;
            ?>
            </div>

            <?php
            // Pagination
            the_posts_navigation();

        else :

            get_template_part( 'template-parts/content', 'none' );

        endif;
        ?>

    </main></div><?php
get_footer();
Notice the use of the custom class pnet-custom-category on the primary container. This allows us to target this specific page with CSS later. We also used get_template_part to keep the code modular.
You might also like:

Adding Custom Fields to Your Category
To truly elevate your WordPress custom category template, you might want to display data that goes beyond the standard title and description. For example, a “Featured Image” for the category header itself, or a specific color scheme for that section of the site.
While you can code custom taxonomy fields from scratch, using a tool like Advanced Custom Fields (ACF) is acceptable here as it stores data efficiently. Once you have added an image field to your category taxonomy, you can retrieve it in your template like this:
$term = get_queried_object();
$image = get_field('category_hero_image', $term);

if( $image ) {
    echo '<div class="pnet-hero-image"><img src="' . esc_url($image['url']) . '" alt="' . esc_attr($image['alt']) . '" /></div>';
}
Tip: How to Effortlessly Add Custom Fonts to WordPress (The Performance-First Guide)
Styling Your New Category Layout
With the structure in place, the final step is styling. Since we added the pnet-custom-category class in our PHP file, we can scope our CSS specifically to these pages. This ensures that your changes do not accidentally break the layout of your standard blog posts or other archives.
Here is an example of CSS you might add to your theme’s style.css file to turn a standard list into a modern grid layout for this category:
.pnet-custom-category .pnet-grid-container {
    display: grid;
    grid_template_columns: repeat(auto-fit, minmax(300px, 1fr));
    gap: 2rem;
    margin-top: 2rem;
}

.pnet-custom-category .post {
    border: 1px solid #e2e2e2;
    padding: 20px;
    border-radius: 8px;
    transition: transform 0.3s ease;
}

.pnet-custom-category .post:hover {
    transform: translateY(-5px);
    box-shadow: 0 10px 20px rgba(0,0,0,0.1);
}

.pnet-custom-category .page-title {
    font-size: 3rem;
    text-align: center;
    color: #333;
}
Troubleshooting Common Issues
Even seasoned developers run into hiccups when working with the template hierarchy. If your WordPress custom category template isn’t loading as expected, here are the first things you should check.
1. The Permalink Flush
This is the “turn it off and on again” of WordPress development. Sometimes, WordPress caches its rewrite rules. If you have registered a new custom post type or taxonomy associated with your template, go to Settings > Permalinks and simply click “Save Changes” without editing anything. This forces WordPress to rebuild the internal link structure.
2. Template Priority
Remember the hierarchy list we discussed earlier? Check your theme folder for conflicting files. If you have a category-news.php but also a archive.php, WordPress should pick the category file. However, if you are using a child theme, ensure the parent theme doesn’t have a higher-priority file that is overriding your child theme logic.
3. Browser and Server Caching
If you are making changes to CSS or PHP but not seeing them on the front end, clear your browser cache. If your hosting provider uses server-side caching (like Varnish or Nginx caching), you must purge that as well. During development, it is advisable to keep caching plugins disabled.
You might also like:

Enhancing User Navigation
A custom template is useless if users cannot navigate it effectively. When designing your custom category page, consider adding a sub-navigation menu. For example, if you have a “Products” category, you might want to display links to sub-categories like “Software,” “Hardware,” and “Services” right at the top.
You can achieve this by using the wp_list_categories function inside your new template file:
<div class="pnet-sub-categories">
    <ul>
        <?php
        $this_category = get_queried_object();
        wp_list_categories( array(
            'child_of' => $this_category->term_id,
            'title_li' => '',
            'depth'    => 1,
            'style'    => 'list',
        ));
        ?>
    </ul>
</div>
This snippet dynamically lists the children of the current category, creating a seamless browsing experience that feels like a dedicated landing page rather than a generic archive.
Conclusion
Mastering the template hierarchy allows you to transform a standard WordPress installation into a bespoke Content Management System. Whether you choose the simple file naming method or the more robust template_include filter, the ability to serve a WordPress custom category template is a vital skill for any serious developer. It improves SEO by increasing engagement, strengthens your branding, and provides a better experience for your visitors. Start experimenting with your local development site today, and unlock the full potential of your theme.