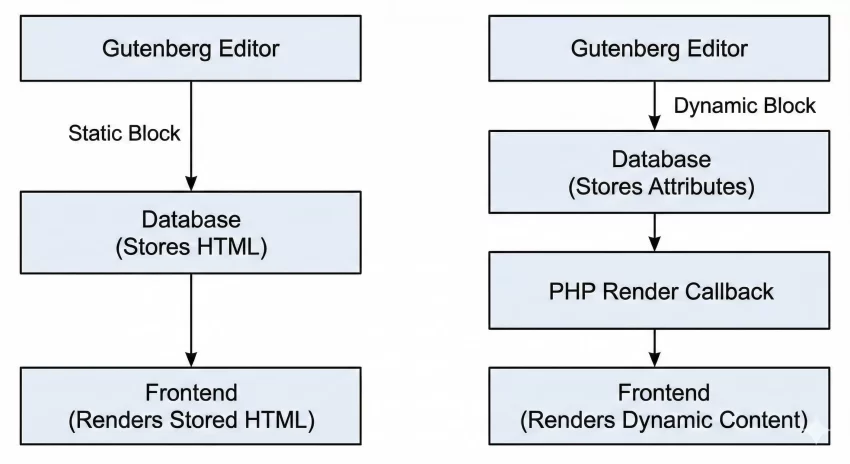
As the Gutenberg editor evolves into a comprehensive Full Site Editing (FSE) experience, developers often hit a wall when dealing with content that must update on the fly. Static blocks save HTML directly to the database, meaning if your underlying data—like a custom post type, API feed, or user-specific metadata—changes, the static block will still display the old information until manually updated and resaved. This is a fatal flaw for elements like latest post grids, pricing tables, or personalized user dashboards. The solution to this limitation is creating a WordPress dynamic block.
A WordPress dynamic block bypasses the static saving mechanism. Instead of storing hardcoded HTML in the database, it stores only the block’s attributes (the settings or parameters configured by the user). When the page loads on the frontend, WordPress hands these attributes to a PHP callback function, which renders the HTML in real-time. In this comprehensive guide, we will explore exactly how to build one safely and efficiently, ensuring your dynamic content stays fresh without sacrificing the rich editing experience of the Gutenberg editor.
Prerequisites for Building
Before diving into the code, ensure your development environment is properly configured. You will need a modern stack to compile JavaScript and write modern PHP.
- PHP 8.0 or higher running on your local server.
- Node.js and npm installed to use
@wordpress/scripts. - A local WordPress development environment (like LocalWP, Docker, or XAMPP).
- A code editor configured with a dark theme to reduce eye strain during long coding sessions (highly recommended for developers).
- A basic understanding of React and PHP.
- Backup your site and database before testing new plugins.
Step 1: Setting Up the Plugin Environment
To create a WordPress dynamic block, it is best practice to encapsulate your code within a dedicated plugin rather than a theme. This ensures that if the user switches themes, your block and its dynamic data remain intact and functional.
We will start by creating the foundational folder structure and the main PHP file that tells WordPress this is a valid plugin. This file will be responsible for initializing our block when the init hook fires.
Creating the Directory and Main File
Navigate to your wp-content/plugins/ directory and create a new folder named pnet-dynamic-block. Inside this folder, create a file named pnet-dynamic-block.php. This will be the entry point.
<?php
/**
 * Plugin Name: Pnet Dynamic Block
 * Description: A robust plugin to register a WordPress dynamic block.
 * Version: 1.0.0
 * Author: Your Name
 * Text Domain: pnet-dynamic-block
 */

if ( ! defined( 'ABSPATH' ) ) {
    exit; // Exit if accessed directly.
}

/**
 * Initialize the block registration.
 */
function pnet_init_dynamic_block() {
    // We will register our block here in the upcoming steps.
}
add_action( 'init', 'pnet_init_dynamic_block' );

You might also like: Effortlessly Add Custom Admin Columns WordPress: The Ultimate Guide
For Developers
Step 2: Defining the Block Metadata with block.json
The modern and most efficient way to register a WordPress dynamic block is by using a block.json file. This file acts as the single source of truth for your block, defining its name, category, attributes, and the scripts it requires. The WordPress Block API heavily relies on this file to optimize asset loading.
By using block.json, WordPress automatically knows which JavaScript and CSS files to enqueue without requiring you to write complex PHP enqueuing logic. Furthermore, it allows you to define a render property to point directly to a PHP file for server-side rendering.
Drafting the block.json Structure
Create a src folder inside your plugin directory. Inside src, create your block.json file. Here, we define an attribute called numberOfPosts which our PHP render callback will use later to fetch data dynamically.
{
    "$schema": "https://schemas.wp.org/trunk/block.json",
    "apiVersion": 3,
    "name": "pnet/dynamic-posts",
    "version": "1.0.0",
    "title": "Pnet Dynamic Posts",
    "category": "widgets",
    "icon": "admin-post",
    "description": "A WordPress dynamic block displaying recent posts.",
    "attributes": {
        "numberOfPosts": {
            "type": "number",
            "default": 3
        }
    },
    "textdomain": "pnet-dynamic-block",
    "editorScript": "file:./index.js",
    "render": "file:./render.php"
}
Step 3: Registering the Block in PHP
With our block.json securely in place, we must instruct WordPress to read it and register the block in the backend. Because we are using the modern JSON approach, the PHP code required is incredibly minimal and clean.
We will update the pnet_init_dynamic_block function we created in Step 1. We will use the register_block_type function, pointing it to the directory containing our compiled block.json file (which will reside in the build directory after compilation).
Executing the Registration Function
Update your main plugin file (pnet-dynamic-block.php) with the following code. Ensure that the path points to the build directory where your compiled assets will eventually sit.
/**
 * Initialize the block registration using block.json.
 */
function pnet_init_dynamic_block() {
    register_block_type( __DIR__ . '/build' );
}
add_action( 'init', 'pnet_init_dynamic_block' );
Path Configuration
Step 4: Crafting the React Edit Interface
While the frontend of our WordPress dynamic block is rendered via PHP, the backend editor experience is built using React. When a user interacts with the Gutenberg editor, they need a visual interface to adjust settings, such as changing the numberOfPosts attribute.
In this step, we use the ServerSideRender component provided by WordPress. This component makes an asynchronous REST API call to your WordPress server, fetches the output of your PHP render callback, and displays it in the editor seamlessly. This ensures the editor matches the frontend perfectly.
Setting up the build process
First, initialize npm and install the WordPress scripts package. Run this in your plugin root directory via your terminal:
npm init -y
npm install @wordpress/scripts --save-dev
Add the build scripts to your package.json:
"scripts": {
    "build": "wp-scripts build",
    "start": "wp-scripts start"
}
Creating the Edit Component (src/index.js)
Create index.js in your src folder. We will register the block on the client-side and set up the edit function. Notice that we do not use a save function; for a WordPress dynamic block, the save function should simply return null.
import { registerBlockType } from '@wordpress/blocks';
import { useBlockProps, InspectorControls } from '@wordpress/block-editor';
import { PanelBody, RangeControl } from '@wordpress/components';
import ServerSideRender from '@wordpress/server-side-render';
import metadata from './block.json';

registerBlockType( metadata.name, {
    edit: ( { attributes, setAttributes } ) => {
        const blockProps = useBlockProps();

        return (
            <div { ...blockProps }>
                <InspectorControls>
                    <PanelBody title="Settings">
                        <RangeControl
                            label="Number of Posts"
                            value={ attributes.numberOfPosts }
                            onChange={ ( value ) => setAttributes( { numberOfPosts: value } ) }
                            min={ 1 }
                            max={ 10 }
                        />
                    </PanelBody>
                </InspectorControls>

                <ServerSideRender
                    block={ metadata.name }
                    attributes={ attributes }
                />
            </div>
        );
    },
    save: () => null, // Crucial: Dynamic blocks return null here.
} );
You might also like: BackupBuddy WordPress Plugin Review: Is It Still the Best in 2026?
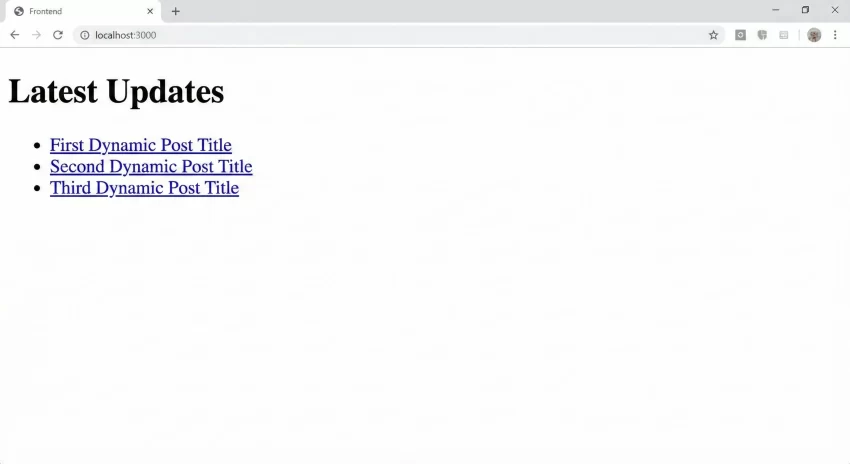
Step 5: Developing the PHP Render Callback
The core power of a WordPress dynamic block resides in its render callback. Because we defined "render": "file:./render.php" in our block.json, WordPress knows exactly which file to execute when rendering the block on the frontend or when the ServerSideRender component requests it.
This PHP file receives three arguments natively: $attributes, $content, and $block. We will use the $attributes array to read our numberOfPosts value, query the database securely using WP_Query, and output the customized HTML.
Writing the render.php file
Create a file named render.php inside your src directory. Write the logic to fetch recent posts. We will escape all output using functions like esc_html() and esc_url() to maintain strict security standards.
<?php
/**
 * Render callback for the Pnet Dynamic block.
 *
 * @param array    $attributes The block attributes.
 * @param string   $content    The block content (empty for dynamic blocks).
 * @param WP_Block $block      The block instance.
 */

// Ensure attributes are properly typed.
$number_of_posts = isset( $attributes['numberOfPosts'] ) ? intval( $attributes['numberOfPosts'] ) : 3;

$args = array(
    'post_type'      => 'post',
    'posts_per_page' => $number_of_posts,
    'post_status'    => 'publish',
);

$query = new WP_Query( $args );

// Generate block wrapper attributes safely.
$wrapper_attributes = get_block_wrapper_attributes();

ob_start();
?>
<div <?php echo $wrapper_attributes; ?>>
    <h3 class="pnet-dynamic-title">Latest Updates</h3>
    <?php if ( $query->have_posts() ) : ?>
        <ul class="pnet-post-list">
            <?php while ( $query->have_posts() ) : $query->the_post(); ?>
                <li>
                    <a href="<?php echo esc_url( get_permalink() ); ?>">
                        <?php echo esc_html( get_the_title() ); ?>
                    </a>
                </li>
            <?php endwhile; ?>
        </ul>
        <?php wp_reset_postdata(); ?>
    <?php else : ?>
        <p><?php esc_html_e( 'No posts found.', 'pnet-dynamic-block' ); ?></p>
    <?php endif; ?>
</div>
<?php
return ob_get_clean();
Run npm run build in your terminal. This will process your React code and copy your block.json and render.php to the build directory. Your WordPress dynamic block is now complete and functional!
You might also like: Stop the Panic: Quickly Fix WordPress Image Upload Error
Common Errors and Troubleshooting
Building a WordPress dynamic block involves bridging PHP and JavaScript, which can occasionally lead to frustrating bugs. Here are the most common errors developers encounter and exactly how to resolve them.
Block Validation Error: “This block contains unexpected or invalid content”
This usually occurs if you previously had a save function returning HTML, and then switched to a dynamic block returning null. WordPress compares the HTML saved in the database with what the save function generates. Because you changed the architecture, it mismatches. To fix this, you must click “Attempt Block Recovery” in the editor, or delete the block from the post and re-add it. Ensure your save function in index.js strictly returns null.
The ServerSideRender Component Shows a Spinner indefinitely
If the ServerSideRender component in the editor never stops loading, it usually means your PHP render callback is throwing a fatal error or a warning that corrupts the JSON response of the REST API. Check your server’s PHP error logs. Ensure that your render.php file doesn’t have any typos, such as missing semicolons, and that you are not accidentally echoing content directly outside of the output buffer (ob_start() and return ob_get_clean()).
White Screen of Death (WSOD) upon activation
A WSOD when activating the plugin indicates a severe PHP syntax error in your main plugin file. Ensure you haven’t forgotten the closing parenthesis in your add_action hook, and verify that register_block_type( __DIR__ . '/build' ); is pointing to a valid directory. If the build directory doesn’t exist because you forgot to run npm run build, WordPress might fail gracefully, but older versions might throw errors.
Summary and Conclusion
Transitioning from static block development to building a WordPress dynamic block unlocks immense potential for creating data-driven, highly interactive websites within the Gutenberg and Full Site Editing ecosystem. By utilizing the block.json standard, we can streamline the registration process, minimize PHP bloat, and ensure optimal asset loading for performance.
Remember that the key paradigm shift is returning null in your React save function and handling all markup generation via the PHP callback. By leveraging the ServerSideRender component, we maintain a flawless WYSIWYG editing experience. With these principles mastered, you are now equipped to build complex, scalable tools that remain perfectly synced with your database, ensuring your users always see the most accurate and up-to-date information through your custom WordPress dynamic block.