
Is there anything more frustrating than a silent contact form? You launch your website, test the design, and wait for leads to roll in—only to realize weeks later that your website hasn’t been delivering messages. If you are struggling with emails landing in spam folders or vanishing entirely, you are likely dealing with a poor WordPress SMTP configuration. This is a common headache for developers and site owners alike, but fortunately, it is entirely fixable.
By default, WordPress relies on PHP mail functions that hosting providers often block or limit to prevent spam. The solution is to route your emails through a dedicated Simple Mail Transfer Protocol (SMTP) server. In this guide, we will walk you through the correct WordPress SMTP configuration steps using plugins to ensure your emails hit the inbox every single time.
(Note: If you are a developer who prefers keeping your site lightweight and want to solve this without adding another plugin, check out our previous guide on how to fix WordPress not sending email using custom code snippets.)
Why Your WordPress Emails Are Failing
Before we dive into the WordPress SMTP configuration, it helps to understand why the default system fails. WordPress uses a core function called wp_mail() to send emails. This function relies on PHP’s standard mail handler.
The problem isn’t usually with WordPress itself, but with the hosting environment. Shared hosting servers are notorious for having poor “sender reputation” because spammers often abuse them. Consequently, email providers like Gmail, Outlook, and Yahoo treat emails originating from these servers with extreme suspicion. Without a proper WordPress SMTP configuration, your password resets, order confirmations, and contact form notifications are likely being flagged as junk.
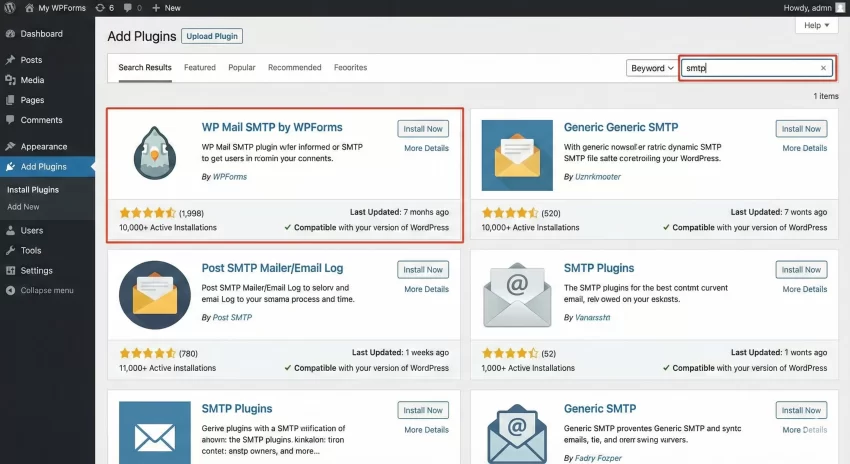
Step 1: Choosing the Right SMTP Plugin
To implement a robust WordPress SMTP configuration, you need a plugin that acts as a bridge between your WordPress site and your email provider. While there are many options, we recommend plugins that support OAuth2 authentication (which is more secure than saving your password directly in the database).
Popular choices include:
- WP Mail SMTP: The most popular option with a user-friendly wizard.
- Post SMTP (formerly Postman SMTP): Excellent for debugging and logging errors.
- FluentSMTP: A completely free and feature-rich option.
For this tutorial, we will focus on a general workflow that applies to most of these plugins, ensuring your WordPress SMTP configuration is solid regardless of the tool you choose.
Step 2: Preparing Your SMTP Service Details
A plugin is just the connector; you still need a service to actually send the emails. You cannot complete a WordPress SMTP configuration without an SMTP provider. You have two main routes here:
Route A: Using Gmail/Google Workspace (Best for Low Volume)
If you are a small business sending fewer than 500 emails a day, Google is a reliable choice. However, for security, you should not use your login password. You will need to create an “App Password” or set up a Google Cloud Project for OAuth.
Route B: Using Transactional Email Services (Best for Reliability)
For professional WordPress SMTP configuration, services like SendGrid, Brevo (formerly Sendinblue), or Amazon SES are superior. They are designed specifically to ensure high deliverability.
Typical Details You Will Need:
- SMTP Host: e.g.,
smtp.sendgrid.netorsmtp.gmail.com - Encryption: TLS or SSL
- Port: Usually 587 (TLS) or 465 (SSL)
- Username/Password: Provided by your SMTP service (API keys are often used here).
You might also like:
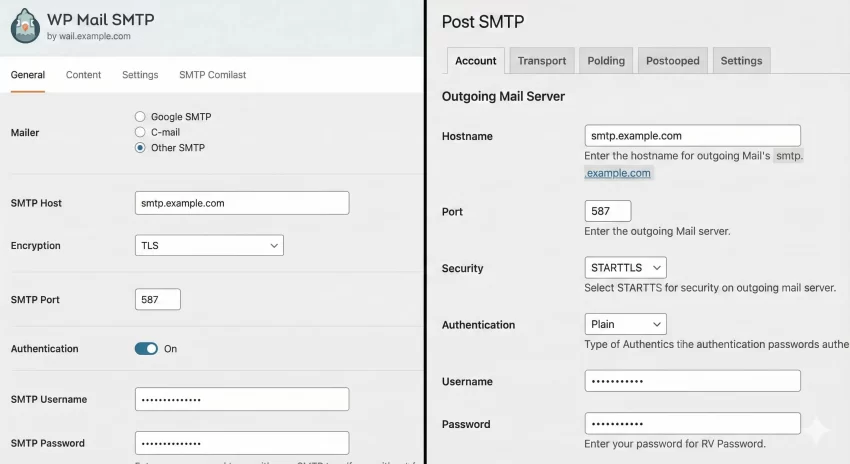
Step 3: Configuring the Plugin Settings
Once you have installed your chosen plugin, navigate to the settings page to begin the WordPress SMTP configuration. While the interface varies by plugin, the core fields remain the same.
1. From Email and Name: Ensure the “From Email” matches the domain you are sending from. If your website is domain.com, your “From Email” should be something like support@domain.com. Using a mismatched email (like a Yahoo address on a business site) is a major red flag for spam filters and ruins your WordPress SMTP configuration efforts.
2. The Mailer Setup: Select your mailer. If you are using a generic host, select “Other SMTP”. Enter the Host, Port, and Encryption details you gathered in Step 2. Toggle “Authentication” to ON and input your username and password (or API key).
Step 4: Debugging SMTP Issues with Custom Code
Sometimes, even after a perfect WordPress SMTP configuration via a plugin, things go wrong. Perhaps a conflict with another plugin is stopping the email trigger. While plugins offer logs, sometimes you need to check if wp_mail is firing correctly at the code level.
You can use the wp_mail_failed action hook to catch errors. Below is a snippet you can add to your theme’s functions.php file or a custom site-specific plugin. We use the prefix pnet_ to ensure no conflicts occur.
/**
 * Log WordPress Mail Failures to the Error Log
 * Useful for debugging WordPress SMTP Configuration issues.
 */
function pnet_log_mail_errors( $wp_error ) {
    if ( is_wp_error( $wp_error ) ) {
        $error_message = $wp_error->get_error_message();
        $error_data    = $wp_error->get_error_data();

        // Construct the log entry
        $log_entry  = " [PNET SMTP ERROR] Message: " . $error_message . " | ";
        $log_entry .= "Data: " . print_r( $error_data, true );

        // Write to the standard WordPress debug.log
        error_log( $log_entry );
    }
}
add_action( 'wp_mail_failed', 'pnet_log_mail_errors', 10, 1 );
After adding this, try sending an email. If it fails, check your debug.log file inside the /wp-content/ folder. This gives you raw insight into why your WordPress SMTP configuration might be rejecting the connection.
Step 5: Testing Your Configuration
Never assume your WordPress SMTP configuration is working just because you saved the settings. Go to the “Email Test” tab provided by your plugin. Send a test email to a separate account (like a personal Gmail).
Checklist for a successful test:
- Did the email arrive in the Inbox (not Spam)?
- Is the “From Name” correct?
- Does the “Reply-To” address work?
If the test email fails, double-check your ports. Port 25 is often blocked by hosting providers. Switch to Port 587 using TLS encryption for the most reliable WordPress SMTP configuration.
You might also like:
Advanced: Force “From” Name and Email Programmatically
Sometimes, third-party plugins (like contact forms or membership plugins) try to override your settings, breaking your consistent branding. To enforce your WordPress SMTP configuration rules strictly, you can use filters. This ensures that no matter what plugin sends the email, it always comes from your official address.
/**
 * Force the "From" Email Address globally
 */
function pnet_force_sender_email( $original_email_address ) {
    return 'admin@pixelnet.in'; // Replace with your actual email
}
add_filter( 'wp_mail_from', 'pnet_force_sender_email' );

/**
 * Force the "From" Name globally
 */
function pnet_force_sender_name( $original_email_from ) {
    return 'PixelNet Support'; // Replace with your actual name
}
add_filter( 'wp_mail_from_name', 'pnet_force_sender_name' );
Common WordPress SMTP Configuration Mistakes
Even with the best tools, we see users making the same mistakes. Avoid these to keep your WordPress SMTP configuration healthy:
1. Using Two SMTP Plugins
More is not always better. activating two SMTP plugins will cause conflicts, often crashing the wp_mail function entirely. Stick to one robust solution.
2. Ignoring SPF and DKIM Records
This is the technical part of WordPress SMTP configuration that most people skip. These are DNS records you add to your domain (via GoDaddy, Namecheap, etc.) that verify you own the domain. Without SPF/DKIM, your emails are high-risk candidates for the spam folder.
3. Sending Marketing Emails via WordPress
Your WordPress SMTP configuration is for transactional emails (password resets, receipts). Do not use it to send a newsletter to 5,000 subscribers. You will get your IP blacklisted immediately. Use a dedicated service like MailChimp or ConvertKit for newsletters.
Conclusion
Setting up a proper WordPress SMTP configuration is not just a “nice to have”—it is a necessity for any professional website. By moving away from the default PHP mail function and using a dedicated SMTP server, you ensure that your communication lines remain open and reliable.
Whether you choose a plugin-heavy approach or prefer to debug with our custom pnet_ code snippets, the goal remains the same: 100% deliverability. Take the time to configure this today, and you won’t have to worry about lost leads tomorrow.