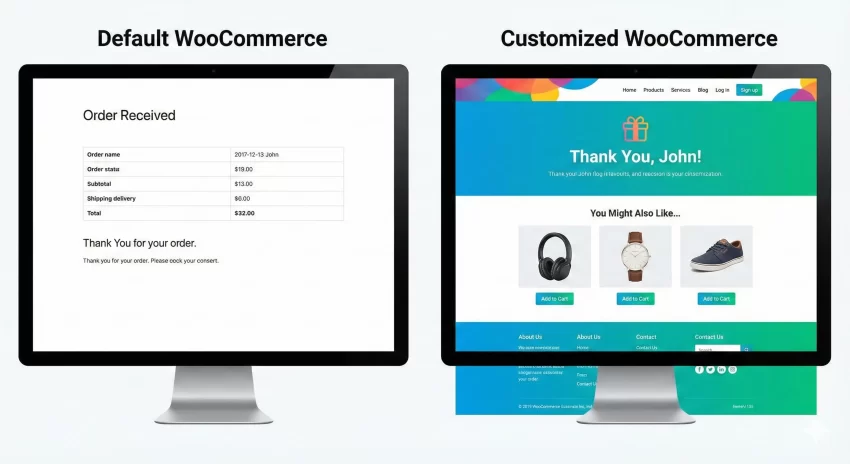
The moment a customer completes a purchase on your store is not the end of their journey; it is the beginning of a relationship. However, the default WooCommerce order received endpoint is often functionally adequate but visually uninspiring. When you learn to customize WooCommerce thank you page effectively, you unlock a powerful touchpoint that can drive retention, encourage social sharing, and even upsell products immediately after a sale.
As WordPress developers, we often rely on heavy plugins to achieve simple layout changes. While plugins have their place, they can add unnecessary bloat to your site. In this guide, we will explore how to programmatically customize WooCommerce thank you page using actions, filters, and custom functions. We will cover everything from adding simple custom messages to injecting dynamic content based on the order details.
Why You Should Customize WooCommerce Thank You Page
Before we dive into the code, it is essential to understand the “why” behind this customization. The “Order Received” page—often called the “Thank You” page—is the only page in the sales funnel with a 100% open rate. Every single paying customer sees it. Leaving it in its default state is a missed opportunity for several reasons:
- Customer Retention: A generic message feels transactional. A personalized message feels relational.
- Upselling and Cross-selling: The customer is already in a buying mood. This is the perfect time to suggest accessories or related digital products.
- Onboarding: For digital products or memberships, this page serves as the first step of onboarding, guiding users on how to access their downloads or services.
- Data Collection: It is the ideal spot for conversion tracking scripts or post-purchase surveys.
By taking control of this endpoint, you transform a static confirmation screen into a dynamic asset for your business.
Understanding the Core Hook: woocommerce_thankyou
The primary tool we will use to customize WooCommerce thank you page is the woocommerce_thankyou action hook. This hook fires when the order is received, and it passes the $order_id as an argument. This is incredibly powerful because it allows us to retrieve the entire order object and conditionally display content based on what was purchased.
It is important to note that this hook is located at the bottom of the default template. If you need to add content before the order details table, you might consider the woocommerce_before_thankyou hook. However, for most custom content like upselling or tracking scripts, woocommerce_thankyou is the standard.
Let’s start with the basics of customize WooCommerce thank you page. To ensure our modifications are safe and sustainable, we will use a custom function prefix pnet_ to avoid conflicts with other plugins or themes.
You might also like:

Method 1: Adding a Custom Message to the Thank You Page
The simplest way to customize WooCommerce thank you page is by adding a personalized message. Perhaps you want to offer a coupon code for their next purchase to encourage immediate retention. We can hook into woocommerce_thankyou and output simple HTML.
In this example, we will check if the order has been paid and then display a “VIP” message with a discount code. We will place this code in your theme’s functions.php file or a custom site-specific plugin.
add_action( 'woocommerce_thankyou', 'pnet_add_custom_thankyou_message', 10, 1 );

function pnet_add_custom_thankyou_message( $order_id ) {
    if ( ! $order_id ) return;

    $order = wc_get_order( $order_id );

    // Only show to customers who actually paid (avoids showing on failed orders)
    if ( $order->has_status( 'failed' ) ) return;

    ?>
    <div class="pnet-thankyou-message" style="background: #fdfdff; border: 1px solid #e1e1e1; padding: 20px; margin-bottom: 20px; border-radius: 5px;">
        <h3>Welcome to the Family!</h3>
        <p>Thank you for trusting us with your purchase. As a token of our appreciation, here is a 20% discount code for your next visit:</p>
        <div style="background: #e8f0fe; color: #1a73e8; padding: 10px; display: inline-block; font-weight: bold; font-family: monospace; font-size: 1.2em;">
            VIPCUSTOMER20
        </div>
        <p><small>Valid for the next 30 days.</small></p>
    </div>
    <?php
}
This snippet creates a distinct section on the confirmation page. By checking $order->has_status('failed'), we ensure that we do not thank a customer whose payment did not actually go through. This level of logic is why coding is often superior to using generic plugins.
Method 2: Displaying Dynamic Content Based on Products
A more advanced way to customize WooCommerce thank you page is to display content conditionally based on the specific items in the cart. This is particularly useful for stores that sell a mix of physical and digital goods. For example, if a user buys a “WordPress Course,” you might want to show a direct link to the student dashboard immediately.
We will loop through the order items to check for a specific product ID (let’s say ID 123 is our special course). If it exists, we display the onboarding instructions.
add_action( 'woocommerce_thankyou', 'pnet_product_specific_content', 20, 1 );

function pnet_product_specific_content( $order_id ) {
    if ( ! $order_id ) return;

    $order = wc_get_order( $order_id );
    $items = $order->get_items();
    $target_product_id = 123; // Change this to your specific product ID
    $found = false;

    foreach ( $items as $item ) {
        if ( $item->get_product_id() == $target_product_id ) {
            $found = true;
            break;
        }
    }

    if ( $found ) {
        echo '<div class="woocommerce-info"><strong>Important:</strong> You have purchased the Masterclass! <a href="/student-dashboard">Click here to access your lessons</a> immediately.</div>';
    }
}
This code makes your store feel intelligent and responsive to the user’s needs. It removes friction by predicting exactly what the user is looking for next.
Tip: Boost Sales: How to Display WooCommerce Discount Percentage Easily
Method 3: Adding Social Sharing Buttons
Word of mouth is free marketing. When a customer buys something they are excited about, they are often willing to share it. By default, WooCommerce does not offer social sharing on the order received page. We can easily fix this.
We will create a function that outputs simple sharing links pre-filled with a message like “I just bought some amazing gear at [Store Name]!”
add_action( 'woocommerce_thankyou', 'pnet_add_social_sharing', 5 );

function pnet_add_social_sharing( $order_id ) {
    $share_url = urlencode( home_url() );
    $share_text = urlencode( 'I just bought something awesome! Check it out:' );

    ?>
    <div class="pnet-social-share" style="margin: 20px 0; text-align: center;">
        <h4>Share the love?</h4>
        <a href="https://twitter.com/intent/tweet?text=<?php echo $share_text; ?>&url=<?php echo $share_url; ?>" target="_blank" class="button">Share on Twitter</a>
        <a href="https://www.facebook.com/sharer/sharer.php?u=<?php echo $share_url; ?>" target="_blank" class="button">Share on Facebook</a>
    </div>
    <?php
}
By using the priority of 5 in the add_action function, we can attempt to position this element higher up on the page, depending on how your specific theme triggers the hook actions.
You might also like:
Method 4: Redirecting to a Completely Custom Page
Sometimes, modifying the existing endpoint isn’t enough. You might want to customize WooCommerce thank you page by completely bypassing the default template and sending users to a custom WordPress page built with the Block Editor or Elementor.
This approach gives you total design freedom without touching PHP templates for layout. However, you must be careful. If you simply redirect, you might lose the conversion tracking data typically fired on the standard thank you page hook. If you proceed with this method, ensure your analytics setup can handle the redirect.
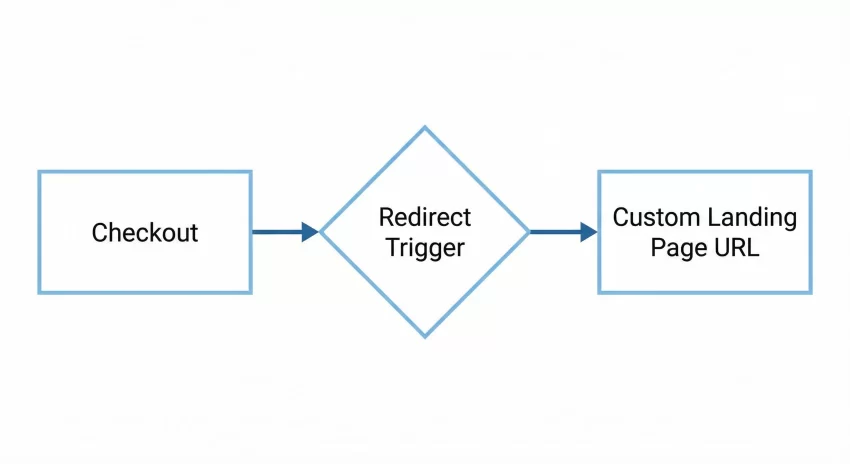
Here is how you handle the redirect safely:
add_action( 'woocommerce_thankyou', 'pnet_custom_redirect_thankyou', 10, 1 );

function pnet_custom_redirect_thankyou( $order_id ) {
    $order = wc_get_order( $order_id );

    // Prevent redirect loop if the order failed
    if ( ! $order || $order->has_status( 'failed' ) ) {
        return;
    }

    // Check if we have already redirected to avoid loops
    if ( ! isset( $_GET['redirected'] ) ) {
        // Define your custom page URL
        $custom_url = home_url( '/custom-thank-you/' );

        // Use wp_safe_redirect
        wp_safe_redirect( add_query_arg( 'redirected', 'true', $custom_url ) );
        exit;
    }
}
Advanced: Changing the Title and Text
If you prefer to stick to the standard template but just hate the phrasing “Order Received,” you can filter the text strings. This is often cleaner than overriding the template file itself.
WooCommerce provides filters for the thank you title and the order received text. For a deeper dive into available filters, I recommend checking the WooCommerce Code Reference for the template structure.
Here is how to change the title text:
add_filter( 'woocommerce_endpoint_order-received_title', 'pnet_change_thankyou_title', 10, 1 );

function pnet_change_thankyou_title( $old_title ) {
    return 'Success! Your Gear is on the Way';
}
And here is how to change the sub-text:
add_filter( 'woocommerce_thankyou_order_received_text', 'pnet_change_thankyou_text', 10, 2 );

function pnet_change_thankyou_text( $text, $order ) {
    if ( $order && $order->get_billing_first_name() ) {
        return 'Hi ' . esc_html( $order->get_billing_first_name() ) . ', we have received your order and are processing it now.';
    }
    return $text;
}
Styling Your Customizations
Adding the PHP logic is only half the battle. To truly customize WooCommerce thank you page professionally, you need to ensure your new elements match your theme. While we used inline styles in the examples above for simplicity, the best practice is to enqueue a dedicated stylesheet or add CSS to your Customizer.
Target the classes we added, such as .pnet-thankyou-message, to ensure responsiveness on mobile devices. A thank you page that breaks on mobile is a disaster for user experience, as many users shop exclusively on their phones.
Summary
The default WooCommerce confirmation endpoint is a blank canvas waiting for your creativity. Whether you choose to add simple retention messages, dynamic content based on purchased items, or completely redirect the user to a custom landing page, the effort you put in to customize WooCommerce thank you page will yield long-term dividends. By using the code snippets provided above, you maintain a lightweight site while delivering a heavyweight customer experience.