Default WooCommerce functionality covers the basics: transactional receipts, password resets, and shipping updates. However, complex e-commerce operations often hit a wall when specific business logic requires tailored communication. Whether you need to alert a dropshipping supplier, notify a warehouse manager, or send a specialized “Thank You” sequence to high-ticket buyers, standard settings won’t suffice. The solution lies in programmatically triggering WooCommerce custom email notifications.
In this technical guide, we will bypass third-party automation plugins to build a lightweight, code-based solution. By hooking directly into the WooCommerce order lifecycle, we ensure that your WooCommerce custom email notifications are sent instantly, reliably, and without the overhead of heavy add-ons.
Prerequisites
Before modifying your production environment, ensure you meet the following technical requirements. This implementation requires direct access to your theme files or a site-specific plugin.
- PHP 7.4 or higher (PHP 8.1+ recommended for security).
- Access to FTP/SFTP or your hosting Control Panel.
- A child theme installed or a custom functionality plugin created.
- Basic understanding of WordPress Action Hooks and Filters.
- A reliable SMTP solution (e.g., WP Mail SMTP) to ensure deliverability.
- Backup Required: Always create a full site backup before editing PHP files.
Intermediate
functions.php file, consider using a staging site first. Step 1: Set Up Your Development Environment
To implement WooCommerce custom email notifications, you must decide where your code will live. While many developers place snippets directly into the functions.php file of the active theme, this practice is risky. If the theme updates, your code is overwritten. The superior method is creating a site-specific plugin or using a child theme.
For this guide, we will assume you are working within a Child Theme’s functions.php file or a custom plugin file. This ensures that your custom email logic remains intact regardless of design updates. If you are creating a dedicated plugin for this, ensure you have the standard plugin header comments at the top of your file so WordPress recognizes it.
Before writing the logic, verify that your server can send emails. Many local development environments (like LocalWP or XAMPP) capture emails internally, but live servers require proper DNS configuration. We recommend testing a simple wp_mail() function to your admin address to confirm the infrastructure is ready before adding the WooCommerce specific logic.
Step 2: Hook into Order Completion
The core of this functionality relies on the WordPress Hook API. Specifically, we need to listen for the moment an order transitions to the “Completed” status. WooCommerce provides a dynamic hook for this: woocommerce_order_status_completed. This action fires immediately after payment is confirmed and the stock is reduced, making it the perfect trigger for your WooCommerce custom email notifications.
Understanding the Action Hook
The woocommerce_order_status_completed hook passes one critical argument: the $order_id. With this ID, we can retrieve the full order object and access all data related to the customer, the products purchased, and the billing address. Without this hook, you would have to rely on generic WordPress post updates, which is inefficient and prone to errors.
/**
 * Hook into the order completion status.
 * passes the $order_id to our custom function.
 */
add_action( 'woocommerce_order_status_completed', 'pnet_send_custom_notification', 10, 1 );

function pnet_send_custom_notification( $order_id ) {
    // Logic will go here
}
For Developers
woocommerce_thankyou if you want to trigger emails simply when the thank you page renders, but woocommerce_order_status_completed is more secure for server-side verification of payment. Step 3: Retrieve Order Data
Once we have the $order_id inside our function, we need to instantiate the order object. Modern WooCommerce development (version 3.0+) uses CRUD getters to access data rather than accessing meta properties directly. This ensures forward compatibility if the database schema changes in the future.
We will use wc_get_order() to grab the object. From there, we can extract the customer’s email, their name, and the items they bought. This data allows us to personalize the WooCommerce custom email notifications, increasing the likelihood that the recipient will engage with the content.
function pnet_send_custom_notification( $order_id ) {
    // 1. Get the order object
    $order = wc_get_order( $order_id );

    if ( ! $order ) {
        return;
    }

    // 2. Retrieve necessary variables
    $billing_first_name = $order->get_billing_first_name();
    $billing_email      = $order->get_billing_email();
    $order_total        = $order->get_total();

    // Example: Only send if total is above $100
    if ( $order_total < 100 ) {
        return;
    }
}
In the code above, we added a conditional check. This demonstrates the power of custom coding over basic plugins: you can apply strict logic. For example, you might only want to trigger these emails for VIP customers or orders containing a specific product category.
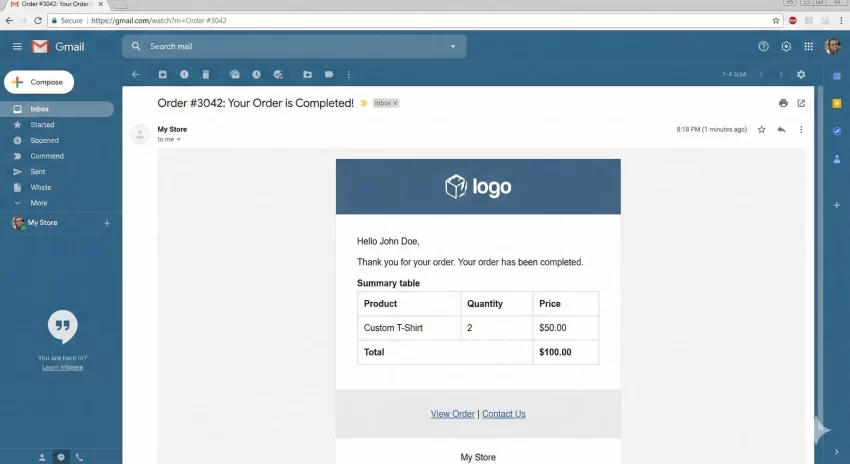
Step 4: Compose the HTML Email
Now that we have the data, we must construct the email content. While you can send plain text, HTML emails provide a professional appearance that aligns with your brand identity. To send HTML emails via WordPress, we must set the correct Content-Type headers.
Building the Content Variable
We will create a variable $message that contains our HTML structure. You can use inline CSS to style this email, as many email clients strip out external stylesheets. To make the email dynamic, we inject the variables we retrieved in the previous step (like $billing_first_name) directly into the string.
    // ... inside pnet_send_custom_notification function

    $to = 'warehouse@example.com'; // Or use $billing_email for customer
    $subject = 'Alert: High Value Order #' . $order_id;

    // Start HTML Buffer
    ob_start();
    ?>
    <html>
    <head>
        <title>New High Value Order</title>
    </head>
    <body>
        <h1>New Order Received!</h1>
        <p>Hello Admin,</p>
        <p>A new order has been placed by <strong><?php echo esc_html( $billing_first_name ); ?></strong>.</p>
        <p>Total Value: <?php echo wc_price( $order_total ); ?></p>
        <p><a href="<?php echo esc_url( $order->get_edit_order_url() ); ?>">View Order</a></p>
    </body>
    </html>
    <?php
    $message = ob_get_clean();

    // Set Headers for HTML
    $headers = array('Content-Type: text/html; charset=UTF-8');

    // Send the mail
    wp_mail( $to, $subject, $message, $headers );
Using ob_start() and ob_get_clean() is a cleaner way to write large blocks of HTML within PHP than concatenating long strings. This keeps your code readable and maintainable.
Step 5: Prevent Duplicate Emails
A common issue with hooking into woocommerce_order_status_completed is that the hook might fire multiple times if an order status is toggled back and forth by an admin or an automated payment gateway ipn. This results in the customer receiving duplicate WooCommerce custom email notifications, which looks unprofessional.
To prevent this, we use WordPress post meta. When we send the email for the first time, we save a “flag” in the database against that specific order ID. Before sending any future emails, we check if this flag exists.
    // ... inside pnet_send_custom_notification function

    // Check if email already sent
    if ( get_post_meta( $order_id, '_pnet_custom_email_sent', true ) ) {
        return;
    }

    // ... [Send Mail Code from Step 4] ...

    // Mark as sent
    update_post_meta( $order_id, '_pnet_custom_email_sent', 'yes' );
} // End Function
Pro Tip
_pnet_) to avoid conflicts with WooCommerce core data or other plugins. Troubleshooting Common Errors
Even with clean code, email delivery environments can be tricky. If your WooCommerce custom email notifications are failing to arrive, check these common culprits.
1. Emails Going to Spam
If your server is not authenticated, Gmail and Outlook will block your messages. Ensure you have SPF and DKIM records set up. Using a plugin like WP Mail SMTP resolves this by routing emails through a trusted provider like SendGrid or Amazon SES.
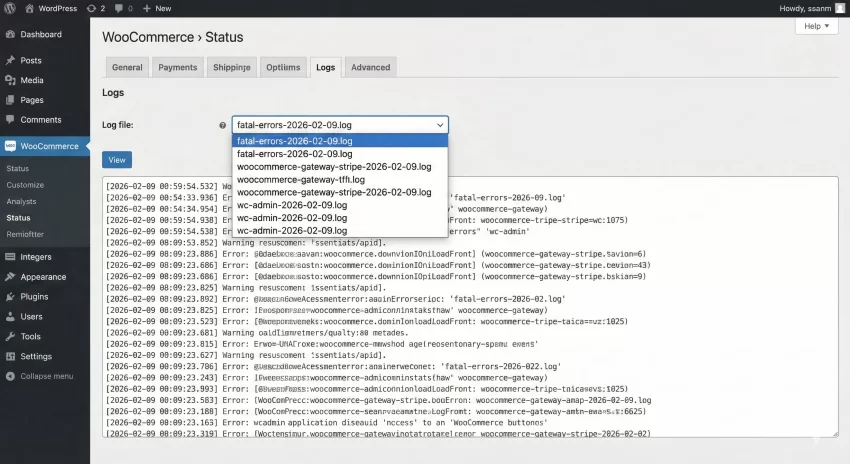
2. The Hook Isn’t Firing
If you are testing by manually changing order statuses in the dashboard, ensure you are strictly moving from “Processing” to “Completed.” Some payment gateways automatically complete orders for virtual products. Check your WooCommerce logs at WooCommerce > Status > Logs to see if any fatal PHP errors occurred during the transaction.
Summary
Sending WooCommerce custom email notifications allows for granular control over your e-commerce communications, bridging the gap between standard transactional receipts and advanced business logic. By utilizing the woocommerce_order_status_completed hook, retrieving the order object, and implementing duplicate prevention logic, you have created a robust notification system.
This method keeps your site lightweight by avoiding heavy automation plugins while giving you the flexibility to design emails exactly how you need them. Whether for internal alerts or customer engagement, this code-first approach ensures reliability and scalability for your online store.


