Are you struggling with WordPress’s default permission system? Out of the box, WordPress provides a handful of predefined user profiles—Subscriber, Contributor, Author, Editor, and Administrator. While these defaults cover basic blogging needs, they quickly become a liability when you are building complex applications, membership portals, or client websites. Giving an external writer the ‘Editor’ role might grant them too much control over other authors’ content, whereas the ‘Contributor’ role prevents them from uploading essential images. This is the exact problem many developers face. The ultimate solution is to programmatically create custom user role permissions tailored exactly to your business logic. In this comprehensive guide, we will walk you through the precise, database-friendly PHP method to establish these specialized access levels without relying on bloated third-party plugins.
- PHP 8.0 or higher running on your server environment.
- A complete backup of your WordPress database (specifically the
wp_optionstable). - Access to your custom theme’s
functions.phpfile or a site-specific utility plugin. - Basic understanding of WordPress user capabilities and PHP array structures.
Step 1: Understanding the WP_Roles Object and Database Architecture
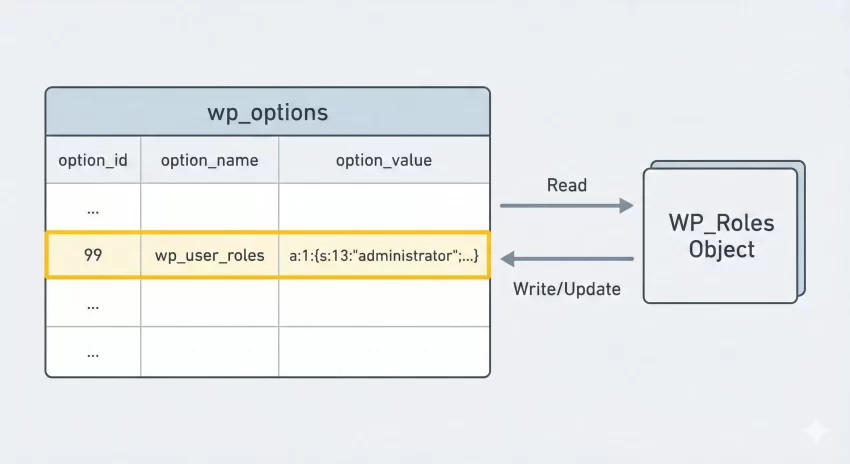
Before you jump into writing the code to create custom user role setups, it is crucial to understand how WordPress handles these permissions behind the scenes. Unlike posts or users, which have their own dedicated database tables, user roles are serialized and stored inside a single row within the wp_options table under the wp_user_roles option name. Every time you load a page, the global WP_Roles object retrieves this array to verify what the current user is allowed to do.
Because this data is persistent in the database, executing the function to create custom user role profiles on every single page load (such as hooking into the init action) is a massive performance killer and a bad practice. It forces WordPress to overwrite the database row repeatedly. Instead, we only need to register the new profile once.
Primitive Capabilities vs. Meta Capabilities
When you define the capabilities for your new user group, you will be assigning “primitive” capabilities. Primitive capabilities are explicit permissions stored in the database, such as edit_posts, publish_pages, or delete_users. On the other hand, meta capabilities like edit_post (singular) are not directly granted to a user. WordPress dynamically translates meta capabilities into primitive capabilities by checking the specific post’s author and status. For a deep dive into all available capabilities, you should reference the official WordPress Code Reference API.
Step 2: Using the Correct Hooks for Role Creation
As established, we must avoid creating the role on every page load. The absolute best practice for a WordPress developer is to hook the function that will create custom user role configurations into a plugin or theme activation hook. If you are building a custom plugin for your PixelNet clients, you will use register_activation_hook. If you are building this into a theme, you should tie it to the after_switch_theme action hook.
Using the activation hook ensures the database write operation occurs exactly one time. When the administrator activates the theme or plugin, WordPress updates the serialized array in the options table. From that point forward, the role exists permanently until explicitly removed.
Setting Up the Activation Function
We will write a setup function that runs on theme switch. This function will call the core WordPress function add_role(). This function accepts three parameters: the role slug (a unique, lowercase string with no spaces), the display name (a human-readable string), and an associative array of capabilities (where the key is the capability name and the value is a boolean true or false).
Backup Required
Step 3: Writing the PHP Code to Register the Role
Now we will implement the actual PHP script to create custom user role access. In this scenario, let us imagine we are creating a “Client Manager” role. This user needs the ability to read, edit, and publish posts and pages, but they should absolutely not be allowed to switch themes, install plugins, or mess with core WordPress settings.
We will construct an array of capabilities that mirrors an Editor, but perhaps with a few restrictions or additions. It is often helpful to fetch an existing role’s capabilities as a baseline, but for absolute precision, defining them explicitly is safer.
The Core Implementation Code
Below is the exact code you need to place in your theme or plugin. Notice how we prefix our functions with pnet_ to avoid naming collisions with other plugins.
/**
 * Function to create custom user role on theme activation.
 */
function pnet_add_client_manager_role() {
    // Define the unique slug and display name
    $role_slug = 'client_manager';
    $display_name = 'Client Manager';

    // Define the specific capabilities
    $capabilities = array(
        'read'                   => true,
        'edit_posts'             => true,
        'delete_posts'           => true,
        'publish_posts'          => true,
        'upload_files'           => true,
        'edit_pages'             => true,
        'publish_pages'          => true,
        'edit_others_posts'      => true,
        'edit_others_pages'      => true,
        'manage_categories'      => true,
        // Explicitly deny sensitive administrative capabilities
        'switch_themes'          => false,
        'edit_themes'            => false,
        'activate_plugins'       => false,
        'edit_plugins'           => false,
        'edit_users'             => false,
        'delete_users'           => false,
        'manage_options'         => false,
    );

    // Add the role to the database
    $result = add_role( $role_slug, $display_name, $capabilities );

    // Optional: Log the result for debugging
    if ( null !== $result ) {
        error_log( 'Client Manager role created successfully.' );
    } else {
        error_log( 'Client Manager role already exists.' );
    }
}

// Hook into theme activation
add_action( 'after_switch_theme', 'pnet_add_client_manager_role' );
If you need to create custom user role profiles for a custom post type (CPT), ensure your CPT registration includes 'map_meta_cap' => true and specific capability types, then add those specific capabilities (e.g., edit_portfolio_items) to the array above.
You might also like: WordPress enqueue scripts and styles: Best Practices for Developers (2026)
Step 4: Managing, Updating, and Removing Roles
A common pitfall developers encounter when they create custom user role logic is failing to plan for the future. What happens if you need to add a new capability to the “Client Manager” six months from now? Because add_role() does nothing if the role already exists, simply updating the array in your activation hook won’t apply the changes to existing sites.
Updating Capabilities Dynamically
To update an existing role, you must fetch the role object using get_role() and then use the add_cap() or remove_cap() methods. If you are pushing an update, you can hook this into an upgrade routine or a one-time admin init check (using an option flag to ensure it only runs once).
Pro Tip
admin_init just to force the database to refresh, but remember to remove this before pushing to production! Cleaning Up with remove_role
Good citizenship in WordPress development dictates that if your plugin or theme is uninstalled, you should clean up the database. You can remove a role using the remove_role() function. Be careful: any users currently assigned to that role will fall back to having no role (and thus, zero permissions on the site) unless you programmatically migrate them to a default role like Subscriber first.
/**
 * Function to clean up the custom role on theme deactivation.
 */
function pnet_remove_client_manager_role() {
    // Remove the role from the wp_options table
    remove_role( 'client_manager' );
}

add_action( 'switch_theme', 'pnet_remove_client_manager_role' );
Common Errors and Troubleshooting
Even seasoned developers run into issues when manipulating WordPress permissions. Here are the most frequent problems encountered when attempting to create custom user role setups, and exactly how to resolve them.
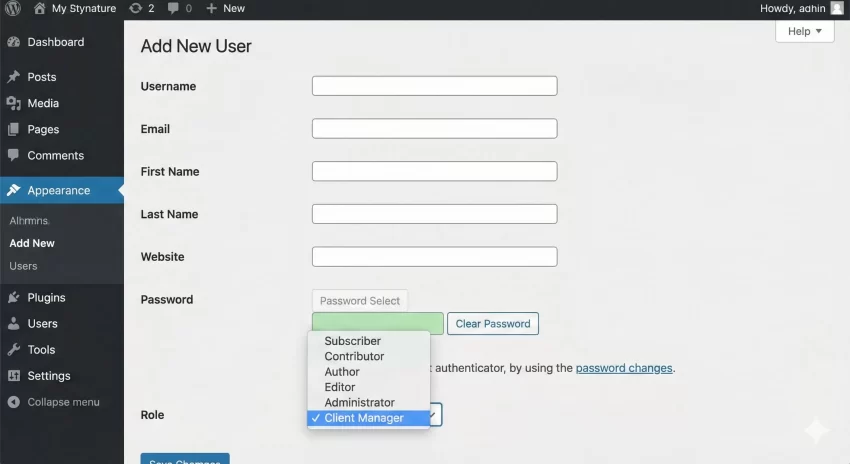
Why is my custom role not showing up in the user dropdown?
If you wrote the code but the role is invisible in the wp-admin/user-new.php dropdown, the code most likely did not execute. If you used an activation hook, you must actually deactivate and reactivate your theme or plugin to trigger the function. The database is not updated just by saving the PHP file.
How do I remove capabilities from an existing custom role?
You cannot use add_role() to overwrite existing capabilities. You must retrieve the role object and explicitly call the remove method. For example: $role = get_role( 'client_manager' ); $role->remove_cap( 'delete_posts' );. This change will be written to the database immediately.
Will the custom role be deleted if I deactivate the theme?
No, not automatically. Because the role is saved in the database, it persists regardless of the active theme or plugin. It will only be deleted if you explicitly write a function using remove_role() and hook it to the deactivation or uninstall routines, as demonstrated in Step 4.
You might also like: How to Create Custom WordPress Shortcode for Dynamic Data: Unlock Hidden Power
Conclusion: Taking Control of Your Access Management
Relying on default user groups is a recipe for security vulnerabilities and frustrated clients. By using the programmatic methods outlined above, you can safely create custom user role configurations that perfectly align with your project’s unique requirements. We started by understanding the database architecture, properly utilized activation hooks to protect server performance, wrote the exact PHP array needed to define precise capabilities, and covered the necessary cleanup routines.
By keeping this logic in your code rather than relying on heavy plugins, your WordPress builds will remain fast, secure, and fully under your control as a developer. Keep your capability arrays organized, always backup your database before manipulating roles, and your custom permission systems will work flawlessly.