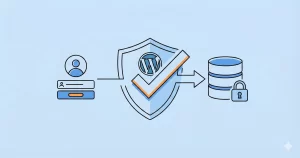
We have all been there. You land on a website ready to sign up or request a quote, but you are immediately greeted by a wall of text boxes. It is intimidating, it is exhausting, and for many users, it is a reason to click the “Back” button immediately. If you are struggling with high abandonment rates on your long forms, the solution might be simpler than you think: a WordPress Multi-Step Form.
Splitting a long, complex form into bite-sized, manageable chunks isn’t just a design trend; it is a psychological hack. It reduces cognitive load, making the process feel faster and easier, even if the amount of data collected is exactly the same. As developers, we often default to heavy form plugins to achieve this, but sometimes, a lightweight, custom solution is exactly what the project demands for performance and flexibility.
In this guide, I will walk you through creating a custom WordPress Multi-Step Form from scratch. We will build a sleek, AJAX-powered form that uses jQuery for smooth transitions and PHP for secure processing. Whether you are building a quote engine, a registration flow, or a complex survey, this guide will give you the foundation you need.
Why You Should Use a WordPress Multi-Step Form
Before we dive into the code, let’s understand why this effort is worth it. A WordPress Multi-Step Form does more than just look good—it fundamentally changes how users interact with your site.
First, it leverages the “Sunk Cost Fallacy.” By getting a user to fill out a few simple fields in Step 1 (like their name or industry), they have already “invested” in the process. They are statistically far more likely to complete Step 2 and Step 3 than if they saw all 20 fields at once. Second, it allows you to categorize information logically. Grouping “Personal Info,” “Business Details,” and “Project Requirements” into separate slides helps the user maintain focus.
Furthermore, from a technical SEO and performance standpoint, coding this yourself ensures you aren’t loading 500KB of unused CSS and JS libraries just to render a single form. We are going to keep this lightweight.
Prerequisites and Setup
To follow along with this tutorial, you should be comfortable editing your theme files. Ideally, you should be working in a child theme to prevent your changes from being overwritten during updates. We will be using:
- HTML5 for the structure.
- CSS3 for the styling and progress bar.
- jQuery for the step transitions (standard in WordPress).
- PHP for handling the AJAX submission.
We will encapsulate our logic in a custom plugin structure or your theme’s functions.php file. For this guide, I will use the function prefix pnet_ to keep our namespace clean and avoid conflicts.
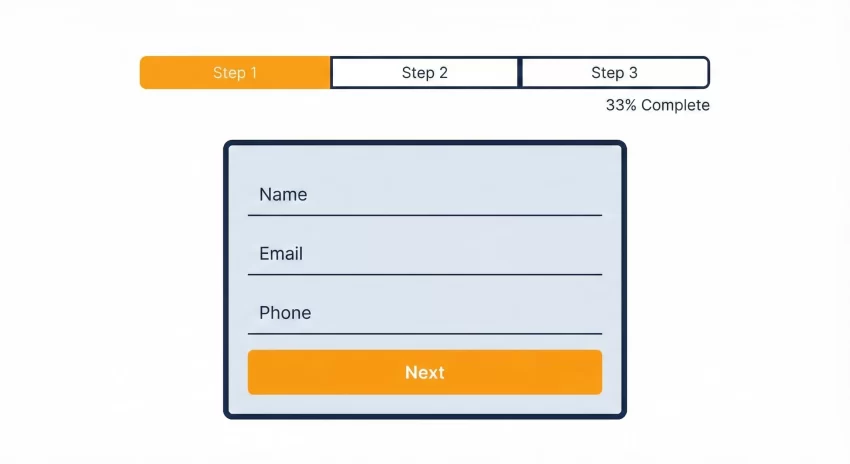
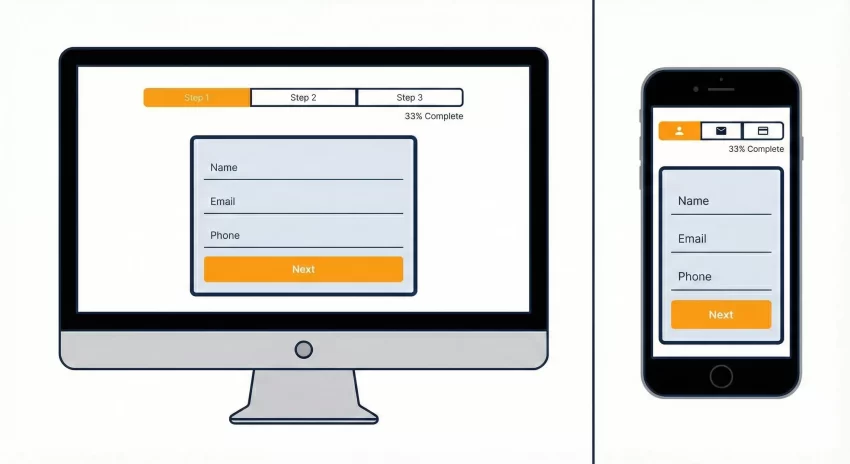
Step 1: The HTML Structure
The core of a WordPress Multi-Step Form is the container. We need a wrapper, a progress bar to give users visual feedback, and separate “fieldsets” for each step. Since standard HTML forms don’t support “pages,” we will simulate this by grouping inputs into div containers and toggling their visibility.
Here is the HTML structure. You can place this inside a shortcode function to display it anywhere on your site.
function pnet_multistep_form_shortcode() {
    ob_start();
    ?>
    <div id="pnet_form_wrapper">
        <ul id="pnet_progressbar">
            <li class="active">Account Setup</li>
            <li>Social Profiles</li>
            <li>Details</li>
        </ul>

        <form id="pnet_multistep_form" action="#" method="POST">

            <fieldset class="pnet_step_active">
                <h3>Create your account</h3>
                <input type="text" name="email" placeholder="Email" />
                <input type="password" name="pass" placeholder="Password" />
                <input type="password" name="cpass" placeholder="Confirm Password" />
                <input type="button" name="next" class="next action-button" value="Next" />
            </fieldset>

            <fieldset>
                <h3>Social Profiles</h3>
                <input type="text" name="twitter" placeholder="Twitter" />
                <input type="text" name="facebook" placeholder="Facebook" />
                <input type="button" name="previous" class="previous action-button" value="Previous" />
                <input type="button" name="next" class="next action-button" value="Next" />
            </fieldset>

            <fieldset>
                <h3>Personal Details</h3>
                <input type="text" name="fname" placeholder="First Name" />
                <input type="text" name="lname" placeholder="Last Name" />
                <input type="text" name="phone" placeholder="Phone" />
                <textarea name="address" placeholder="Address"></textarea>
                <input type="button" name="previous" class="previous action-button" value="Previous" />
                <input type="submit" name="submit" class="submit action-button" value="Submit" />
            </fieldset>

        </form>
        <div id="pnet_form_message"></div>
    </div>
    <?php
    return ob_get_clean();
}
add_shortcode('pnet_multi_form', 'pnet_multistep_form_shortcode');
Understanding the Structure
Note that we are using fieldset tags. While technically standard HTML tags, we will treat them as slides. Only the first fieldset has the class pnet_step_active. All others will be hidden via CSS initially. This setup is crucial for the WordPress Multi-Step Form to function correctly.
You might also like:
Step 2: Styling with CSS
Now, let’s make it look professional. We need to hide the inactive steps and style the progress bar. We will use absolute positioning to stack the fieldsets on top of each other, ensuring smooth animations when we switch between them.
/* Hide all fieldsets except the first one */
#pnet_multistep_form fieldset {
    background: white;
    border: 0 none;
    border-radius: 3px;
    box-shadow: 0 0 15px 1px rgba(0, 0, 0, 0.4);
    padding: 20px 30px;
    box-sizing: border-box;
    width: 80%;
    margin: 0 10%;
    position: relative;
    display: none; /* Hidden by default */
}

/* Show the first fieldset */
#pnet_multistep_form fieldset.pnet_step_active {
    display: block;
}

/* Progress Bar Styling */
#pnet_progressbar {
    margin-bottom: 30px;
    overflow: hidden;
    counter-reset: step;
    text-align: center;
}

#pnet_progressbar li {
    list-style-type: none;
    color: #333;
    text-transform: uppercase;
    font-size: 9px;
    width: 33.33%;
    float: left;
    position: relative;
}

#pnet_progressbar li.active {
    color: #FCA311; /* Orange Highlight */
    font-weight: bold;
}
The CSS above is minimal. You will likely want to add more styling to match your theme’s typography and button styles. The key takeaway here is display: none on the fieldsets, which our JavaScript will toggle shortly.
Step 3: The JavaScript Logic
This is where the magic happens. We need to listen for clicks on the “Next” and “Previous” buttons. When a user clicks “Next,” we validate the current step (optional but recommended), fade it out, and fade in the next step. We also need to update the progress bar to reflect the current stage of the WordPress Multi-Step Form.
We will enqueue this script using wp_enqueue_script and pass our AJAX URL using wp_localize_script.
jQuery(document).ready(function($) {
    var current_fs, next_fs, previous_fs; // Fieldsets

    $(".next").click(function(){
        current_fs = $(this).parent();
        next_fs = $(this).parent().next();

        // Activate next step on progressbar
        $("#pnet_progressbar li").eq($("fieldset").index(next_fs)).addClass("active");

        // Show the next fieldset
        next_fs.show();
        // Hide the current fieldset
        current_fs.hide();
    });

    $(".previous").click(function(){
        current_fs = $(this).parent();
        previous_fs = $(this).parent().prev();

        // De-activate current step on progressbar
        $("#pnet_progressbar li").eq($("fieldset").index(current_fs)).removeClass("active");

        // Show the previous fieldset
        previous_fs.show();
        // Hide the current fieldset
        current_fs.hide();
    });

    // Handle Form Submission via AJAX
    $("#pnet_multistep_form").submit(function(e) {
        e.preventDefault();
        var formData = $(this).serialize();

        $.ajax({
            type: 'POST',
            url: pnet_ajax_obj.ajax_url,
            data: formData + '&action=pnet_process_form',
            success: function(response) {
                $("#pnet_form_message").html(response.data);
                $("#pnet_multistep_form").hide();
            },
            error: function() {
                $("#pnet_form_message").html("An error occurred.");
            }
        });
    });
});
You might also like:
Step 4: Processing the Data with PHP
The final piece of the puzzle is handling the data once the user hits “Submit” on the final step of your WordPress Multi-Step Form. Since we are using AJAX, we need to hook into WordPress’s AJAX actions.
We will create a function pnet_process_form. This function should sanitize the input, validate the data (never trust user input!), and then perform your desired action, such as sending an email or saving the entry to the database.
add_action('wp_ajax_pnet_process_form', 'pnet_process_form');
add_action('wp_ajax_nopriv_pnet_process_form', 'pnet_process_form');

function pnet_process_form() {
    // 1. Verify Nonce (Security Best Practice - highly recommended to add)

    // 2. Sanitize Inputs
    $email = sanitize_email($_POST['email']);
    $fname = sanitize_text_field($_POST['fname']);
    $lname = sanitize_text_field($_POST['lname']);

    // 3. Process Data (Example: Send Email)
    $to = get_option('admin_email');
    $subject = 'New Multi-Step Form Submission';
    $message = "Name: $fname $lname \nEmail: $email";

    wp_mail($to, $subject, $message);

    // 4. Send Response
    wp_send_json_success('Thank you! Your form has been submitted successfully.');
}
Tip: Stop Email Failures: The Ultimate WordPress SMTP Configuration Guide
Optimizing for Mobile Devices
When building a WordPress Multi-Step Form, mobile responsiveness is often where custom code fails. A long progress bar might break on a small screen. To fix this, consider using CSS Media Queries to stack the progress bar items vertically or hide the text labels on screens smaller than 600px, showing only step numbers.
Additionally, ensure your “Next” and “Previous” buttons have enough touch padding. Nothing frustrates a mobile user more than trying to tap “Next” and accidentally hitting a different link.
Common Pitfalls to Avoid
As you implement this, keep an eye out for these common issues:
- Validation Errors: Since we are hiding fieldsets, HTML5 validation (like `required`) sometimes acts strictly on visible fields or prevents submission if a hidden field is invalid. You may need to add custom JS validation before allowing the user to click “Next”.
- Enter Key Submission: By default, pressing “Enter” in a form triggers the submit button. On a multi-step form, this might submit the form before the user reaches the last step. You should disable the “Enter” key trigger via JavaScript.
- Data Loss: If a user refreshes the page, they lose their progress. Advanced implementations use LocalStorage to save the user’s spot in the WordPress Multi-Step Form.
Conclusion
Creating a WordPress Multi-Step Form doesn’t require an expensive annual license for a premium plugin. With a little bit of HTML, CSS, and jQuery, you can build a highly performant, custom solution that fits your specific needs perfectly. By breaking down the user journey, you create a less daunting experience that encourages users to complete the process, ultimately driving more leads for your business.
Ready to implement this? Start by copying the HTML structure into your local environment and playing with the CSS. Once you master the basic flow, the possibilities for customization are endless.