
A manually entered date in an Elementor template can go stale, leaving you to update it wherever it appears. You can avoid that repeated maintenance by adding a reusable Elementor Dynamic Tags value in a small site plugin, then selecting it from a compatible dynamic-tag control in the editor. This guide builds a current-date tag that follows the timezone configured in WordPress, with a format setting you can adjust for different displays.
The tag works only in controls that support dynamic tags; availability varies by Elementor version and feature, and some controls may require Elementor Pro. You will create and register the tag in your own plugin rather than modifying Elementor or your theme. Test the change on staging or a development site before using it on a live site.
- A WordPress development or staging site running a current, supported PHP version.
- Elementor installed and active; confirm that your chosen editor control supports dynamic tags and check whether it requires Pro.
- Permission to create a small custom plugin in
wp-content/pluginsor a site-specific must-use plugin. - A recent backup, or a disposable staging environment, before testing PHP changes.
- Basic familiarity with PHP classes, WordPress hooks, and editing a page in Elementor.
Step 1: Choose a Safe Plugin Location
Put the custom date tag in a small site-specific plugin, not in Elementor core or your active theme. Elementor updates can overwrite core changes, while a theme change can remove code stored in a theme file. A plugin keeps this functionality available independently of the site design and gives you one clear place to maintain it.
For this guide, create a dedicated directory such as wp-content/plugins/pnet-elementor-current-date/. The simplest version can use one main plugin file, pnet-elementor-current-date.php, for its plugin header, dependency checks, and registration callback. As the implementation grows, move the tag class into a separate file, for example includes/class-pnet-elementor-current-date-tag.php, and load it from the main file. Keep the class file loaded before registering the tag.
This separation also makes graceful failure easier: the plugin should check that Elementor and the required dynamic-tag API are available before it tries to load or register the tag. If Elementor is inactive, the rest of WordPress should continue working without a fatal error. Avoid editing a parent theme or placing this feature in a theme-specific functions file.
For Developers
pnet_ prefix to reduce the chance of collisions with other plugins. Create and Activate the Plugin
Create a folder named pnet-elementor-current-date inside wp-content/plugins/, then add a file named pnet-elementor-current-date.php. This is the plugin entry point; the tag class and Elementor registration code will be added to it in the following steps. Keeping the work in its own plugin means a theme change will not remove the feature.
Add this complete starter file. Its helper safely checks whether Elementor is available, and can be used by the registration code added next.
<?php
/**
* Plugin Name: PNET Elementor Current Date
* Description: Adds a reusable current-date dynamic tag to Elementor.
* Version: 1.0.0
* Requires at least: 6.0
* Requires PHP: 8.0
* Author: PixelNet
* License: GPL-2.0-or-later
*/
if (!defined('ABSPATH')) {
exit;
}
function pnet_elementor_current_date_is_available() {
return class_exists('Elementor\Plugin');
}
Save the file, then open Plugins in the WordPress dashboard and activate PNET Elementor Current Date. The helper does not register a tag yet; it provides a safe dependency check for the implementation. Do not paste this code into Elementor core or a parent-theme file. If WordPress reports a PHP error, deactivate the plugin through the dashboard or file manager and correct the file before continuing.
Step 2: Implement the Current-Date Tag
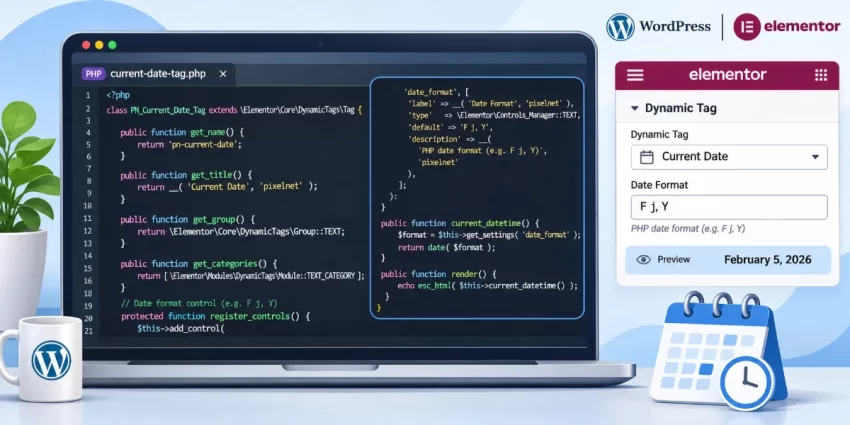
Add the tag class to the plugin file, after the starter code. Elementor uses its dynamic-tag base class and the methods below to identify the tag, place it in the editor, and render its value. The site group makes it available with site-related tags; the text category indicates that it returns text.
class PNET_Elementor_Current_Date_Tag extends \Elementor\Core\DynamicTags\Tag {
    public function get_name() {
        return 'pnet-current-date';
    }

    public function get_title() {
        return esc_html__('Current Date', 'pnet-elementor-current-date');
    }

    public function get_group() {
        return 'site';
    }

    public function get_categories() {
        return [\Elementor\Modules\DynamicTags\Module::TEXT_CATEGORY];
    }

    protected function register_controls() {
        $this->add_control('date_format', [
            'label' => esc_html__('Date Format', 'pnet-elementor-current-date'),
            'type' => \Elementor\Controls_Manager::TEXT,
            'default' => 'F j, Y',
            'label_block' => true,
        ]);
    }

    public function render() {
        $format = $this->get_settings('date_format');
        $format = is_string($format) && $format !== '' ? $format : 'F j, Y';
        echo esc_html(current_datetime()->format($format));
    }
}
get_name() supplies a unique internal identifier, while get_title() is the label editors see. get_group() and get_categories() determine where Elementor lists the tag and which compatible controls can use it. The format control defaults to F j, Y; PHP date-format tokens let you customize the displayed date. In render(), current_datetime() uses the WordPress site timezone, and esc_html() safely outputs the result as text. See the WordPress current_datetime() reference.
Add the Format Control
The register_controls() method in the tag class adds a text field to the tag settings, so editors can choose a display format without creating a separate tag for each variation. The control uses the label Date Format, the internal setting name date_format, and the default value F j, Y. For example, that default displays a date like June 18, 2025.
In render(), retrieve the saved value with $this->get_settings('date_format'). Use the default when the setting is missing or empty, as in the class above. This fallback helps ensure the tag still returns a date if an editor clears the field or older widget data does not contain the setting.
Format tokens follow PHP date formatting: F is the full month name, j is the day without a leading zero, and Y is the four-digit year. For a numeric month and padded day, for example, use m/d/Y. The field accepts a format string; it does not validate that the string represents a particular calendar format. Keep the rendered value as text and pass it through esc_html(), as shown, rather than outputting editor-provided markup.
Step 3: Register the Tag with Elementor
The class now defines the tag, but Elementor will not list it until you connect it to Elementor’s dynamic-tag registry. Add the following code after the class definition in your plugin’s main file. It hooks into elementor/dynamic_tags/register and registers a new instance of the class you created in the previous step.
function pnet_register_current_date_tag($dynamic_tags) {
    if (!class_exists('Elementor\Core\DynamicTags\Tag')) {
        return;
    }

    if (!class_exists('PNET_Elementor_Current_Date_Tag')) {
        return;
    }

    $dynamic_tags->register(new PNET_Elementor_Current_Date_Tag());
}
add_action('elementor/dynamic_tags/register', 'pnet_register_current_date_tag');
The checks prevent registration if Elementor’s tag API or your class is unavailable. If you keep the class in the main plugin file, place this block after its definition. If you move the class to includes/class-pnet-elementor-current-date-tag.php, load that file with require_once before adding the registration callback. Do not declare the class before Elementor’s base class is available; otherwise, a site without Elementor may encounter a PHP fatal error.
Confirm the Registration Hook and Dependencies
Save the plugin and confirm Elementor is active. The hook passes its dynamic-tag manager to the callback, and register() adds the tag instance to the editor’s registry. For details on the integration point, see the official Elementor Dynamic Tags developer guide.
The tag appears only in controls that support dynamic tags; availability can depend on the Elementor version and license. If it is missing, check that the plugin is active, the class file loads successfully, and your PHP error log contains no errors.
You might also like:

Confirm the Registration Hook and Dependencies
Before testing the picker, verify that the tag class is loaded before Elementor fires elementor/dynamic_tags/register. If the class is stored in a separate file, include it with require_once from the main plugin file and make sure that include runs before the registration callback is added. Keep the tag class declaration behind a dependency check so PHP never tries to extend Elementor’s base class when Elementor is unavailable.
Registration should also confirm that Elementor\Core\DynamicTags\Tag exists before creating the tag instance. Elementor’s APIs and available dynamic-tag controls can vary by version and license, so a registered tag may still be absent from a particular field. Test it in a control with a dynamic-tag picker; some controls or features may require Elementor Pro.
For Developers
Did you know: You can explore our complete guide on add custom fonts to WordPress for step-by-step details.
Step 4: Select and Test the Tag in the Elementor Editor
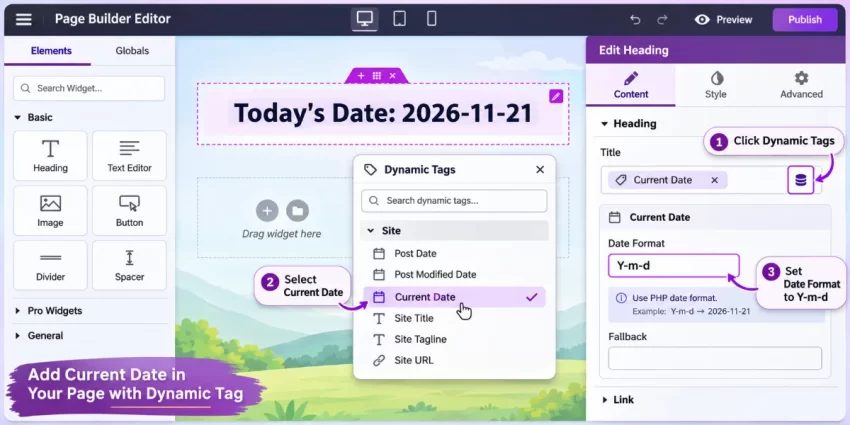
Open the page or template you want to edit in Elementor, then select a widget with a field that supports dynamic tags. A Heading or Text Editor field may work, but availability depends on the specific control, Elementor version, and license. Look for the dynamic-tag icon beside the field; if it is not present, choose another compatible control rather than assuming the plugin registration failed.
Click the dynamic-tag icon and find Current Date in the tag picker. Select it to attach the tag to that field. In the tag settings, enter a recognizable test format such as Y-m-d, which displays the year, month, and day numerically. Preview the page in Elementor and confirm the result is a date. Then preview or publish the page and compare the front-end output with the editor preview.
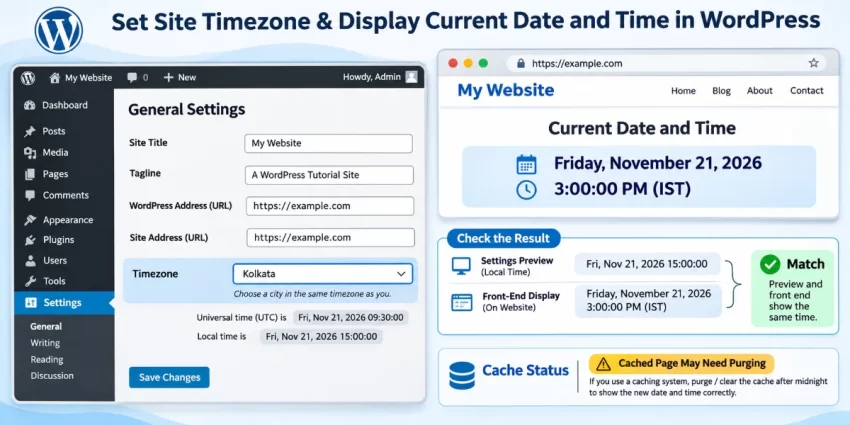
The displayed date should follow the timezone configured in WordPress because the tag uses current_datetime(). If the editor preview and published page differ, first confirm the selected format and check for errors. A cached front-end page may continue showing its previous rendered date after midnight; purge the relevant page or CDN cache before retesting. The tag updates when the page is rendered, but caching can delay when visitors see the new value.
Step 5: Verify Timezone, Output, and Caching
Confirm the site timezone in the WordPress dashboard under Settings > General. Use a test format such as Y-m-d H:i to make the date and time easy to compare, then check the Elementor preview and the published page. The displayed time should match the site timezone, not necessarily the server timezone. Once testing is complete, change the tag format to the presentation you want visitors to see.
If the editor preview and front end disagree, check whether full-page caching, a caching plugin, a host-level cache, or a CDN is serving an older rendered page. Clear the relevant caches and reload the page. Object caching may affect data used to build a response, while page and CDN caching can preserve the rendered output itself. A server-rendered tag normally reflects the time when WordPress renders the page; it does not update in a visitor’s browser by itself. If a cached page is created before midnight and retained afterward, visitors may continue seeing yesterday’s date until that cache expires or is purged.
Common Errors: Troubleshoot Missing or Incorrect Dates in Elementor Dynamic Tags
If the date tag does not behave as expected, check the registration path first, then verify the selected control and rendered output. These checks usually reveal whether the issue is in plugin loading, Elementor compatibility, date formatting, or caching.
- The tag is missing from the picker: Confirm the plugin is active, the tag class file loads before registration, and the callback is attached to
elementor/dynamic_tags/register. Check that Elementor is active and that the chosen editor control supports dynamic tags; some controls require Elementor Pro. - A fatal error mentions the tag base class: The class may be declared before Elementor is available. Guard the class declaration and registration with checks for the required Elementor classes, and verify that the installed version provides the API used by the plugin.
- The tag appears but renders nothing: Confirm that
render()runs, that the control setting is nameddate_formatin both registration and retrieval, and that the widget has saved settings. Review the PHP error log for notices or exceptions. - The date is different from local time: Check the timezone under Settings > General. Use
current_datetime()rather than PHP server-time functions so WordPress site timezone settings apply. - The live page shows yesterday: Purge page, host, and CDN caches. A cached response may remain unchanged past midnight until it expires or is cleared.
- Unexpected markup or characters appear: Keep the output as plain text, escape it with
esc_html(), and do not echo untrusted HTML from the format setting.
You might also like:

Conclusion: Reuse a WordPress-Aware Current Date
A manually maintained date can quickly become stale when it is repeated across Elementor pages or templates. A small site-specific plugin solves that problem by registering a reusable current-date tag through Elementor’s dynamic-tag hook. Once selected in a compatible editor control, the tag renders the date automatically whenever WordPress builds the page, without requiring edits to Elementor core or your theme.
The essential details are straightforward but important: load the tag class safely, register it only when Elementor’s API is available, use current_datetime() to respect the WordPress site timezone, and escape the rendered value with esc_html(). Test the tag in the editor and on the published front end, and remember that page or CDN caching can delay a date change around midnight. You can extend the plugin with a small set of predefined formats or adapt the same pattern to another site-specific value. Used this way, Elementor Dynamic Tags make routine content more consistent while keeping the implementation maintainable.