
An external app that needs protected WordPress REST API resources cannot safely rely on a person’s regular account password. For secure WordPress REST API Authentication, create a dedicated integration user, issue an Application Password for that app, and send it with HTTP Basic Authentication over HTTPS. This keeps the integration credential separate from the user’s everyday login.
This guide covers user permissions, creating and storing the credential, making a PHP request, protecting the connection, and diagnosing common failures. Application Passwords are individually revocable, but they do not grant extra access: the integration user’s WordPress capabilities still determine which REST API actions succeed. Before you begin, make sure you have:
- A WordPress 5.6 or later site where Application Passwords are available and the REST API is reachable.
- HTTPS working for the site URL; never send an Application Password over plain HTTP.
- Administrator access to create or select a dedicated integration user and manage its capabilities.
- PHP 8.0+ with the cURL extension for the example client, or an equivalent HTTP client in your external app.
- A backup or staging site for testing any integration that will create or modify content.
- The target REST API route, its HTTP method, and the minimum capabilities needed for the intended operation.
Confirm the site and integration requirements
Before creating credentials, confirm that the site can support Application Passwords and that the external client can reach the intended REST API route. Application Passwords are built into WordPress 5.6 and later, but a site-level policy, hosting configuration, or user-specific filter may disable them. Check the WordPress version and verify that the feature is available for the integration user.
Test the exact canonical HTTPS site URL, including any subdirectory, and confirm that its certificate is valid. A reverse proxy, firewall, or security plugin may block REST requests or remove the Authorization header; identify those layers early rather than weakening TLS protections. Do not send credentials over plain HTTP, even for a quick test.
Next, identify the route, HTTP method, and action the app needs. For example, reading a resource and creating or editing content can require different capabilities. Check that the route is registered and reachable, and plan to test with the smallest appropriate request. A successful REST API Authentication exchange identifies the WordPress user; it does not grant permission by itself. WordPress authorization checks and the user’s capabilities still decide whether each operation is allowed. This distinction helps you choose a least-privilege account instead of granting broad access just to make a request succeed.
Create a dedicated WordPress integration user
In the WordPress dashboard, go to Users > Add New and create an account named for the integration, such as inventory-sync or reporting-service. Use an email address controlled by your organization, and do not reuse a personal administrator account. This separate identity makes it easier to audit the app’s activity, adjust its access, and disable it without affecting a person’s account.
Assign the lowest role that supports the app’s exact tasks. A read-only integration may need no elevated role, while creating posts, editing existing posts, and uploading media can require different capabilities. Managing users is a separate, sensitive permission and should not be granted unless the integration genuinely performs that work. If the built-in roles do not fit, use a carefully defined custom role with only the required capabilities.
Least Privilege
Use a strong, unique account password for the user itself, then keep its login credentials restricted to administrators. The external app will receive a separate Application Password in the next step, so its access can be revoked independently without changing the user’s normal account password.
Did you know: You can Preload Critical CSS to prioritize essential stylesheets for individual page layouts, reduce rendering delays, and improve WordPress loading performance.
Generate an Application Password
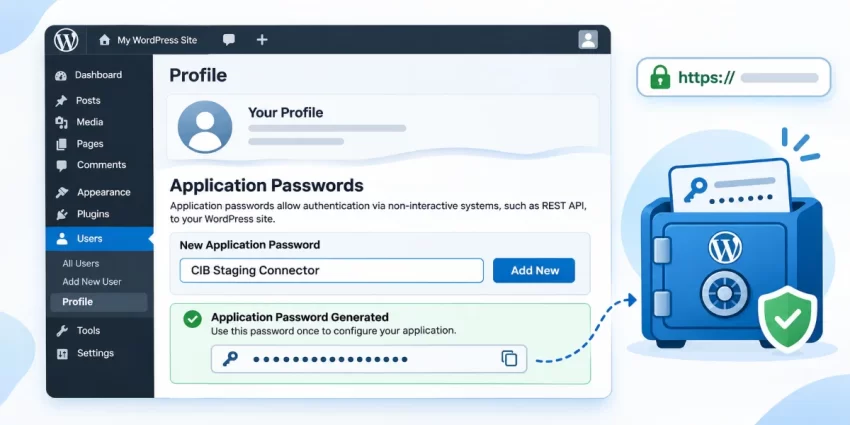
Sign in to the WordPress dashboard with an account that can manage users, then open Users and select the dedicated integration user. On that user’s profile, scroll to the Application Passwords section. Enter a clear label that identifies the external app and its purpose, such as Inventory Sync Production, then select Add New Application Password.
WordPress displays the generated password once. Copy it immediately into your organization’s approved secrets manager; do not put it in a ticket, email, source code, or a browser-side app. The displayed value may contain spaces for readability, so remove those display-only spaces when configuring a client if required. WordPress stores a hash of the credential rather than the usable plaintext password. Each named Application Password is separate and can be revoked from the same profile without changing the user’s main password.
If the section is missing, confirm that the site runs WordPress 5.6 or later and that the profile is accessed through HTTPS. Then check whether a site or user policy, security plugin, host, or other filter disables Application Passwords, and whether the integration user is allowed to use them. The official WordPress REST API authentication guide describes the feature and its requirements.
Prepare the external client credentials
Configure the external service to read the integration username, Application Password, and canonical site URL from server-side environment variables or a managed secrets store. Keep these values out of source control, browser JavaScript, URLs, and diagnostic logs. Use the site’s final HTTPS address, including any WordPress subdirectory, so requests do not need to follow redirects.
WordPress may show the generated password with spaces between groups for readability. Remove those display-only spaces when setting the secret. The following PHP 8.0+ helper loads the values, checks that required settings are present, and rejects a non-HTTPS site URL without printing secrets:
 $siteUrl,
        'username' => $username,
        'app_password' => $password,
    ];
}

$config = pnet_load_wp_api_config();
Set the three environment variables in the hosting platform’s protected configuration, not in a committed .env file. A browser-based app must never receive a reusable Application Password; send its requests through a protected server-side service instead.
Server-side secrets
Send an authenticated REST API request
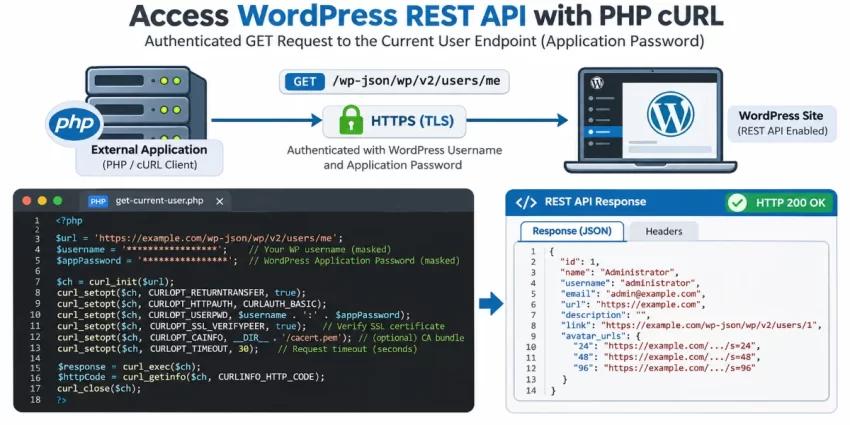
Application Passwords use HTTP Basic Authentication: send the integration username and generated Application Password, not the user’s ordinary account password. This PHP client builds a REST URL beneath the configured site, accepts a route, method, and optional JSON payload, and returns the status and response without exposing credentials.
 true,
        CURLOPT_USERPWD => $username . ':' . $password,
        CURLOPT_HTTPAUTH => CURLAUTH_BASIC,
        CURLOPT_HTTPHEADER => $headers,
        CURLOPT_CUSTOMREQUEST => $method,
        CURLOPT_SSL_VERIFYPEER => true,
        CURLOPT_SSL_VERIFYHOST => 2,
        CURLOPT_CONNECTTIMEOUT => 10,
        CURLOPT_TIMEOUT => 30,
        CURLOPT_FOLLOWLOCATION => false,
    ];

    if ($payload !== null) {
        $json = json_encode($payload, JSON_THROW_ON_ERROR);
        $options[CURLOPT_HTTPHEADER] = ['Accept: application/json', 'Content-Type: application/json'];
        $options[CURLOPT_POSTFIELDS] = $json;
    }

    $handle = curl_init($url);
    if ($handle === false) {
        throw new RuntimeException('Could not initialize the HTTP client.');
    }

    curl_setopt_array($handle, $options);
    $body = curl_exec($handle);
    if ($body === false) {
        $error = curl_error($handle);
        curl_close($handle);
        throw new RuntimeException('WordPress API request failed: ' . $error);
    }

    $status = (int) curl_getinfo($handle, CURLINFO_HTTP_CODE);
    curl_close($handle);

    return [
        'status' => $status,
        'body' => $body,
        'json' => json_decode($body, true),
    ];
}

$result = pnet_wp_api_request($config, 'wp/v2/users/me');
The final line makes a safe initial GET request to the current-user route; the integration user must be permitted to access it. Check $result['status'] and the returned JSON rather than logging request headers or secrets. Credentials accompany each request, so HTTPS and certificate verification are essential. Redirects are deliberately not followed: investigate a redirect and configure the canonical HTTPS URL instead of sending credentials to an unexpected host.
You might also like:

Verify authentication and interpret the response
Check the HTTP status and decoded JSON returned by the client; never dump request headers, credentials, or the full cURL configuration. A successful response from wp/v2/users/me should contain information identifying the authenticated user, although fields can vary with the endpoint and site configuration. Confirm the identity matches the integration account before testing the specific route the app needs.
 $status,
            'authenticated' => true,
            'user_id' => $data['id'] ?? null,
            'user_name' => $data['name'] ?? null,
        ];
    }

    return [
        'status' => $status,
        'authenticated' => false,
        'error_code' => is_array($data) ? ($data['code'] ?? null) : null,
        'message' => is_array($data) ? ($data['message'] ?? 'Unexpected response.') : 'Response was not valid JSON.',
    ];
}

$identity = pnet_verify_wp_identity($config);
print_r($identity);
This reports only the status and selected response fields, not the password or Authorization header. A 200 indicates the read succeeded; verify the returned identity. A 401 usually means credentials are missing or rejected, while a 403 commonly means the user authenticated but lacks permission for that action. A 404 points to an incorrect route or unavailable resource. Inspect any REST error code and message, then test the least-privilege target endpoint. Successful identity verification validates WordPress REST API Authentication, but does not prove that every route or write operation is authorized.
Did you know: Query Strings on CSS and JavaScript files may affect how static resources are cached? Discover how WordPress Remove Query Strings can help optimize your WordPress site’s performance.
Create or update content through the REST API
After the identity check succeeds, test a write on staging or create a draft on the live site. The integration user must have the capabilities required to create or edit posts; valid credentials do not bypass WordPress authorization. This example uses the existing pnet_wp_api_request() client and sends content as JSON without putting credentials in the payload or URL.
 $title,
            'content' => $content,
            'status' => 'draft',
        ]
    );

    $post = $result['json'] ?? null;
    if ((int) ($result['status'] ?? 0) !== 201 || !is_array($post) || empty($post['id'])) {
        throw new RuntimeException(
            'WordPress did not create the draft. HTTP status: ' . (int) ($result['status'] ?? 0)
        );
    }

    return [
        'id' => (int) $post['id'],
        'status' => $post['status'] ?? null,
    ];
}

$createdPost = pnet_create_draft_post(
    $config,
    'Integration test draft',
    'Created through the WordPress REST API.'
);
A successful creation normally returns HTTP 201; check the returned post ID and status in the dashboard before proceeding. To update an existing post, use the same client with a route such as wp/v2/posts/123, the POST method, and only the fields being changed. Replace 123 with the real post ID. Editing can require different capabilities from creating; media uploads, custom post types, and plugin routes may also impose route-specific permission checks. Keep initial tests as drafts and never treat a successful read as proof that a write is authorized.
Harden and maintain the integration
Issue one Application Password for each external app, using a label that identifies its service and environment. Separate credentials make access easier to audit: if one app is retired or compromised, revoke only its password rather than disrupting other integrations. Store each secret in server-side environment configuration or a managed secrets vault, restrict who can read it, and redact it from application logs, exception reports, telemetry, and support tickets.
Keep HTTPS certificate and host verification enabled in the client. If a certificate check fails, fix the certificate chain or hostname configuration; do not disable TLS verification. Also avoid logging request headers, since the Basic Authentication header contains reusable credentials.
Plan a rotation procedure before production launch. Generate a replacement Application Password in the integration user profile, update the external service’s protected configuration, and verify a permitted request with the new credential. Once the replacement works, revoke the previous password from that profile. If exposure is suspected, revoke the affected credential immediately, then issue and configure a replacement; review access logs for unusual requests where available. Remove credentials when an integration is permanently decommissioned, and periodically review the profile for passwords that are no longer needed.
You might also like:
Common Errors
Diagnose failures by checking the HTTP status and WordPress REST API error response, then verify the URL, credential, and user permissions in that order. Do not log the Application Password or publish an Authorization header while investigating.
Application Passwords section is missing
Confirm the site runs WordPress 5.6 or later and that you are viewing the profile over HTTPS. A site or user filter, security plugin, hosting policy, or proxy configuration may disable Application Passwords. Check with the site administrator or hosting provider before changing security settings.
401 Unauthorized
Check that the username is correct and the client uses the generated Application Password, not the account login password. Remove display-only spaces from the credential, confirm it has not been revoked, and verify the request reaches the canonical HTTPS URL. If the credentials are correct, check whether a proxy or firewall strips the Authorization header.
403 Forbidden
Authentication may have succeeded, while the integration user lacks the capability required for the operation. Verify the user role, the endpoint permission callback, and whether the requested action needs additional access. A successful request to one route does not authorize every route.
404 Not Found
Check the REST route spelling, HTTP method, WordPress subdirectory, and whether the route is registered and available. Confirm the REST API is reachable and inspect the JSON error code and message.
Redirects and TLS errors
Use the final canonical HTTPS URL and check that its certificate is valid for the hostname. Do not disable certificate verification or follow an unexpected redirect to make a request work. If a credential was exposed during troubleshooting, revoke it and issue a replacement.
Conclusion
Connecting an external app securely starts with separating its identity from human accounts. Create a dedicated WordPress user with only the capabilities the integration needs, then generate a clearly named Application Password for that app. Configure the credential in server-side secret storage and send it only over HTTPS with certificate verification enabled. This gives the integration its own revocable credential without granting it extra access.
For a reliable rollout, first make a permitted read request and confirm the returned identity. Then test the required write operation with a draft or on staging, and use the HTTP status and REST error details to distinguish rejected credentials from missing permissions or an incorrect route. WordPress capabilities and endpoint rules remain the authority for what an authenticated user can do. Review credentials regularly, rotate them when needed, and revoke any that are exposed or no longer used. These practices provide a maintainable foundation for WordPress REST API Authentication.