In the evolving landscape of digital marketing, data is the currency that drives decision-making. Since Google sunset Universal Analytics, the urgency to Add GA4 to WordPress has become a critical task for every site administrator and developer. However, the path to integration isn’t always linear. While plugins promise a “one-click” fix, they often introduce bloat that a performance-minded developer strives to avoid.
This technical guide addresses the primary problem: How do you implement robust tracking without sacrificing site speed? Whether you prefer the automated ease of Google’s official tools or the lightweight precision of a custom code implementation, this guide covers it all. We will walk through the exact steps to Add GA4 to WordPress, comparing the Site Kit plugin method against a raw PHP implementation in your theme’s functions file. By the end of this tutorial, you will have a fully verified data stream sending events to your analytics dashboard.
Intermediate
Prerequisites for GA4 Integration
Before we dive into the code or configuration, ensure your environment is ready. Trying to Add GA4 to WordPress on an unstable environment can lead to tracking errors or data gaps.
- PHP 7.4 or higher: While WordPress runs on older versions, modern security standards (and Site Kit) function best on PHP 8.0+.
- Administrator Access: You need full permissions to install plugins or edit the
functions.phpfile. - Google Account: Access to the Google Analytics interface to generate your Measurement ID.
- Backup: Always create a full site backup before editing theme files.
- Child Theme: If using the code method, a child theme is mandatory to prevent your changes from being overwritten during updates.
Step 1: Create Your Google Analytics 4 Property
Regardless of the implementation method you choose (Plugin vs. Code), the first requirement is identical: you must have a valid Measurement ID from Google. This ID acts as the bridge between your WordPress site and Google’s servers. Without it, you cannot Add GA4 to WordPress successfully.
1.1 Setup the Property Stream
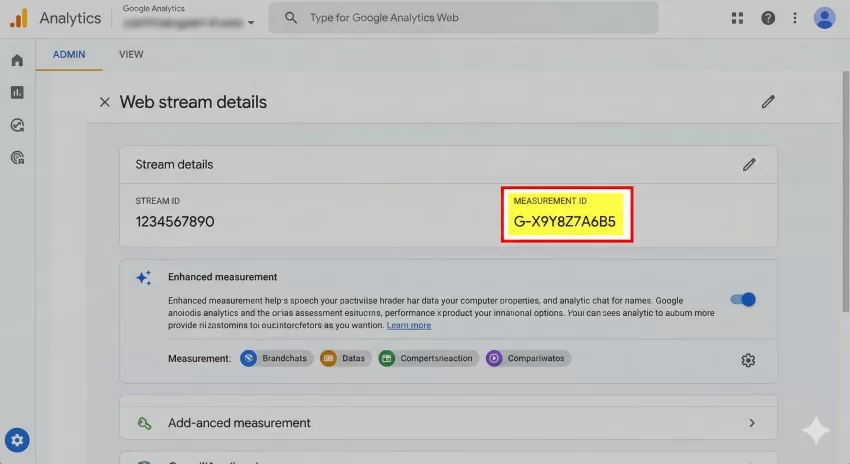
Navigate to your Google Analytics Admin panel. If you are creating a new account, Google defaults to GA4. If you are adding to an existing account, create a new property. Select “Web” as your platform.
Once you enter your website URL and stream name, Google will generate a “Web Stream.” This stream contains your unique Measurement ID, which typically starts with G-XXXXXXX. Copy this ID; we will need it for both methods below.
You might also like:

Step 2: Connect GA4 to WordPress (Two Methods)
Now that you have your Measurement ID, you must choose how to inject the tracking script into your site. This step is pivotal because it dictates your site’s long-term maintenance and performance. You do not need to do both options below; simply choose the one that fits your technical comfort level to Add GA4 to WordPress.
Option A (Site Kit) is best for users who want dashboard widgets and zero code. Option B (Manual Code) is the superior choice for developers who prioritize page speed, Core Web Vitals, and strict control over the DOM. Review both below and pick your path.
Option A: Using Google Site Kit (The No-Code Solution)
For users who prefer a dashboard integration that pulls data back into the WordPress admin, Google Site Kit is the official solution. It allows you to Add GA4 to WordPress without touching a single line of code. Go to Plugins > Add New, search for “Site Kit by Google,” and activate it.
Launch the setup wizard, sign in with your Google account, and grant permissions. Site Kit will detect your property from Step 1 and automatically insert the tag. It handles verification and updates automatically.
Option B: Manual Code Integration (The Performance Choice)
Developers often prefer to Add GA4 to WordPress manually to maintain total control. By injecting the script directly via functions.php, we ensure only the strictly necessary code is loaded. First, locate the “Global Site Tag” in your GA4 Admin under Data Streams > View tag instructions > Install manually.
Next, add the following function to your child theme’s functions.php file. We hook this into wp_head with a priority of 20 to ensure it doesn’t block critical CSS rendering.
Backup Required
/**
 * Add GA4 to WordPress Head manually.
 * * @author Your Name
 * @return void
 */
function pnet_add_ga4_analytics_code() {
    ?>
    <script async src="https://www.googletagmanager.com/gtag/js?id=G-XXXXXX"></script>
    <script>
      window.dataLayer = window.dataLayer || [];
      function gtag(){dataLayer.push(arguments);}
      gtag('js', new Date());

      gtag('config', 'G-XXXXXX');
    </script>
    <?php
}
add_action( 'wp_head', 'pnet_add_ga4_analytics_code', 20 );
You might also like:

Step 3: Verifying the Data Stream
After you Add GA4 to WordPress using either method in Step 2, you must verify that data is actually flowing. Caching plugins often delay the appearance of new code changes, leading to false negatives in testing.
3.1 Clear All Caches
If you use plugins like W3 Total Cache or WP Rocket, clear the page cache immediately. Also, if you are using a CDN like Cloudflare, purge the cache there as well.
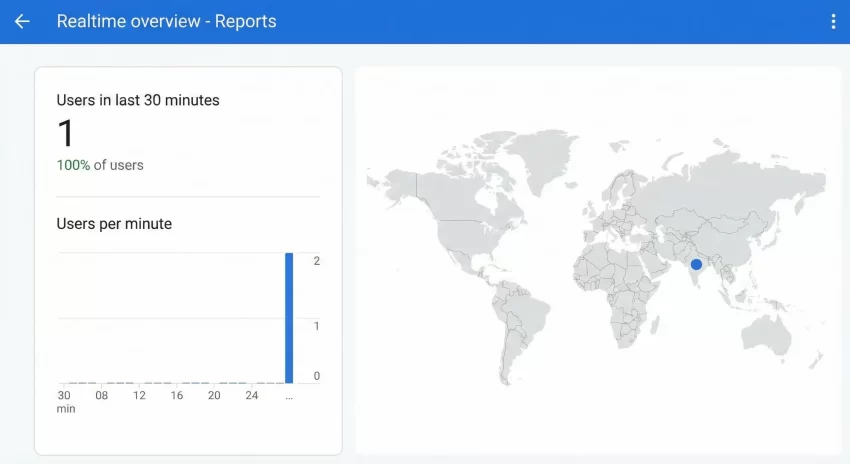
3.2 Use Realtime Reports
Open your website in an Incognito/Private window. Then, go to your Google Analytics dashboard and click on Reports > Realtime. If your installation is correct, you should see at least “1 User” active (which is you) within 30 seconds. This confirmation is the final step to successfully Add GA4 to WordPress.
Must Read: Easily Display Related Posts in WordPress: Boost Engagement Without Bloat
Common Troubleshooting Errors
Even for experienced developers, things can go wrong. Here are the most common issues encountered when attempting to Add GA4 to WordPress.
Q: Why is my Realtime report showing zero users?
A: This is usually a caching issue. Clear your server cache, plugin cache, and browser cache. Also, check if you have an ad-blocker extension installed in your browser, as these often block the gtag.js script from firing.
Q: Can I use both Site Kit and manual code?
A: No. You must choose one. If you Add GA4 to WordPress using both methods, you will double-count every page view, ruining your bounce rate and engagement data.
Pro Tip
Summary
We have explored the definitive workflow to Add GA4 to WordPress. We started by creating the property, then moved to Step 2 where you selected between the ease of Site Kit or the efficiency of manual code, and finally verified the data stream in Step 3.
By following this guide, you have ensured that your site is ready for the future of analytics. Whether you chose the path of the plugin or the precision of code, you can now Add GA4 to WordPress confidently and start gathering the insights that matter.