Are you finding that the default “Categories” and “Tags” just aren’t cutting it for your specific content needs? If you are running a portfolio, a movie database, or a recipe site, you likely need a better way to group your content. The solution is to create custom taxonomy in WordPress.
Organizing your content is not just about keeping things tidy in the backend; it is crucial for User Experience (UX) and SEO. When you effectively structure your data, you help search engines understand the hierarchy of your site, and you help visitors find exactly what they are looking for.
In this guide, we are going to explore two distinct paths. First, we will look at the beginner-friendly plugin method, which gets you up and running in minutes. Then, we will dive deep into the developer-focused manual coding method, giving you total control over your site’s structure without the bloat. By the end of this post, you will know exactly how to create custom taxonomy in WordPress for your specific project needs.
Understanding Custom Taxonomies: The Basics
What is a Taxonomy? Before we start building, let’s clarify what we are working with. In WordPress, a “taxonomy” is simply a way to group things together. The two default taxonomies you are used to are Categories (hierarchical) and Tags (non-hierarchical).
However, when you are using Custom Post Types (CPTs)—say, for a “Books” post type—you might need specific groups like “Genre” or “Author.” You wouldn’t want to mix these with your standard blog categories. This is where the ability to create custom taxonomy in WordPress becomes a superpower for your site architecture.
Hierarchical vs. Non-Hierarchical
When you decide to create custom taxonomy in WordPress, you have to choose between two styles:
- Hierarchical: These work like Categories. You can have parent and child terms. Example: Fiction > Sci-Fi.
- Non-Hierarchical: These work like Tags. They are flat labels with no parent/child relationship. Example: Best Seller, 2024 Release.
Method 1: The Plugin Route (Custom Post Type UI)
If you are not comfortable touching PHP files or simply want a quick visual interface, plugins are the way to go. The most popular and reliable option is Custom Post Type UI (CPT UI).
Here is how you can use it to create custom taxonomy in WordPress without writing a single line of code:
- Install and Activate: Go to Plugins > Add New and search for “Custom Post Type UI.” Install and activate it.
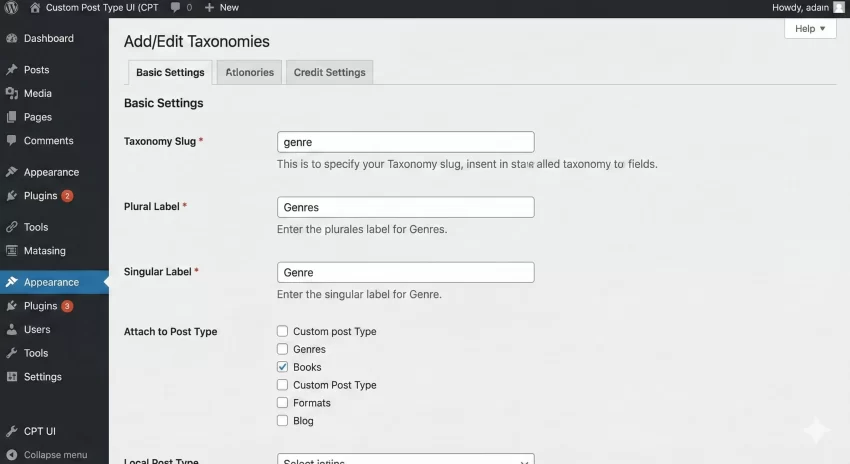
- Navigate to Add/Edit Taxonomies: In your dashboard sidebar, look for the CPT UI menu and select “Add/Edit Taxonomies.”
- Fill in the Slugs:
- Taxonomy Slug: This is the URL-friendly name (e.g., ‘genre’). Use lowercase letters and underscores only.
- Plural Label: e.g., “Genres”.
- Singular Label: e.g., “Genre”.
- Attach to Post Type: Check the box for the Custom Post Type you want this taxonomy to belong to (e.g., “Books” or “Portfolio”).
Once you hit “Add Taxonomy,” you are done! You will instantly see your new taxonomy appear under your CPT menu. This method is fantastic for rapid prototyping, but it does add a dependency to your site. If you ever deactivate the plugin, your taxonomy registration disappears (though your data remains safe in the database).
You might also like:

Method 2: The Manual Code Route (Recommended for Developers)
For those of us who prefer a lightweight site and fewer plugins, coding it manually is the gold standard. To create custom taxonomy in WordPress manually, we utilize the core function register_taxonomy().
This function allows you to define every single label, capability, and rewrite rule with granular precision. You should place this code in your theme’s functions.php file or, even better, in a site-specific plugin to ensure your taxonomies survive a theme change.
Step 1: The Basic Setup
We will hook our function into init. Note that we are using the pnet_ prefix to prevent conflicts with other themes or plugins.
Here is a complete code snippet to create a hierarchical taxonomy (like Categories) called “Genre” for a CPT called “Book”:
function pnet_register_genre_taxonomy() {

    // 1. Define the labels for the GUI
    $labels = array(
        'name'              => _x( 'Genres', 'taxonomy general name', 'textdomain' ),
        'singular_name'     => _x( 'Genre', 'taxonomy singular name', 'textdomain' ),
        'search_items'      => __( 'Search Genres', 'textdomain' ),
        'all_items'         => __( 'All Genres', 'textdomain' ),
        'parent_item'       => __( 'Parent Genre', 'textdomain' ),
        'parent_item_colon' => __( 'Parent Genre:', 'textdomain' ),
        'edit_item'         => __( 'Edit Genre', 'textdomain' ),
        'update_item'       => __( 'Update Genre', 'textdomain' ),
        'add_new_item'      => __( 'Add New Genre', 'textdomain' ),
        'new_item_name'     => __( 'New Genre Name', 'textdomain' ),
        'menu_name'         => __( 'Genres', 'textdomain' ),
    );

    // 2. Define the arguments
    $args = array(
        'hierarchical'      => true, // Set to false for "Tag" like behavior
        'labels'            => $labels,
        'show_ui'           => true,
        'show_admin_column' => true,
        'query_var'         => true,
        'rewrite'           => array( 'slug' => 'genre' ),
        'show_in_rest'      => true, // Essential for Gutenberg Editor support
    );

    // 3. Register the taxonomy
    // Usage: register_taxonomy( 'slug', 'post_type', $args );
    register_taxonomy( 'genre', array( 'book' ), $args );
}

// Hook into the 'init' action
add_action( 'init', 'pnet_register_genre_taxonomy' );
Understanding the Code Arguments
Let’s break down the critical parts of the code above so you can modify it to create custom taxonomy in WordPress for your own needs:
- ‘hierarchical’ => true: This creates a category-style taxonomy with checkboxes. If you change this to
false, you get a tag-style input field where users can type new terms on the fly. - ‘show_in_rest’ => true: This is crucial for modern WordPress. If you omit this or set it to false, the taxonomy sidebar panel will not appear in the Gutenberg Block Editor.
- ‘rewrite’ => array( ‘slug’ => ‘genre’ ): This defines the URL structure. For example, your archive page will be at
yoursite.com/genre/sci-fi/.
Tip: Easily Disable Gutenberg Editor Programmatically
Displaying Custom Taxonomies on the Front End
Once you successfully create custom taxonomy in WordPress, the backend work is done. But how do you show these terms to your visitors on the single post page? You will need to edit your specific template file (like single-book.php) and use the the_terms() function.
// Inside the loop
if ( has_term( '', 'genre' ) ) {
    echo '<div class="book-genres"><strong>Genres: </strong>';
    the_terms( $post->ID, 'genre', '', ', ', '' );
    echo '</div>';
}
This simple snippet checks if the post has terms assigned to the ‘genre’ taxonomy and, if so, prints them out as clickable links.
Troubleshooting Common Issues
The Dreaded 404 Error
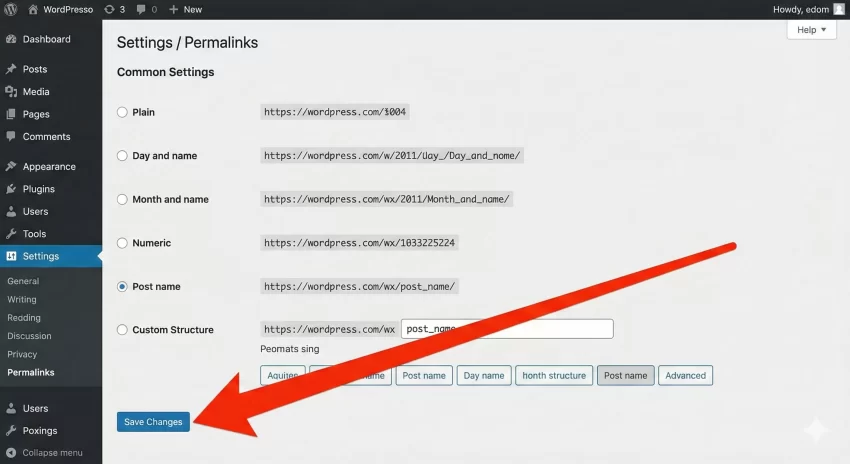
The most common issue users face after they create custom taxonomy in WordPress is the 404 error on archive pages. You create a new term, click “View,” and WordPress tells you the page doesn’t exist.
The Fix: This happens because your permalinks haven’t refreshed. To fix this:
- Go to Settings > Permalinks in your dashboard.
- Scroll down and click Save Changes. You don’t need to change any settings; just hitting save flushes the rewrite rules.
Plugin vs. Code: Which is Better?
So, should you use CPT UI or write the code yourself to create custom taxonomy in WordPress? Let’s compare.
Pros of Plugins (CPT UI):
- Speed: You can create complex taxonomies in seconds.
- Ease of Use: No risk of syntax errors bringing down your site.
- Portability: Easy to export settings to another site.
Pros of Manual Code:
- Performance: One less plugin to load means fewer database queries and lighter overhead.
- Version Control: You can track changes in Git.
- Independence: You are not reliant on a plugin author for updates or security fixes.
Conclusion
Whether you choose the convenience of a plugin or the robustness of manual coding, the ability to create custom taxonomy in WordPress is an essential skill for any site owner looking to scale. It transforms your website from a simple blog into a structured, powerful content management system.
If you are a beginner, start with CPT UI to understand how taxonomies relate to post types. Once you are comfortable, try converting those settings into PHP code using the snippets provided above. This transition is a great step toward mastering WordPress development.
Ready to organize your content? Go ahead and create custom taxonomy in WordPress today and see the difference it makes in your site structure!