
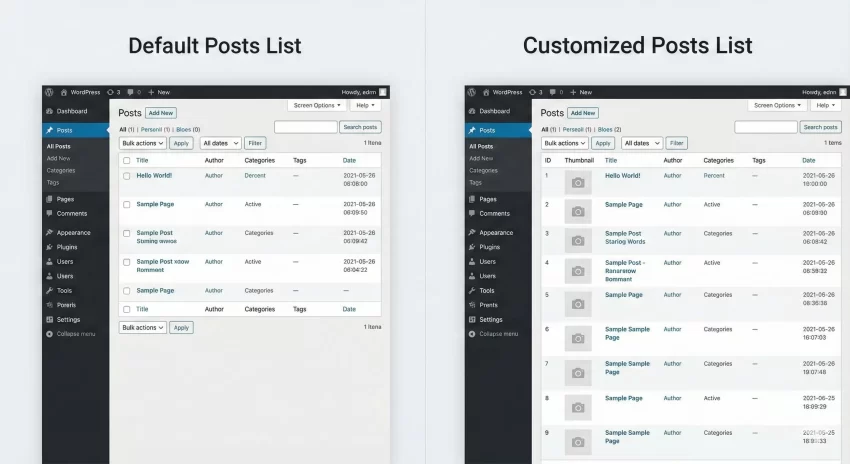
Let’s face it: the default WordPress dashboard is fantastic, but it is rarely perfect right out of the box. If you manage a content-heavy site, you have likely stared at the “Posts” screen and wished you could see more than just the title, author, and date. Maybe you need to see the Featured Image at a glance, or perhaps a specific custom field like “Price” or “Release Date.”
Adding this data can save you hours of clicking “Edit,” checking a value, and clicking “Back.” Today, we are going to dive deep into how to add custom admin columns WordPress developers and site owners love. This isn’t just about making things look pretty; it is about building a dashboard that actually works for you.
In this guide, we will bypass the heavy plugins and get our hands dirty with some clean, efficient PHP. By the end of this tutorial, you will know exactly how to add custom admin columns WordPress specifically tailored to your workflow.
Why You Should Customize Your Admin Columns
Before we jump into the code, let’s talk about why this matters. When you are running a high-traffic blog or an eCommerce store, data visibility is everything. By default, WordPress hides a lot of the “good stuff” inside the post editor.
When you add custom admin columns WordPress allows you to expose that hidden data right on the listing screen. Here are a few scenarios where this is a lifesaver:
- Photography Sites: Display a thumbnail of the Featured Image so you don’t delete the wrong post.
- eCommerce (WooCommerce): Show SKU numbers or stock levels directly in the product list.
- Editorial Teams: specific custom fields, like “Review Status” or “Word Count,” visible to editors.
- Developers: Quickly see the Post ID for debugging purposes.
Ready to supercharge your dashboard? Let’s get coding.
The Two Hooks You Need to Know
WordPress is built on a system of hooks and filters. To add custom admin columns WordPress relies on two specific hooks. Understanding these is the key to mastering admin customization.
manage_posts_columns: This filter allows you to add (or remove) headers from the table. Think of this as creating the label for your new column.manage_posts_custom_column: This action controls what data actually gets printed inside that column for each row.
If you want to read the official documentation, you can check out the manage_posts_custom_column reference on the WordPress Developer Resources.
Step 1: Adding the Column Header
First, we need to tell WordPress that a new column exists. We will create a function that modifies the default array of columns. In this example, we are going to add a “Featured Image” column and a “Post ID” column.
Add the following code to your theme’s functions.php file or a custom site-specific plugin. Note that we are using the prefix pnet_ to ensure our function names don’t clash with other plugins.
function pnet_add_custom_admin_columns( $columns ) {
    // Adding the Featured Image column
    $columns['pnet_featured_image'] = __( 'Featured Image', 'textdomain' );

    // Adding the Post ID column
    $columns['pnet_post_id'] = __( 'ID', 'textdomain' );

    return $columns;
}
add_filter( 'manage_posts_columns', 'pnet_add_custom_admin_columns' );
When you save this and refresh your Posts page, you will see the new headers appear. However, the rows underneath them will be empty. That is because we haven’t told WordPress what data to put there yet. This is a crucial step when you add custom admin columns WordPress recognizes.
You might also like:
Step 2: Populating the Column Content
Now comes the fun part: filling in the data. We will use the manage_posts_custom_column action. This function runs once for every column in every row, so we need to use a standard PHP switch statement (or if/else logic) to check which column is currently being rendered.
function pnet_render_custom_admin_columns( $column_name, $post_id ) {
    switch ( $column_name ) {
        case 'pnet_featured_image':
            if ( has_post_thumbnail( $post_id ) ) {
                echo get_the_post_thumbnail( $post_id, array( 50, 50 ) );
            } else {
                echo __( 'No Image', 'textdomain' );
            }
            break;

        case 'pnet_post_id':
            echo $post_id;
            break;
    }
}
add_action( 'manage_posts_custom_column', 'pnet_render_custom_admin_columns', 10, 2 );
Code Explanation:
- We check if the current column is
pnet_featured_image. If it is, we use the WordPress functionget_the_post_thumbnailto grab a 50x50px version of the image. - If the column is
pnet_post_id, we simply echo the$post_id.
At this point, you have successfully managed to add custom admin columns WordPress post lists display. But we can make it even better.
Step 3: Making Your Custom Columns Sortable
Adding the data is great, but what if you want to sort by that data? For example, sorting posts by ID helps you find the most recent entries regardless of publication date. To add custom admin columns WordPress allows to be sortable, we need one more filter: manage_edit-post_sortable_columns.
function pnet_make_custom_columns_sortable( $columns ) {
    // Make the ID column sortable
    $columns['pnet_post_id'] = 'ID';
    return $columns;
}
add_filter( 'manage_edit-post_sortable_columns', 'pnet_make_custom_columns_sortable' );
Now, the “ID” header will be clickable, allowing you to toggle between ascending and descending order.
You might also like:
Advanced: Styling Your New Columns
Sometimes, when you add custom admin columns WordPress layouts can get a bit messy. The Featured Image column might be too wide, or the ID column might take up unnecessary space. We can fix this by injecting a little bit of CSS directly into the admin head.
function pnet_admin_column_styles() {
    echo '< style>
        .column-pnet_featured_image { width: 60px; }
        .column-pnet_post_id { width: 50px; }
    < /style>';
}
add_action( 'admin_head', 'pnet_admin_column_styles' );
Handling Custom Post Types
The code above works perfectly for standard posts. But what if you are using a Custom Post Type (CPT), like “Movies” or “Portfolio”? The logic to add custom admin columns WordPress uses for CPTs is almost identical, but the hook names change slightly.
Instead of manage_posts_columns, you would use manage_{post_type}_posts_columns.
For example, if your CPT is named movie, your hooks would look like this:
// Header for Movie CPT
add_filter( 'manage_movie_posts_columns', 'pnet_add_movie_columns' );

// Content for Movie CPT
add_action( 'manage_movie_posts_custom_column', 'pnet_render_movie_columns', 10, 2 );
This flexibility is why it is so powerful to manually add custom admin columns WordPress setups require. If you want to know about registering new CPTs, checkout our guide here. Master WordPress Custom Post Type Code (The Right Way).
Troubleshooting Common Issues
Even seasoned developers run into snags. Here are a few things to watch out for when you add custom admin columns WordPress based:
1. The Column Headers Appear, but Data is Missing
Check your case names in the switch statement. The key you define in the $columns array (e.g., pnet_post_id) must match the case in your pnet_render_custom_admin_columns function exactly.
2. Sorting Isn’t Working
If you made a column sortable but clicking it doesn’t change the order, you might need to adjust the query using the request filter. This is common for complex custom fields (meta data), but standard fields like ID usually work out of the box.
3. The Admin Panel is Too Slow
Be careful what data you query. If you add custom admin columns WordPress has to calculate heavily (like counting all comments on all posts for a specific user), it can slow down your dashboard. Stick to simple meta data or post data for the best performance.
Conclusion
Taking control of your WordPress admin area is one of the best investments you can make in your website management workflow. When you take the time to add custom admin columns WordPress becomes less of a generic platform and more of a specialized tool built for your needs.
Whether you are displaying featured images, custom meta fields, or simple IDs, the code provided above gives you a robust foundation. Remember to always backup your site before editing functions.php, and happy coding!
Do you have a specific custom column you always add to your client sites? Let us know in the comments below!