User engagement is the holy grail of web design. As a WordPress developer, you know that keeping a visitor on the page is half the battle won. One subtle yet highly effective way to reduce bounce rates is by adding a WordPress reading time progress bar. This simple UI element provides visual feedback, telling readers exactly how far they are through your content. In this guide, we will explore why this feature matters and how you can implement it using both a plugin-based approach and a custom code method to keep your site lean and fast.
Why Use a Reading Time Progress Bar?
In an era of “skim-reading,” a progress bar acts as a psychological motivator. When a reader sees they are already 50% through an article, they are much more likely to finish it rather than navigate away. It improves User Experience (UX) by providing a sense of accomplishment and transparency regarding the content’s length.
Method 1: The Plugin Approach (Best for Beginners)
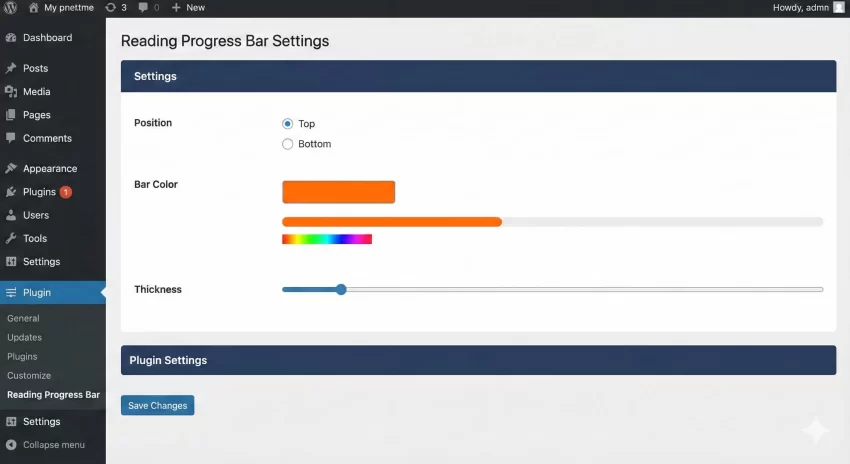
If you prefer a “set it and forget it” solution, using a plugin is the fastest route. Several high-quality plugins can handle this, such as Worth the Read or Read Meter. These plugins offer a GUI to customize colors, thickness, and placement (top or bottom of the screen).
Pros/Cons of Using a Plugin:
Pros
- No coding knowledge required.
- Easy customization of styles via the WordPress dashboard.
- Option to show Estimated Reading Time in minutes alongside the bar.
Cons
- Adds another plugin to your database.
- May load unnecessary CSS/JS files on pages where the bar isn't needed.
- Less Customization options
Tip: If any WordPress reading time progress bar adding unused JS/CSS in your website, you can check our guide on Easily Remove Unused CSS and JS in WordPress for Blazing Fast Speed
You might also like:

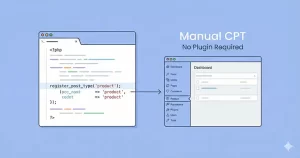
Method 2: The Custom Code Approach (Best for Performance)
For developers who want to maintain a high PageSpeed score, a custom code solution is superior. By using a small snippet of JavaScript and CSS, we can achieve the same result without the overhead of a bulky plugin. We will use the pnet_ prefix for our functions to maintain a clean and organized codebase.
Step 1: The HTML Structure
First, we need a container for our progress bar. We will hook this into the wp_body_open or wp_head, but for the best compatibility, we’ll append it via JavaScript or a simple hook in functions.php.
/**
 * Add Progress Bar HTML to the header
 */
function pnet_add_reading_progress_bar() {
    if ( is_single() ) {
        echo '<div id="pnet-progress-container"><div id="pnet-progress-bar"></div></div>';
    }
}
add_action( 'wp_head', 'pnet_add_reading_progress_bar' );
Step 2: Styling with CSS
Now, let’s make the bar look professional. We will use a fixed position so it stays at the top of the viewport as the user scrolls. To learn more about how WordPress handles various front-end elements, you can check the WordPress Codex on Theme Development.
#pnet-progress-container {
    position: fixed;
    top: 0;
    left: 0;
    width: 100%;
    height: 5px;
    background-color: transparent;
    z-index: 9999;
}

#pnet-progress-bar {
    height: 100%;
    background-color: #FCA311; /* Using your signature orange */
    width: 0%;
    transition: width 0.1s ease;
}
You might also like:
Step 3: The JavaScript Logic
Finally, we need a script to calculate the scroll percentage. This script calculates how much of the article has been read based on the window’s scroll position relative to the document height.
window.onscroll = function() { pnet_update_progress() };

function pnet_update_progress() {
    var winScroll = document.body.scrollTop || document.documentElement.scrollTop;
    var height = document.documentElement.scrollHeight - document.documentElement.clientHeight;
    var scrolled = (winScroll / height) * 100;
    document.getElementById("pnet-progress-bar").style.width = scrolled + "%";
}
Comparing Both Methods
| Feature | Plugin Method | Code Method |
|---|---|---|
| Ease of Use | High | Medium |
| Site Speed | Slight Impact | Minimal Impact |
| Customization | Dashboard-based | CSS-based |
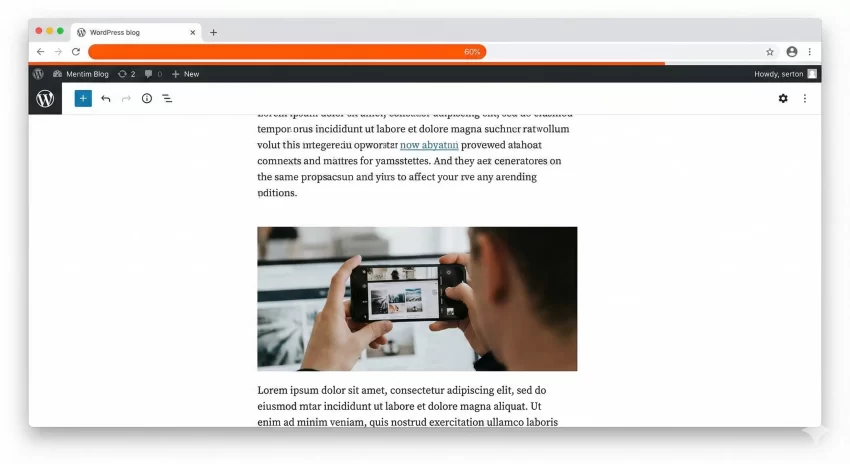
Conclusion
Adding a WordPress reading time progress bar is a fantastic way to enhance the user experience on your blog. If you are a casual user, a plugin like ‘Worth the Read’ will serve you well. However, if you are a developer looking for maximum efficiency, the custom PHP and JavaScript method is the way to go.
Implementing this feature ensures that your readers stay engaged, reducing bounce rates and giving your content the attention it deserves. Which method are you going to choose for your site?