If you’ve ever wanted to build your own plugin options page, add custom settings, or give users complete control over your plugin’s behavior, then this WordPress Settings API Tutorial is exactly what you need. The WordPress Settings API provides a standardized, secure, and scalable way to register settings, create admin pages, and store user-defined configuration options — all without reinventing the wheel.
In this guide, you’ll learn exactly how to create a custom settings page using the WordPress Settings API from scratch. We will walk through each step with proper explanations and fully working code examples using our unique pnet_ prefix.
Let’s get started.
⚙What Is the WordPress Settings API?
The WordPress Settings API is a built-in framework that lets developers create custom admin settings pages while ensuring:
- Data validation & sanitization
- Secure saving of settings
- Proper form structure
- Built-in nonce protection
- Consistent UI within WordPress
Using the API ensures your settings follow WordPress standards, making your plugin future-proof and easier to maintain.
⚒What We Are Going to Build
By the end of this tutorial, you will have a complete settings page that includes:
- A top-level menu in the WordPress dashboard
- A settings form
- Registered settings
- Input fields (text, checkbox, textarea, etc.)
- Sanitization callbacks
- Automatic saving to the database
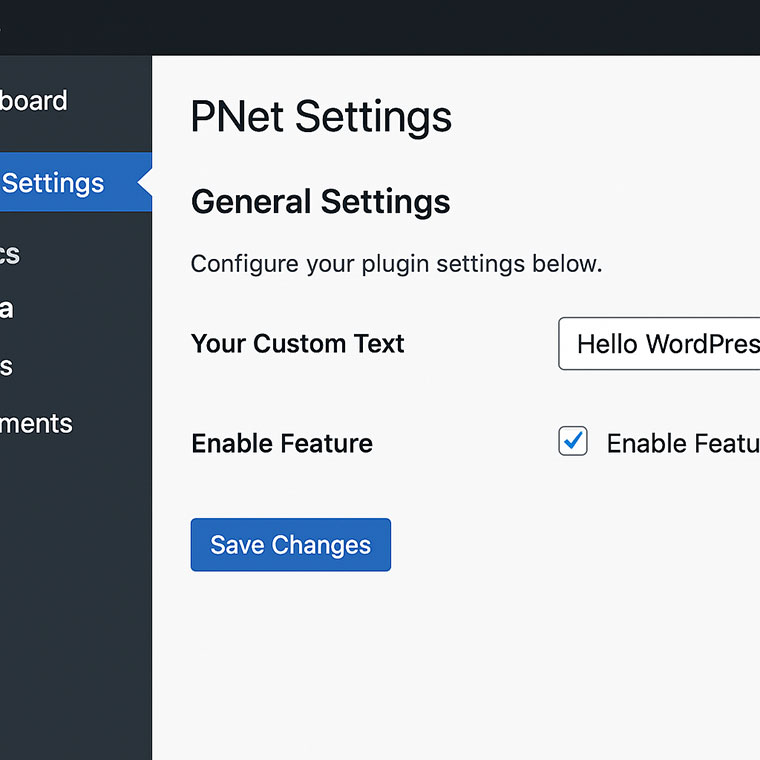
The final page will look similar to any native WordPress settings page — clean and fully functional.
Step 1: Create a Top-Level Admin Menu
Create a file inside your plugin (or theme) — e.g., settings-page.php.
Add the admin menu with:
add_action( 'admin_menu', 'pnet_add_settings_page' );

function pnet_add_settings_page() {
    add_menu_page(
        'PNet Settings',
        'PNet Settings',
        'manage_options',
        'pnet-settings',
        'pnet_render_settings_page',
        'dashicons-admin-generic',
        80
    );
}
This creates a menu item named PNet Settings in the WP dashboard.
Step 2: Render the Settings Page HTML
WordPress will call this function to output the page content:
function pnet_render_settings_page() {
?>
    <div class="wrap">
        <h1>PNet Settings</h1>

        <form method="post" action="options.php">
            <?php
                settings_fields( 'pnet_settings_group' );
                do_settings_sections( 'pnet-settings' );
                submit_button();
            ?>
        </form>
    </div>
<?php
}
This creates a clean WordPress-formatted settings page.
Step 3: Register Settings With the WordPress Settings API
Now let’s register settings and sections:
add_action( 'admin_init', 'pnet_register_settings' );

function pnet_register_settings() {

    register_setting(
        'pnet_settings_group',
        'pnet_options',
        'pnet_sanitize_settings'
    );

    add_settings_section(
        'pnet_main_section',
        'General Settings',
        'pnet_section_description',
        'pnet-settings'
    );

    add_settings_field(
        'pnet_text_field',
        'Your Custom Text',
        'pnet_render_text_field',
        'pnet-settings',
        'pnet_main_section'
    );

    add_settings_field(
        'pnet_checkbox_field',
        'Enable Feature',
        'pnet_render_checkbox_field',
        'pnet-settings',
        'pnet_main_section'
    );
}
This code does 3 things:
- Registers your settings
- Creates a settings section
- Adds fields inside the section
Step 4: Add a Description for the Settings Section
function pnet_section_description() {
    echo '
Configure your plugin settings below.
';
}
Step 5: Render the Input Fields
Text Field
function pnet_render_text_field() {
    $options = get_option( 'pnet_options' );
    ?>
    <input type="text"
           name="pnet_options[pnet_text_field]"
           value="<?php echo isset($options['pnet_text_field']) ? esc_attr($options['pnet_text_field']) : ''; ?>"
           class="regular-text">
    <?php
}
Checkbox Field
function pnet_render_checkbox_field() {
    $options = get_option( 'pnet_options' );
    $checked = isset( $options['pnet_checkbox_field'] ) ? 'checked' : '';
    ?>
    <label>
        <input type="checkbox"
               name="pnet_options[pnet_checkbox_field]"
               value="1" <?php echo $checked; ?>>
        Enable this feature
    </label>
    <?php
}
This gives users a fully interactive settings interface.
Step 6: Sanitize User Input
Security is essential. Sanitization ensures user data is safe.
function pnet_sanitize_settings( $input ) {
    $output = array();

    if ( isset( $input['pnet_text_field'] ) ) {
        $output['pnet_text_field'] = sanitize_text_field( $input['pnet_text_field'] );
    }

    $output['pnet_checkbox_field'] = isset( $input['pnet_checkbox_field'] ) ? 1 : 0;

    return $output;
}
Step 7: Use Saved Settings Anywhere in Your Theme/Plugin
Retrieve the settings like this:
$options = get_option( 'pnet_options' );

$custom_text = $options['pnet_text_field'] ?? '';
$is_enabled  = !empty( $options['pnet_checkbox_field'] );
You can now use the settings for, including – but not limited to:
- Enabling/disabling plugin features
- API keys
- Layout preferences
- Custom behavior
Example:
if ( $is_enabled ) {
    // Execute codes
}
Additional Tips for Using the WordPress Settings API
- Keep all settings within a single option array: This keeps the database clean and improves plugin performance.
- Use unique prefixes (
pnet_) consistently: It ensures compatibility and prevents naming conflicts. - Always sanitize inputs: Never trust user-entered data.
- Categorize with tabs: If you have lots of settings and the belong to different categories, you can add multiple settings tabs using
add_settings_section()for a better user experience. - Add contextual help: You can provide tooltips or help tabs using
get_current_screen().
Conclusion
Creating an admin settings page using the WordPress Settings API might look complex at first, but once you understand the structure — sections, fields, and settings — it becomes incredibly efficient. This WordPress Settings API Tutorial helps you build a robust, scalable, and user-friendly settings interface that aligns perfectly with WordPress core standards.
Whether you’re building a simple plugin or a full-fledged commercial product, mastering the Settings API is a must-have skill for every WordPress developer.


