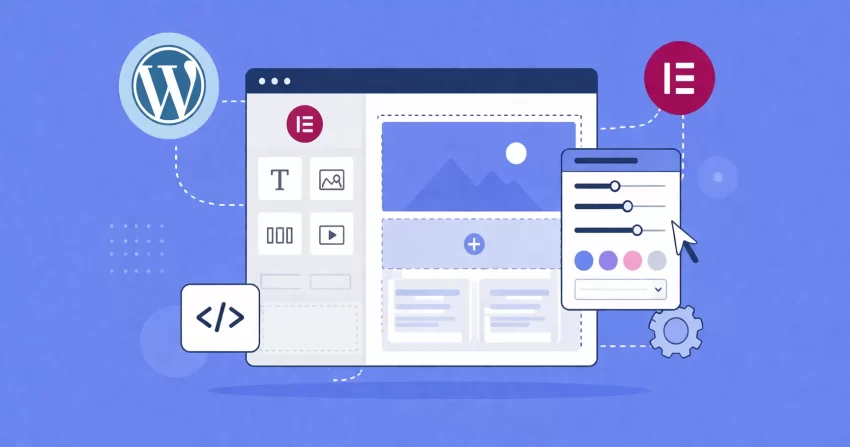
Are you tired of being restricted by the default widgets and settings when building WordPress sites? This is a common problem for advanced developers who need highly specific UI elements, such as a multi-layered color picker or a complex visual selector, that simply do not exist out of the box. The solution is creating and registering Elementor custom controls. By leveraging the native API, you can build tailored, dynamic, and highly interactive user interfaces right inside the editor panel. In this comprehensive technical guide, we will walk you through the precise steps required to build, implement, and register these components, empowering you to extend the page builder’s capabilities to meet any project’s exact requirements.
Building Elementor custom controls requires a solid understanding of both backend PHP architecture and frontend JavaScript integration, specifically utilizing Backbone.js and Marionette.js, which power the editor’s reactive interface. We will be constructing a specialized color palette picker as our primary example. Understanding how to properly instantiate and register Elementor custom controls ensures your themes and plugins remain maintainable, performant, and seamlessly integrated into the user’s workflow.
Prerequisites for Building Elementor Custom Controls
Before diving into the code, ensure your development environment meets the necessary requirements for creating Elementor custom controls safely and effectively:
- PHP 8.0 or higher configured on your local or staging server.
- WordPress version 6.0+ installed and running.
- Elementor (Free or Pro) installed and activated.
- A foundational understanding of Object-Oriented PHP and JavaScript (Backbone/Marionette).
- A complete backup of your development site (database and files).
For Developers
Understanding the Architecture of Elementor Custom Controls
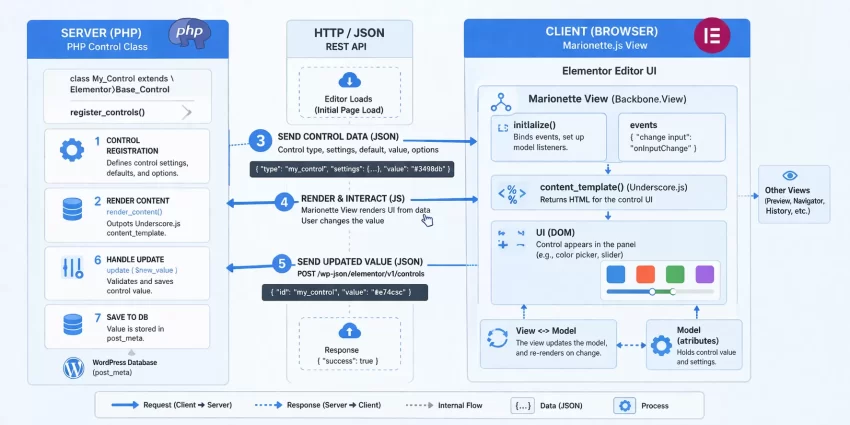
The architecture of Elementor custom controls is fundamentally split into two distinct parts: the server-side PHP class and the client-side JavaScript view. To successfully implement Elementor custom controls, you must ensure these two environments communicate flawlessly.
The Server-Side PHP Component
On the server side, Elementor custom controls are defined by extending the core \Elementor\Base_Data_Control class. This PHP class is responsible for registering the control’s unique identifier, enqueuing necessary assets (CSS and JS), defining the default settings, and generating the Underscore.js HTML template that will be rendered in the editor panel. The PHP component acts as the blueprint for your Elementor custom controls, passing localized data and settings directly into the editor’s JavaScript application.
The Client-Side JavaScript Component
On the client side, Elementor custom controls rely on Marionette.js, a robust framework built on top of Backbone.js. When the editor loads, Marionette takes the Underscore.js template provided by your PHP class and instantiates a view. This JavaScript view handles all user interactions—such as clicking a color swatch, dragging a slider, or typing in an input field. It then updates the underlying Backbone model, which automatically triggers a UI refresh in the preview area. Mastering this data-binding process is the key to creating responsive Elementor custom controls.
Setting Up the Plugin Infrastructure
To safely add Elementor custom controls to your site, you should encapsulate your code within a custom WordPress plugin. This ensures that your Elementor custom controls remain active even if the user changes their theme.
Creating the Base Plugin File
Start by navigating to your wp-content/plugins directory and creating a new folder named pnet-elementor-controls. Inside this folder, create a file named pnet-elementor-controls.php. This will serve as the bootstrap file for your Elementor custom controls plugin.
<?php
/**
 * Plugin Name: PNET Elementor Custom Controls
 * Description: Registers advanced Elementor custom controls for the editor panel.
 * Version: 1.0.0
 * Author: Your Name
 */

if ( ! defined( 'ABSPATH' ) ) {
    exit; // Exit if accessed directly.
}

// Define plugin paths
define( 'PNET_E_CONTROLS_URL', plugin_dir_url( __FILE__ ) );
define( 'PNET_E_CONTROLS_PATH', plugin_dir_path( __FILE__ ) );
Did you know: You can effortlessly bypass layout restrictions and achieve flawless design control by developing a Custom Elementor Skin tailored directly to your exact project specifications?
Enqueuing Editor Scripts and Styles
Your Elementor custom controls will require specific JavaScript and CSS files to function and look correct inside the editor. We must hook into the elementor/editor/after_enqueue_scripts action to load our assets only when the Elementor editor is active. Proper asset management is crucial when building performant Elementor custom controls.
<?php
/**
 * Enqueue scripts for Elementor custom controls.
 */
function pnet_enqueue_control_scripts() {
    wp_enqueue_script(
        'pnet-custom-control-js',
        PNET_E_CONTROLS_URL . 'assets/js/pnet-control.js',
        array( 'jquery' ),
        '1.0.0',
        true
    );

    wp_enqueue_style(
        'pnet-custom-control-css',
        PNET_E_CONTROLS_URL . 'assets/css/pnet-control.css',
        array(),
        '1.0.0'
    );
}
add_action( 'elementor/editor/after_enqueue_scripts', 'pnet_enqueue_control_scripts' );
Creating the PHP Control Class
The core of registering Elementor custom controls involves creating a dedicated PHP class. This class dictates how the control behaves, what data it stores, and the markup it outputs to the editor. We will create a class called Pnet_Color_Picker_Control.
Extending the Base Data Control
Create a new file at includes/class-pnet-color-picker.php. This class must extend \Elementor\Base_Data_Control. When developing Elementor custom controls, overriding specific methods like get_type() and content_template() is mandatory.
<?php
namespace Pnet\Controls;

if ( ! defined( 'ABSPATH' ) ) {
    exit; // Exit if accessed directly.
}

class Pnet_Color_Picker_Control extends \Elementor\Base_Data_Control {

    /**
     * Get control type.
     */
    public function get_type() {
        return 'pnet_color_picker';
    }

    /**
     * Enqueue control scripts and styles.
     */
    public function enqueue() {
        // Assets are enqueued globally via the plugin hook,
        // but control-specific assets can be enqueued here if needed.
    }

    /**
     * Get default settings.
     */
    protected function get_default_settings() {
        return array(
            'colors' => array( '#ff0000', '#00ff00', '#0000ff' ), // Default palette
        );
    }

    /**
     * Render the control's UI in the editor via Underscore.js template.
     */
    public function content_template() {
        $control_uid = $this->get_control_uid();
        ?>
        <div class="elementor-control-field">
            <label for="<?php echo esc_attr( $control_uid ); ?>" class="elementor-control-title">{{{ data.label }}}</label>
            <div class="elementor-control-input-wrapper">
                <div class="pnet-color-picker-wrapper">
                    <# _.each( data.colors, function( color ) { #>
                        <div class="pnet-color-swatch" data-value="{{ color }}" style="background-color: {{ color }};"></div>
                    <# } ); #>
                    <input type="hidden" id="<?php echo esc_attr( $control_uid ); ?>" data-setting="{{ data.name }}" />
                </div>
            </div>
        </div>
        <# if ( data.description ) { #>
            <div class="elementor-control-field-description">{{{ data.description }}}</div>
        <# } #>
        <?php
    }
}
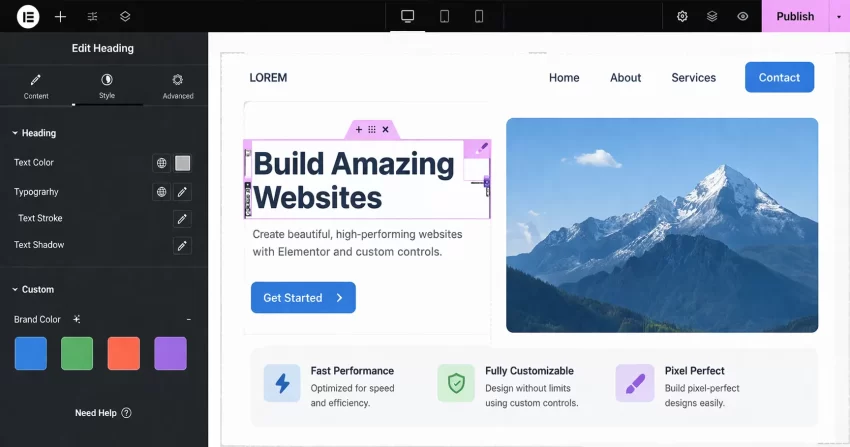
In the content_template() method, we are outputting standard HTML intertwined with Underscore.js template tags ({{{ ... }}} and <# ... #>). The data.label and data.colors variables are dynamically injected by Elementor when the control is instantiated. The hidden input field containing data-setting="{{ data.name }}" is the critical bridge that tells Elementor where to save the data for these Elementor custom controls.
Developing the JavaScript View (Marionette.js)
Elementor custom controls are practically useless without the frontend JavaScript logic to drive them. We need to create the JavaScript behavior that detects clicks on our color swatches and updates the hidden input value, subsequently updating the Elementor model.
Handling Events and Data Binding
Create your JS file at assets/js/pnet-control.js. We will use jQuery and Marionette.js to listen to the editor’s initialization event, map our custom control type to a JavaScript view, and define the interactive behaviors.
jQuery( window ).on( 'elementor:init', function() {
    var controlView = elementor.modules.controls.BaseData.extend( {

        // Define UI elements to easily access them via this.ui
        ui: function() {
            var ui = elementor.modules.controls.BaseData.prototype.ui.apply( this, arguments );
            ui.swatches = '.pnet-color-swatch';
            ui.input = 'input[type="hidden"]';
            return ui;
        },

        // Define DOM events
        events: function() {
            return _.extend( elementor.modules.controls.BaseData.prototype.events.apply( this, arguments ), {
                'click @ui.swatches': 'onSwatchClick'
            } );
        },

        // Triggered when the view is fully rendered in the panel
        onReady: function() {
            this.updateActiveSwatch();
        },

        // Handle the click event on a color swatch
        onSwatchClick: function( event ) {
            var $clickedSwatch = jQuery( event.currentTarget );
            var selectedColor = $clickedSwatch.data( 'value' );

            // Update the hidden input value
            this.ui.input.val( selectedColor );

            // Crucial: Tell Elementor to save the new value into the model
            this.setValue( selectedColor );

            // Visually update the UI
            this.updateActiveSwatch();
        },

        // Visually highlight the currently selected swatch
        updateActiveSwatch: function() {
            var currentValue = this.getControlValue();
            this.ui.swatches.removeClass( 'pnet-active' );
            this.ui.swatches.filter( '[data-value="' + currentValue + '"]' ).addClass( 'pnet-active' );
        }

    } );

    // Register the JavaScript view with the exact type name defined in PHP
    elementor.addControlView( 'pnet_color_picker', controlView );
} );
Important Notice
elementor.addControlView() MUST exactly match the string returned by your PHP class’s get_type() method. If these do not match, the editor will fail to render the component entirely. 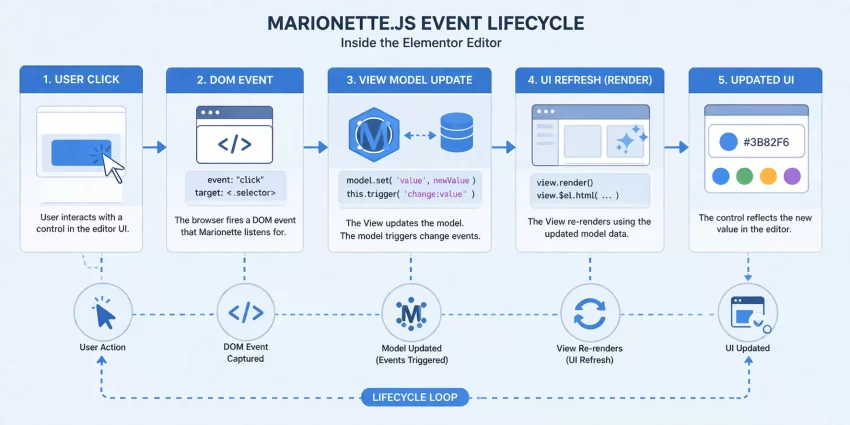
Registering the Control with Elementor
Now that both the PHP blueprint and the JavaScript view are prepared, the final step in creating Elementor custom controls is to register the PHP class with the Elementor system. Elementor provides a specific action hook for this process.
Hooking into Elementor Action
Go back to your main plugin file (pnet-elementor-controls.php) and add the following hook. We use the elementor/controls/controls_registered hook. This is the only safe and officially supported method to introduce new Elementor custom controls into the application registry.
<?php
/**
 * Register the custom control with Elementor.
 *
 * @param \Elementor\Controls_Manager $controls_manager
 */
function pnet_register_custom_controls( $controls_manager ) {

    // Include the class file
    require_once PNET_E_CONTROLS_PATH . 'includes/class-pnet-color-picker.php';

    // Instantiate and register the control
    $controls_manager->register( new \Pnet\Controls\Pnet_Color_Picker_Control() );

}
add_action( 'elementor/controls/register', 'pnet_register_custom_controls' );
Implementing the Control in a Widget
To verify your setup is fully functional, you can now use your newly registered control inside any Elementor widget’s _register_controls() method. By adding it just like any native control, you complete the lifecycle of Elementor custom controls.
<?php
// Inside an Elementor Widget class...
protected function register_controls() {
    $this->start_controls_section(
        'section_content',
        array(
            'label' => __( 'Content', 'pnet-plugin' ),
        )
    );

    // Using our newly registered Elementor custom control!
    $this->add_control(
        'custom_color_choice',
        array(
            'label'   => __( 'Brand Color', 'pnet-plugin' ),
            'type'    => 'pnet_color_picker',
            'colors'  => array( '#e74c3c', '#8e44ad', '#27ae60', '#f39c12' ), // Custom override
            'default' => '#27ae60',
        )
    );

    $this->end_controls_section();
}
Troubleshooting Common Errors
Even experienced developers run into issues when engineering advanced integrations. Building Elementor custom controls involves multiple moving parts. Here are the most common pitfalls and their solutions.
Control not appearing in the panel?
If your Elementor custom controls are completely missing from the editor sidebar, first ensure that the elementor/controls/register action hook is firing. Double-check your plugin is activated. If the hook is firing, verify that the get_type() string in your PHP class perfectly matches the type parameter you used inside the widget’s add_control() method.
JavaScript errors in the console?
When Elementor custom controls fail to load interactively, open your browser’s Developer Tools (F12) and check the Console tab. If you see errors regarding elementor.addControlView is not a function or BaseData is undefined, your JavaScript file might be enqueued too early. Ensure your script is enqueued on the elementor/editor/after_enqueue_scripts hook and has jquery as a dependency.
Value not saving on update?
If you can interact with your Elementor custom controls, but the page doesn’t update or the value reverts upon saving, the JavaScript view is failing to bind data. Check your Marionette.js events object. Ensure you are calling this.setValue( newValue ) when the user interacts with the UI. Furthermore, guarantee your HTML template includes an element, as Elementor relies on this data attribute to extract the model value.
Conclusion: Empowering Your Development Workflow
By following the architecture and code samples detailed in this technical guide, you can break free from native limitations and build highly optimized, specialized interfaces. The process involves creating a symbiotic relationship between a PHP backend class that handles configuration and an Underscore/Marionette JavaScript view that handles reactivity. While the learning curve for the Backbone.js event lifecycle can be steep initially, the flexibility it offers is unparalleled.
Whether you need dynamic data fetchers, API-driven dropdowns, or complex visual layout selectors, mastering the creation of Elementor custom controls is a definitive milestone for any serious WordPress developer looking to build premium, scalable solutions.