Every WordPress developer knows the frustration: you build a pixel-perfect site with excellent content, but it struggles to stand out in Search Engine Results Pages (SERPs). The missing piece isn’t always keywords or backlinks; it’s often context. Search engines require a standardized language to understand your content’s intent. The most effective solution is to add schema markup WordPress directly into your theme’s architecture. By implementing structured data, you transform standard search listings into rich snippets—featuring star ratings, images, and FAQs—which can significantly improve Click-Through Rates (CTR).
While numerous plugins exist, they often add unnecessary overhead or lock strictly formatted JSON-LD behind paywalls. For developers, the cleanest and most performant method is to add schema markup WordPress manually using PHP. This guide provides a granular, code-first approach to injecting dynamic, valid JSON-LD schema into your WordPress headers, ensuring your SEO strategy remains lightweight and completely under your control.
- PHP 7.4 or higher: We will use modern array syntax and functions.
- Access to functions.php: Preferably via a Child Theme or a custom site-specific plugin.
- Basic JSON knowledge: Understanding key-value pairs and nesting.
- Backup Required: Always backup your site before editing theme files.
Backup Required
functions.php can cause site-wide errors if syntax is incorrect. Understanding JSON-LD for WordPress
JSON-LD (JavaScript Object Notation for Linked Data) is the preferred schema format for Google. Unlike Microdata, which clutters your HTML DOM elements, JSON-LD separates the data from the visual presentation. It is injected as a script block in the <head> or body, making it easier for search engine crawlers to parse without rendering the page layout.
When you set out to add schema markup WordPress, you are essentially constructing a multi-dimensional array in PHP that represents the current page’s context. We then sanitize this data and output it as a JSON string wrapped in <script> tags. This method is superior because it allows you to dynamically pull post meta, author details, and custom fields programmatically.
Step 1: Setting Up the Hook Structure
To begin, we need a hook that triggers on the front end of your website. The wp_head action hook is the standard location for outputting schema markup. We will create a wrapper function that checks which type of page is being viewed (Single Post, Page, Product, etc.) and constructs the appropriate schema array.
This conditional logic is crucial. You do not want “Article” schema appearing on your “Contact Us” page, nor do you want “Product” schema on a blog post. Efficiently targeting these post types is the first step to successfully add schema markup WordPress.
/**
 * Main function to output JSON-LD Schema in wp_head
 */
function pnet_add_schema_markup_wordpress() {
    // skip if not the main query or if it is an admin page
    if ( is_admin() || ! is_main_query() ) {
        return;
    }

    $schema = [];

    // Global Schema (Organization) - Applies to all pages
    $schema['organization'] = pnet_get_organization_schema();

    // Contextual Schema
    if ( is_single() && 'post' === get_post_type() ) {
        $schema['article'] = pnet_get_article_schema();
    } elseif ( is_page() ) {
        $schema['webpage'] = pnet_get_webpage_schema();
    }

    // Output the JSON-LD
    if ( ! empty( $schema ) ) {
        // filter out null values to keep JSON clean
        $final_schema = array_values( array_filter( $schema ) );

        // Wrap in graph if multiple entities exist, or output singly
        if ( count( $final_schema ) > 1 ) {
             $payload = [
                '@context' => 'https://schema.org',
                '@graph'   => $final_schema
             ];
        } else {
             $payload = $final_schema[0];
             $payload['@context'] = 'https://schema.org';
        }

        echo PHP_EOL . '< script type="application/ld+json">';
        echo json_encode( $payload, JSON_UNESCAPED_SLASHES | JSON_PRETTY_PRINT );
        echo '</ script>' . PHP_EOL;
    }
}
add_action( 'wp_head', 'pnet_add_schema_markup_wordpress' );
You might also like: Instantly Boost Social Proof: Display WooCommerce Total Sales Count
Step 2: Defining Organization Schema
Organization schema helps Google understand the entity behind the website. This should usually be present on the homepage, but including it globally (or via a @graph implementation) connects your content to your brand. When developers add schema markup WordPress, they often forget to link the publisher (Organization) to the Article, which results in warnings in the Rich Results Test.
We will create a helper function pnet_get_organization_schema() that returns an array defining your logo, name, and social contacts.
function pnet_get_organization_schema() {
    $logo_url = get_site_icon_url(); // Uses Site Icon

    return [
        '@type' => 'Organization',
        '@id'   => home_url( '/#organization' ),
        'name'  => get_bloginfo( 'name' ),
        'url'   => home_url(),
        'logo'  => [
            '@type' => 'ImageObject',
            'url'   => $logo_url ? $logo_url : 'https://example.com/default-logo.png',
            'width' => 512,
            'height'=> 512
        ],
        'sameAs' => [
            'https://www.facebook.com/yourpage',
            'https://twitter.com/yourhandle',
            'https://linkedin.com/in/yourprofile'
        ]
    ];
}
Step 3: Generating Dynamic Article Schema
This is the most critical section for bloggers and content sites. To correctly add schema markup WordPress for blog posts, we must dynamically retrieve the post title, excerpt, featured image, author data, and publication dates. Hardcoding these values is impossible for a dynamic CMS.
Fetching and Sanitizing Post Data
We use WordPress core functions like get_the_title() and get_the_author_meta(). However, raw data often contains HTML entities or shortcodes. We must sanitize this using wp_strip_all_tags() to ensure the JSON remains valid.
function pnet_get_article_schema() {
    global $post;

    // Get the featured image
    $img_id  = get_post_thumbnail_id( $post->ID );
    $img_url = wp_get_attachment_image_url( $img_id, 'full' );

    // Get Author Data
    $author_id = $post->post_author;
    $author_name = get_the_author_meta( 'display_name', $author_id );

    return [
        '@type' => 'BlogPosting',
        '@id'   => get_permalink() . '#article',
        'mainEntityOfPage' => [
            '@type' => 'WebPage',
            '@id'   => get_permalink()
        ],
        'headline' => wp_strip_all_tags( get_the_title() ),
        'description' => wp_strip_all_tags( get_the_excerpt() ),
        'image' => $img_url ? [
            '@type' => 'ImageObject',
            'url'   => $img_url
        ] : null,
        'author' => [
            '@type' => 'Person',
            'name'  => $author_name
        ],
        'publisher' => [
            '@id' => home_url( '/#organization' ) // References the Organization Schema
        ],
        'datePublished' => get_the_date( 'c' ),
        'dateModified'  => get_the_modified_date( 'c' )
    ];
}
Pro Tip
dateModified property is vital for SEO freshness. Whenever you update a post, this field signals to Google that the content is current, potentially boosting rankings. Step 4: Validating Your Implementation
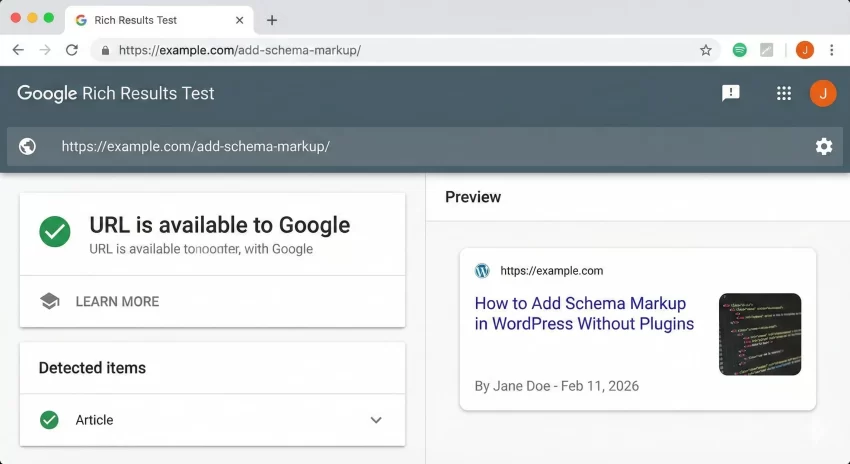
Writing the code is only half the battle. You must verify that your syntax is error-free and that Google can parse it. The best tool for this is the Google Rich Results Test. This tool simulates a Googlebot crawl and highlights any missing required fields or syntax errors.
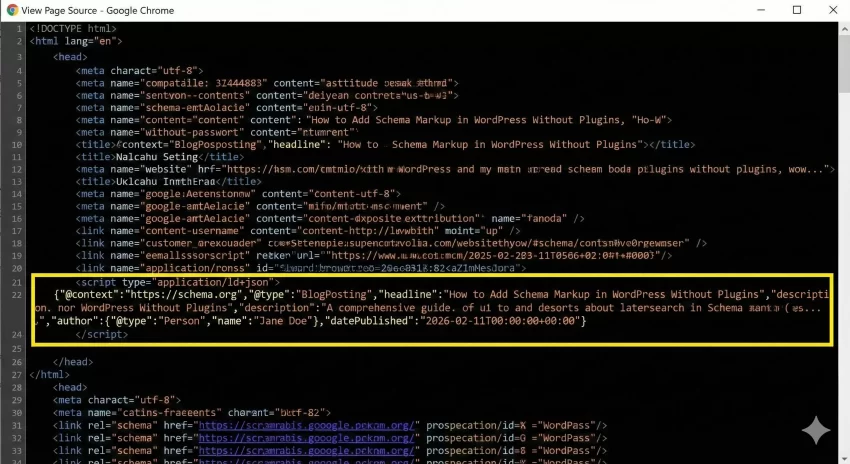
To validate, navigate to your website after implementing the code above. View the page source (Ctrl+U) and search for “application/ld+json”. Copy the entire script block and paste it into the “Code Snippet” section of the validation tool, or simply run the “URL” test if your site is live.
You might also like: Stop Bloating Your Site: Add a WordPress Table of Contents Without Plugin
Troubleshooting Common Errors
Even seasoned developers encounter issues when they attempt to add schema markup WordPress manually. JSON is unforgiving; a single misplaced comma can break the entire block.
JSON Syntax Errors
If the Rich Results Test returns a “Unparsable structured data” error, it usually means there is a trailing comma or an unescaped character. Using PHP’s json_encode() function as shown in Step 1 handles escaping automatically, significantly reducing these errors compared to manual string concatenation.
Missing Required Fields
Google often warns about missing fields like “image” or “author”. Ensure your logic handles cases where a post might not have a featured image (using a fallback default image) or where an author profile is incomplete.
Intermediate
functions.php. Conclusion
Implementing structured data is a powerful lever for SEO performance. When you take the time to add schema markup WordPress via code, you ensure a lean, fast, and customized implementation that caters specifically to your content strategy. You are no longer reliant on generic plugin settings; you have full control over how your entity is presented to the world.
By following this guide, you have successfully set up a scalable system for Organization and Article schema. You can now expand this logic to include Breadcrumbs, Products, or Reviews, giving your WordPress site the competitive edge it deserves in the search results.
You might also like: Easily Add WordPress Estimated Reading Time Without Bloated Plugins


