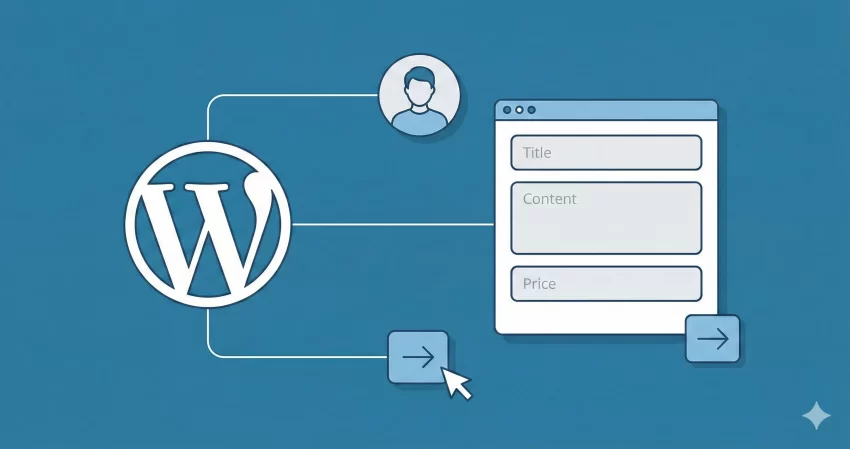
Keeping users out of the backend dashboard is a common challenge for WordPress developers building directories, membership sites, or community blogs. If you want to securely create frontend post submission form workflows that handle custom meta fields and robust editing capabilities, you are in the right place. By moving the authoring experience to the frontend, you improve security, maintain strict brand consistency, and offer a vastly superior user experience. This guide will walk you through building a complete, object-oriented-like procedural approach to frontend publishing without relying on heavy third-party plugins.
Before you create frontend post submission form architectures, you need to establish a solid foundation. We will be using native WordPress core functions, admin-post routing, and secure nonces to ensure your database remains protected from malicious input.
- PHP 8.0 or higher.
- WordPress 6.4 or higher.
- A child theme’s functions.php file or a custom site-specific plugin.
- Basic understanding of WordPress Nonces and the admin-post.php routing system.
Backup Required
Step 1: Build the Display Shortcode and Form UI
The first step to create frontend post submission form functionality is to generate the HTML interface that users will interact with. We will encapsulate this inside a WordPress shortcode so you can deploy it on any page. This form needs fields for the title, content, a custom meta field (like ‘Price’ or ‘Location’), and crucially, an implementation of WordPress nonces to prevent Cross-Site Request Forgery (CSRF).
We must also account for the ‘Edit’ state. If a user is editing an existing post, our form needs to pre-fill the current values. We accomplish this by checking for an ‘edit_id’ URL parameter, verifying the user owns that post, and fetching the existing data.
Registering the Shortcode and Fetching Existing Data
In this sub-step, we initialize our shortcode function. We use get_post() to retrieve the post object if an ID is passed. This allows a single form to handle both the creation of new posts and the updating of existing ones seamlessly.
function pnet_frontend_form_shortcode() {
    if ( ! is_user_logged_in() ) {
        return '<p>You must be logged in to submit or edit a post.</p>';
    }

    $current_user = wp_get_current_user();
    $post_id = isset( $_GET['edit_id'] ) ? intval( $_GET['edit_id'] ) : 0;

    $post_title = '';
    $post_content = '';
    $custom_meta_value = '';
    $form_action = 'pnet_submit_new_post';

    if ( $post_id > 0 ) {
        $existing_post = get_post( $post_id );

        // Security: Ensure the current user owns the post they are trying to edit
        if ( $existing_post && $existing_post->post_author == $current_user->ID ) {
            $post_title = $existing_post->post_title;
            $post_content = $existing_post->post_content;
            $custom_meta_value = get_post_meta( $post_id, 'pnet_custom_meta_key', true );
            $form_action = 'pnet_edit_existing_post';
        } else {
            return '<p>You do not have permission to edit this post.</p>';
        }
    }

    ob_start();
    ?>
    <div class="pnet-frontend-form-container">
        <form id="pnet-post-form" action="<?php echo esc_url( admin_url( 'admin-post.php' ) ); ?>" method="POST">

            <input type="hidden" name="action" value="<?php echo esc_attr( $form_action ); ?>">
            <input type="hidden" name="post_id" value="<?php echo esc_attr( $post_id ); ?>">
            <?php wp_nonce_field( 'pnet_post_action_verify', 'pnet_post_nonce' ); ?>

            <div class="pnet-form-group">
                <label for="pnet_title">Post Title</label>
                <input type="text" id="pnet_title" name="pnet_title" value="<?php echo esc_attr( $post_title ); ?>" required>
            </div>

            <div class="pnet-form-group">
                <label for="pnet_content">Post Content</label>
                <textarea id="pnet_content" name="pnet_content" rows="6" required><?php echo esc_textarea( $post_content ); ?></textarea>
            </div>

            <div class="pnet-form-group">
                <label for="pnet_custom_meta">Custom Meta Field (e.g., Price)</label>
                <input type="text" id="pnet_custom_meta" name="pnet_custom_meta" value="<?php echo esc_attr( $custom_meta_value ); ?>">
            </div>

            <button type="submit" class="pnet-submit-btn">
                <?php echo $post_id > 0 ? 'Update Post' : 'Submit Post'; ?>
            </button>
        </form>
    </div>
    <?php
    return ob_get_clean();
}
add_shortcode( 'pnet_submission_form', 'pnet_frontend_form_shortcode' );

You might also like: Easily Create Custom Taxonomy in WordPress: The Ultimate Code vs. Plugin Guide
Step 2: Processing the New Post Submission
When you create frontend post submission form processing logic, you must route the form data securely. We are utilizing the admin-post.php file, which is WordPress’s native way to handle form submissions without exposing REST API endpoints unnecessarily. We hook into admin_post_pnet_submit_new_post to intercept the payload.
In this step, data sanitization is paramount. Never trust user input. We use functions like sanitize_text_field for titles and meta, and wp_kses_post for the main content to strip out malicious scripts while allowing safe HTML tags.
Validating and Inserting the Data
The code block below verifies the nonce, sanitizes the incoming POST data, and uses the core wp_insert_post() function. If the insertion is successful, we immediately use update_post_meta() to save our custom fields before redirecting the user.
function pnet_handle_new_post_submission() {
    // 1. Verify Nonce and User Authorization
    if ( ! isset( $_POST['pnet_post_nonce'] ) || ! wp_verify_nonce( $_POST['pnet_post_nonce'], 'pnet_post_action_verify' ) ) {
        wp_die( 'Security check failed.' );
    }

    if ( ! is_user_logged_in() ) {
        wp_die( 'Unauthorized user.' );
    }

    // 2. Sanitize Input Data
    $title   = isset( $_POST['pnet_title'] ) ? sanitize_text_field( wp_unslash( $_POST['pnet_title'] ) ) : '';
    $content = isset( $_POST['pnet_content'] ) ? wp_kses_post( wp_unslash( $_POST['pnet_content'] ) ) : '';
    $meta    = isset( $_POST['pnet_custom_meta'] ) ? sanitize_text_field( wp_unslash( $_POST['pnet_custom_meta'] ) ) : '';

    if ( empty( $title ) || empty( $content ) ) {
        wp_redirect( add_query_arg( 'status', 'error_empty', wp_get_referer() ) );
        exit;
    }

    // 3. Prepare Post Array
    $post_data = array(
        'post_title'   => $title,
        'post_content' => $content,
        'post_status'  => 'pending', // Set to publish if you want auto-publishing
        'post_author'  => get_current_user_id(),
        'post_type'    => 'post'
    );

    // 4. Insert Post
    $new_post_id = wp_insert_post( $post_data );

    if ( ! is_wp_error( $new_post_id ) ) {
        // 5. Update Meta Fields
        update_post_meta( $new_post_id, 'pnet_custom_meta_key', $meta );

        // Optional: Purge cache if using W3 Total Cache or similar plugins
        if ( function_exists( 'w3tc_flush_all' ) ) {
            w3tc_flush_all();
        }

        wp_redirect( add_query_arg( 'status', 'success_new', wp_get_referer() ) );
    } else {
        wp_redirect( add_query_arg( 'status', 'error_insert', wp_get_referer() ) );
    }
    exit;
}
add_action( 'admin_post_pnet_submit_new_post', 'pnet_handle_new_post_submission' );
Pro Tip: Caching and CDNs
Step 3: Updating and Editing Existing Posts
To fully create frontend post submission form ecosystems, the edit feature is just as critical as the creation phase. Users inevitably make typos or need to update their custom meta fields later. We handle this via a separate action hook: admin_post_pnet_edit_existing_post.
The logic is similar to insertion, but instead of wp_insert_post(), we use wp_update_post(). Crucially, we must re-verify that the user submitting the edit request is the actual author of the post. Failing to perform this check leads to severe privilege escalation vulnerabilities.
Securing the Update Logic
In this sub-step, we extract the post_id from the hidden input field. We load the existing post from the database and compare the post_author to the currently logged-in user. Only if they match do we proceed with applying the sanitized data to the database.
function pnet_handle_edit_post_submission() {
if ( ! isset( $_POST['pnet_post_nonce'] ) || ! wp_verify_nonce( $_POST['pnet_post_nonce'], 'pnet_post_action_verify' ) ) {
wp_die( 'Security check failed.' );
}
$post_id = isset( $_POST['post_id'] ) ? intval( $_POST['post_id'] ) : 0;
if ( $post_id === 0 ) {
wp_die( 'Invalid Post ID.' );
}
$existing_post = get_post( $post_id );
if ( ! $existing_post || $existing_post->post_author != get_current_user_id() ) {
wp_die( 'You do not have permission to modify this content.' );
}
$title = isset( $_POST['pnet_title'] ) ? sanitize_text_field( wp_unslash( $_POST['pnet_title'] ) ) : '';
$content = isset( $_POST['pnet_content'] ) ? wp_kses_post( wp_unslash( $_POST['pnet_content'] ) ) : '';
$meta = isset( $_POST['pnet_custom_meta'] ) ? sanitize_text_field( wp_unslash( $_POST['pnet_custom_meta'] ) ) : '';
$update_data = array(
'ID' => $post_id,
'post_title' => $title,
'post_content' => $content,
);
$updated_post_id = wp_update_post( $update_data );
if ( ! is_wp_error( $updated_post_id ) ) {
update_post_meta( $updated_post_id, 'pnet_custom_meta_key', $meta );
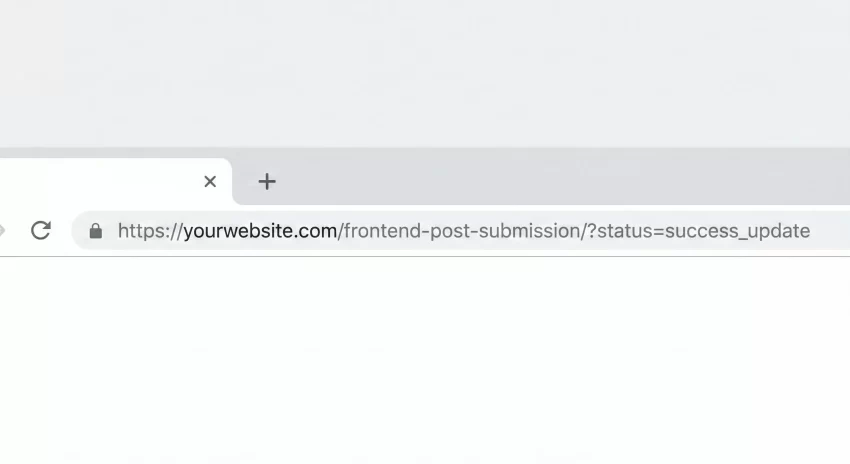
wp_redirect( add_query_arg( 'status', 'success_update', wp_get_referer() ) );
} else {
wp_redirect( add_query_arg( 'status', 'error_update', wp_get_referer() ) );
}
exit;
}
add_action( 'admin_post_pnet_edit_existing_post', 'pnet_handle_edit_post_submission' );
You might also like: Designing WordPress Dark Mode: The Ultimate Developer Guide
Step 4: Providing User Feedback with Notices
When you create frontend post submission form systems, user experience dictates that you must provide clear feedback. Because our form processing logic redirects back to the referring page with a status query parameter, we can catch this parameter and display a success or error message above the form.
You can hook into the_content or simply place this logic right above your shortcode rendering. We will create a small helper function that reads the $_GET['status'] parameter and outputs styled HTML notices safely.
Rendering the Status Messages
Add the following function to your codebase and call it right before your


