
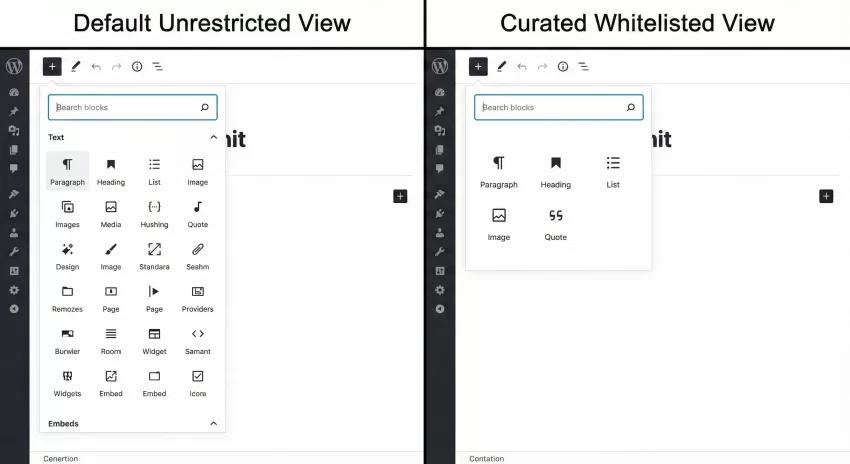
As a WordPress developer, one of the most terrifying moments is handing over a beautifully crafted, pixel-perfect website to a client, only to return a week later and find the layout completely shattered. The Gutenberg editor is incredibly powerful, offering dozens of core blocks, embed options, and potentially hundreds of third-party blocks added by various plugins. However, this flexibility is a double-edged sword. When clients have access to every single block, they often get overwhelmed, use the wrong block for the wrong layout, or inadvertently introduce design inconsistencies that break your carefully structured CSS. The ultimate solution to this problem is learning how to Whitelist WordPress blocks.
When you Whitelist WordPress blocks, you are taking a proactive, developer-first approach to content management. Instead of trying to hide things with CSS or hoping the client reads your documentation, you programmatically declare exactly which blocks are allowed to be loaded in the editor interface. This process is known as “curating the editor experience.” By restricting the block inserter to only the essential tools required for a specific post type, you drastically reduce cognitive load for authors, improve backend performance by loading fewer block assets, and most importantly, bulletproof your site’s design. In this comprehensive technical guide, we will walk through the exact PHP filters, conditional logic, and debugging steps you need to master this technique.
- PHP 8.0 or higher running on your server environment.
- WordPress version 5.8 or higher (when block contexts were introduced).
- A custom child theme or a site-specific utility plugin to safely add PHP code.
- A full database and file backup of your site before making these changes.
- Basic understanding of WordPress hooks and conditional tags.
Understanding the Core PHP Filter
To effectively Whitelist WordPress blocks, we must intercept the block editor’s initialization sequence before it sends the list of registered blocks to the JavaScript application (React) running in the browser. WordPress provides a specific, highly useful filter hook for this exact purpose: allowed_block_types_all.
The allowed_block_types_all filter acts as a gatekeeper. When the block editor loads, it checks this filter to see if a specific array of allowed blocks has been defined. If the filter returns a boolean true (the default behavior), WordPress allows all registered blocks to be displayed. If it returns a boolean false, the editor will literally allow zero blocks, rendering it useless. However, if it returns an indexed array of block name strings (e.g., core/paragraph, core/image), the editor will strictly Whitelist WordPress blocks that match those exact strings, hiding everything else.
It is crucial to understand that this filter passes two arguments to your callback function: the current list of allowed blocks (either boolean or an array), and the $block_editor_context object. The context object is your best friend here, as it contains the $post object, allowing you to check the current post type, post ID, or even post templates before applying your whitelist logic. This means you can Whitelist WordPress blocks uniquely for a ‘Post’, completely differently for a ‘Page’, and have a third unique set for a ‘Portfolio’ custom post type.
Finding the Exact Block Slugs
Before you can write the code to Whitelist WordPress blocks, you must know the exact programmatic names (slugs) of the blocks you want to keep. Every block in WordPress consists of a namespace and a block name, formatted as namespace/block-name. For example, all default WordPress blocks belong to the core namespace.
Finding these names might seem tricky at first, especially for third-party blocks added by plugins like WooCommerce, Yoast, or custom block libraries. However, it is quite straightforward if you utilize your browser’s developer tools. You do not need to guess; you can query the block registry directly from the console.
Using the Browser Console
To find the blocks you want to whitelist, open any WordPress post or page in the block editor. Right-click anywhere on the screen and select “Inspect” to open your browser’s Developer Tools, then navigate to the “Console” tab. In the console, type the following JavaScript command and hit Enter:
wp.blocks.getBlockTypes().forEach( function( block ) {
    console.log( block.name );
});
This simple script queries the WordPress JavaScript global object (wp) and loops through every single block currently registered in your editor. It will output a long list of strings, such as core/paragraph, core/heading, core/list, woocommerce/product-image, etc. You need to copy the specific strings of the blocks you want to retain. Keep these safe in a text document, as they will form the array you use to Whitelist WordPress blocks in the next steps.
Pro Tip: Keep a Reference List
You might also like: Fix the Deadly WordPress Redirect Loop: The Ultimate Guide to Solving ERR_TOO_MANY_REDIRECTS
Step 1: Implementing a Basic Whitelist
Now that we understand the filter and have our block slugs, let’s write our first function to Whitelist WordPress blocks. We will start with a global approach, applying the restriction universally across all post types. This is generally too restrictive for a real-world site, but it is the foundational step necessary to understand the syntax.
In this step, we will hook into allowed_block_types_all and return a simple array containing only the most basic text formatting blocks: paragraph, heading, list, and quote. By doing this, we strip away all design blocks, widget blocks, and embed blocks, creating an ultra-minimalist, distraction-free writing environment.
The Global PHP Code
Open your child theme’s functions.php file or your site-specific custom plugin. Add the following PHP code. Notice that we are prefixing our function with pnet_ to prevent any potential naming collisions with other plugins or themes.
/**
 * Globally Whitelist WordPress blocks for the entire site.
 * * @param bool|array $allowed_block_types Existing allowed blocks.
 * @param WP_Block_Editor_Context $block_editor_context The current block editor context.
 * @return array The restricted list of allowed block slugs.
 */
function pnet_global_block_whitelist( $allowed_block_types, $block_editor_context ) {

    // Define our strict array of allowed blocks
    $pnet_allowed_blocks = array(
        'core/paragraph',
        'core/heading',
        'core/list',
        'core/list-item', // Essential for core/list to function correctly in newer WP versions
        'core/quote',
        'core/image',
    );

    // Return the array to overwrite the default behavior
    return $pnet_allowed_blocks;
}
add_filter( 'allowed_block_types_all', 'pnet_global_block_whitelist', 10, 2 );
Once you save this code and refresh your block editor, you will notice a drastic change. Click the “+” block inserter icon, and you will only see the six blocks we defined in our array. You have successfully managed to Whitelist WordPress blocks globally. However, as you might realize, limiting a ‘Page’ to only these basic blocks makes it impossible to build complex layouts. Therefore, we must move on to conditional logic.
Step 2: Post-Type Specific Logic
The true power of this technique lies in conditional restrictions. A standard ‘Post’ might only need text and image blocks, as the layout is handled by the theme’s single.php template. Conversely, a ‘Page’ might act as a landing page, requiring columns, group blocks, covers, and buttons. To properly Whitelist WordPress blocks without ruining your site’s flexibility, we must evaluate the $block_editor_context object.
The $block_editor_context object contains a property called $post, which represents the current post being edited. By checking $block_editor_context->post->post_type, we can serve different arrays of allowed blocks depending on where the user is currently working. This is the gold standard for developer-client handoffs.
Applying Conditional Restrictions
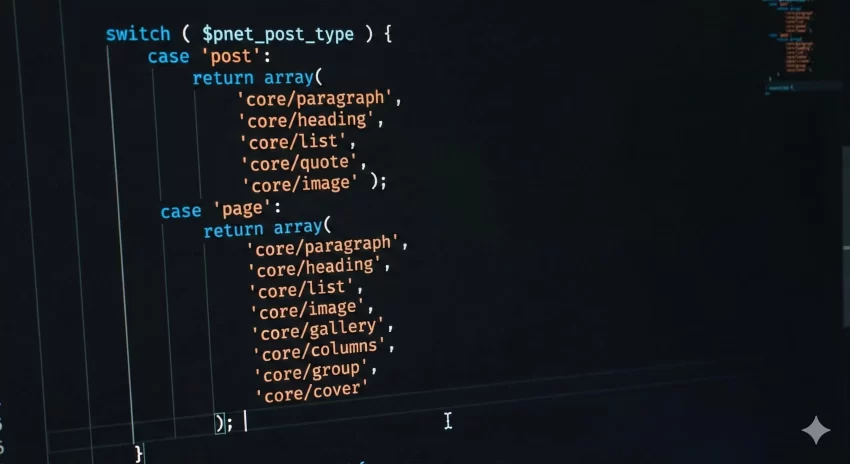
Let’s update our previous function. We will use a PHP switch statement to evaluate the post type. If the user is editing a standard ‘post’, we will give them basic writing tools. If they are editing a ‘page’, we will give them a broader set of layout blocks. For any other post type not specified, we will return the original $allowed_block_types, meaning no restrictions will apply.
/**
 * Conditionally Whitelist WordPress blocks based on post type.
 * * @param bool|array $allowed_block_types Existing allowed blocks.
 * @param WP_Block_Editor_Context $block_editor_context The current block editor context.
 * @return bool|array The restricted list or true to allow all.
 */
function pnet_conditional_block_whitelist( $allowed_block_types, $block_editor_context ) {

    // Ensure we are editing a post and the post object exists
    if ( empty( $block_editor_context->post ) ) {
        return $allowed_block_types;
    }

    // Get the current post type
    $pnet_post_type = $block_editor_context->post->post_type;

    switch ( $pnet_post_type ) {
        case 'post':
            // Strict text-focused Whitelist WordPress blocks for blog posts
            return array(
                'core/paragraph',
                'core/heading',
                'core/list',
                'core/list-item',
                'core/quote',
                'core/image',
                'core/embed', // Allow standard embeds like YouTube
            );

        case 'page':
            // Broader layout-focused Whitelist WordPress blocks for landing pages
            return array(
                'core/paragraph',
                'core/heading',
                'core/list',
                'core/list-item',
                'core/image',
                'core/gallery',
                'core/columns',
                'core/column', // Essential child block for columns
                'core/group',
                'core/button',
                'core/buttons', // Essential parent block for button
                'core/cover',
                'core/spacer',
                'core/separator',
            );

        default:
            // For all other post types (like CPTs), fallback to default behavior (allow all)
            return $allowed_block_types;
    }
}
add_filter( 'allowed_block_types_all', 'pnet_conditional_block_whitelist', 10, 2 );
Crucial Warning: Parent and Child Blocks
core/columns but forget to whitelist core/column (singular), the columns block will completely break in the editor because it is not allowed to insert its own necessary child elements. The same applies to core/buttons and core/button, or core/list and core/list-item. Always check for dependencies! Step 3: Advanced Handling for Custom Post Types
When you build complex applications with WordPress, you inevitably rely heavily on Custom Post Types (CPTs). For example, you might have a ‘Testimonial’ CPT, an ‘Event’ CPT, or a ‘Portfolio’ CPT. These specific data structures often require very rigid, highly restricted data entry formats. If a client inserts a ‘Cover’ block into a ‘Testimonial’ CPT that is only supposed to output simple text on the frontend, it breaks the UI pattern.
Therefore, we must rigorously Whitelist WordPress blocks for these custom structures. Furthermore, sometimes custom post types rely on very specific third-party blocks (like Advanced Custom Fields blocks or custom-built React blocks). You must ensure these custom namespaces are correctly included in your whitelist array.
Restricting a Portfolio CPT with Custom Blocks
Imagine we have a CPT registered as pnet_portfolio. We want to restrict this CPT so the user can only add an Image, a Paragraph, and a custom block we built called pixelnet/project-details. Here is how we expand our switch statement to accommodate this specific requirement.
/**
 * Extended function to Whitelist WordPress blocks for CPTs.
 */
function pnet_advanced_cpt_whitelist( $allowed_block_types, $block_editor_context ) {

    if ( empty( $block_editor_context->post ) ) {
        return $allowed_block_types;
    }

    $pnet_post_type = $block_editor_context->post->post_type;

    // We can use an IF/ELSEIF structure for more complex logic if preferred
    if ( 'pnet_portfolio' === $pnet_post_type ) {

        // Whitelist WordPress blocks specifically for the Portfolio CPT
        $portfolio_blocks = array(
            'core/image',
            'core/paragraph',
            'core/heading',
            'pixelnet/project-details', // Our custom block namespace
            'acf/client-testimonial',   // An ACF registered block
        );

        return $portfolio_blocks;

    } elseif ( 'post' === $pnet_post_type ) {

        return array( 'core/paragraph', 'core/heading', 'core/image' );

    }

    // Default return
    return $allowed_block_types;
}
add_filter( 'allowed_block_types_all', 'pnet_advanced_cpt_whitelist', 10, 2 );
By enforcing these strict rules on custom post types, you essentially turn the Gutenberg editor into a highly customized, bulletproof form builder. The client cannot break the layout because the tools required to break the layout simply do not exist in their interface. They are forced to enter data exactly how your frontend templates are expecting to receive and parse it.
You might also like: Add reCaptcha v3 WordPress: The Ultimate 3-Step Guide
Troubleshooting Common Errors
Even seasoned developers run into issues when manipulating the block registry. When you attempt to Whitelist WordPress blocks, a single typo can result in the infamous “White Screen of Death” (WSOD) within the block editor, or strange, broken UI states where blocks say they are “invalid.” Here are the most common issues and how to resolve them.
Why does my block editor crash with a fatal error after applying the code?
The allowed_block_types_all filter expects a very specific return type. It MUST return either a boolean (true to allow all, false to deny all) or an array of strings. If your custom function accidentally returns null, an empty string "", or undefined (perhaps due to failing an if condition without a default return statement), the React application will crash. Always ensure your function has a fallback return $allowed_block_types; at the very end of its execution path.
Why are my column or list blocks completely broken and uneditable?
As mentioned in the pro-tip earlier, this occurs because you forgot to whitelist the inner child blocks. Many complex WordPress blocks are essentially wrappers for smaller blocks. core/columns requires core/column. core/list requires core/list-item. core/buttons requires core/button. If you whitelist the parent but not the child, the editor cannot render the inner elements, resulting in a broken block state. You must inspect the block dependencies and include all necessary child slugs in your array to properly Whitelist WordPress blocks.
How do I whitelist reusable blocks or synced patterns?
Reusable blocks (now referred to as Synced Patterns in newer WordPress versions) operate under their own specific block slug. If you restrict the editor heavily and want users to still be able to insert their pre-saved patterns, you must explicitly include the core/block slug in your allowed array. Without core/block, the pattern inserter tab will appear empty or fail to function entirely, confusing your content managers.
Mastering the Curation Process
Taking control of the content creation experience is what separates a good website builder from a professional WordPress developer. By utilizing the allowed_block_types_all filter, you protect your intricate layouts, prevent client errors, and create a streamlined, focused writing environment. It takes a little extra time during the development phase to catalog and map out the required blocks, but the reduction in post-launch support tickets and broken layout requests is immeasurable.
Remember to always test your arrays thoroughly, ensuring that parent-child block dependencies are satisfied and that custom post types have the exact tools they need. When you carefully and deliberately Whitelist WordPress blocks, you deliver a robust, enterprise-grade content management system that clients will love to use and struggle to break.


