Want to help customers complete their purchases faster without navigating through the shopping cart? By default, WooCommerce adds products to the cart and requires customers to visit the cart page before proceeding to checkout. This extra step can interrupt the buying process and create unnecessary friction. In this tutorial, you will learn how to add a WooCommerce Buy Now Button next to the standard Add to Cart button, allowing customers to add a product and proceed directly to checkout. We will implement this functionality using a lightweight custom PHP solution without installing another plugin.
Why Add a Buy Now Button in WooCommerce?
WooCommerce provides a standard Add to Cart button that allows customers to collect multiple products before completing their orders. However, this shopping experience is not always ideal for stores selling individual products, digital downloads, limited-time offers, or products that customers typically purchase one at a time.
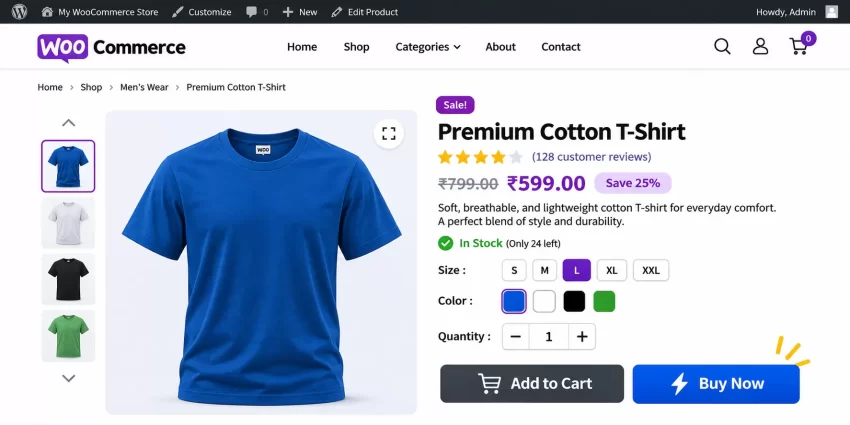
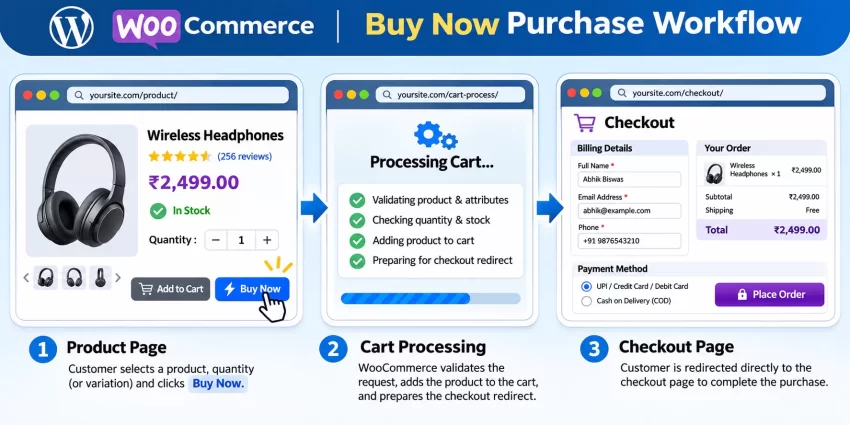
Adding a WooCommerce Buy Now Button gives customers an alternative purchasing option. Instead of following the traditional cart workflow, customers can select a product, click Buy Now, and proceed directly to the checkout page. The existing Add to Cart functionality remains unchanged, so customers can still use the shopping cart whenever they want.
Here are some advantages of implementing this feature:
- Faster checkout: Customers can skip the cart page and proceed directly to checkout.
- Improved user experience: Provide an additional purchasing option without changing the existing shopping workflow.
- Reduced navigation: Eliminate an unnecessary page visit for customers purchasing individual products.
- Better purchase intent: Give customers a direct purchasing action when they are ready to buy.
- Lightweight implementation: Add the functionality using WooCommerce hooks instead of installing an additional plugin.
In this guide, we will create a custom Buy Now button that works with simple and variable products on individual product pages. It will preserve WooCommerce’s native add-to-cart validation and product variation handling.
Prerequisites
Before implementing the WooCommerce Buy Now Button, make sure your development environment meets the following requirements:
- WordPress 6.0 or a compatible newer version.
- WooCommerce installed and activated.
- PHP 8.0 or newer.
- Basic knowledge of PHP and WordPress hooks and filters.
- Access to your child theme’s functions.php file or a site-specific plugin.
- A complete website and database backup.
- A staging environment for testing, preferably.
Important: Never modify the parent theme’s functions.php file directly. Theme updates may overwrite your changes. For a reusable implementation, I recommend using a site-specific plugin. You can also use a child theme if the functionality is specific to that theme.
Understand the WooCommerce Add-to-Cart Workflow
Before writing the code, it is useful to understand how WooCommerce processes product purchases. On a single product page, WooCommerce generates an add-to-cart form containing the product ID, quantity, and, for variable products, the selected variation ID and attributes.
When a customer submits this form, WooCommerce validates the submitted product information, checks stock availability, processes the add-to-cart request, and updates the shopping cart. We can use this existing workflow rather than creating a separate cart-handling mechanism.
Our implementation will follow this sequence:
- Display a Buy Now button next to the existing Add to Cart button.
- Include a custom identifier and security nonce in the product form.
- Allow WooCommerce to process the normal add-to-cart request.
- Detect whether the customer clicked Buy Now.
- Redirect the customer to the checkout page after successful cart processing.
This approach is important because it allows WooCommerce to handle product validation, selected variations, stock restrictions, and quantity processing. We only customize the final redirection behavior.
You might also like: How To Add Custom WooCommerce Product Data Tabs
Step 1: Create the Custom PHP Function
First, we need to create a PHP function that displays the Buy Now button on individual WooCommerce product pages. We will use the woocommerce_after_add_to_cart_button action hook, which allows us to insert additional HTML immediately after the standard Add to Cart button.
We will also restrict the button to simple and variable products. These product types use the standard WooCommerce add-to-cart form, making them suitable for this implementation. Grouped and external products have different purchasing workflows and are intentionally excluded.
1.1 Add the Button Using a WooCommerce Hook
Open your child theme’s functions.php file or your site-specific plugin. Add the following code:
/**
 * Add a Buy Now button to single product pages.
 */
function pnet_add_buy_now_button() {

    global $product;

    if ( ! $product || ! is_a( $product, 'WC_Product' ) ) {
        return;
    }

    // Support simple and variable products only.
    if ( ! $product->is_type( array( 'simple', 'variable' ) ) ) {
        return;
    }

    // Add a nonce for request verification.
    wp_nonce_field(
        'pnet_buy_now_action',
        'pnet_buy_now_nonce',
        false
    );

    echo '<button type="submit"
        name="pnet_buy_now"
        value="1"
        class="button pnet-buy-now-button">
        Buy Now
    </button>';
}
add_action(
    'woocommerce_after_add_to_cart_button',
    'pnet_add_buy_now_button'
);
Let’s understand the important parts of this function:
woocommerce_after_add_to_cart_button: Inserts our custom button inside the existing single-product add-to-cart form, immediately after the default button.$product: Provides access to the current WooCommerce product object.is_type(): Ensures that the button is displayed only for supported simple and variable products.wp_nonce_field(): Generates a security nonce that we will verify before performing the custom redirect.pnet_buy_now: Identifies the customer’s intention to proceed directly to checkout.
Notice that the Buy Now button uses type="submit". This is intentional. It submits the existing WooCommerce product form, preserving the selected quantity and variation information instead of implementing a separate add-to-cart request.
At this stage, the button will appear next to Add to Cart, but clicking it will still follow the default WooCommerce cart behavior. We will implement the checkout redirection in the next step.
You might also like:

Step 2: Redirect Customers Directly to Checkout
Now that the button is available, we need to modify WooCommerce’s default post-add-to-cart redirection behavior. WooCommerce provides the woocommerce_add_to_cart_redirect filter, which allows developers to change the destination URL after an item has been successfully added to the cart.
We will check whether the submitted request contains our custom Buy Now identifier. If it does, we will verify the security nonce and return the WooCommerce checkout URL. Otherwise, we will preserve the original redirect URL so the standard Add to Cart behavior remains unaffected.
2.1 Add the Checkout Redirect Function
Add the following function below the previous code in the same file:
/**
 * Redirect Buy Now requests directly to checkout.
 *
 * @param string $url Redirect URL.
 * @return string
 */
function pnet_buy_now_redirect( $url ) {

    // Check whether the Buy Now button was submitted.
    if (
        ! isset( $_REQUEST['pnet_buy_now'] ) ||
        '1' !== sanitize_text_field(
            wp_unslash( $_REQUEST['pnet_buy_now'] )
        )
    ) {
        return $url;
    }

    // Verify the security nonce.
    $nonce = isset( $_REQUEST['pnet_buy_now_nonce'] )
        ? sanitize_text_field(
            wp_unslash( $_REQUEST['pnet_buy_now_nonce'] )
        )
        : '';

    if ( ! wp_verify_nonce( $nonce, 'pnet_buy_now_action' ) ) {
        return $url;
    }

    // Redirect to the WooCommerce checkout page.
    return wc_get_checkout_url();
}
add_filter(
    'woocommerce_add_to_cart_redirect',
    'pnet_buy_now_redirect',
    10,
    1
);
Here is what happens when this function executes:
- WooCommerce completes its normal add-to-cart processing.
- Our filter checks whether the submitted request contains
pnet_buy_now. - The request value is sanitized before comparison.
- The nonce is verified using
wp_verify_nonce(). - If the request is valid,
wc_get_checkout_url()returns the configured checkout page URL. - If the request does not contain our Buy Now identifier, the original redirect URL is returned.
Using wc_get_checkout_url() is preferable to hardcoding a checkout URL such as /checkout/. WooCommerce can use a customized checkout page, a different permalink structure, or a multilingual URL configuration. The function retrieves the configured checkout destination automatically.
2.2 Why We Should Not Use a Separate Add-to-Cart URL
You might come across tutorials that create a Buy Now button using a direct URL such as ?add-to-cart=123 followed by a checkout redirect. Although this approach can work for basic simple products, it does not provide the same reliable handling of variable product attributes and quantities as submitting the original product form.
Our implementation uses the native product form. This means WooCommerce receives the selected variation ID, product attributes, and quantity through its normal request processing. We only change the redirect destination after the add-to-cart operation.
Pro Tip
Step 3: Style the Buy Now Button with CSS
The default WooCommerce button styling may make the new Buy Now button look identical to Add to Cart. To make the additional purchasing option noticeable, we can apply a separate CSS class and customize its appearance.
Our PHP function already adds the pnet-buy-now-button class. We can target this class to change the background color, typography, border, spacing, and hover effects without affecting other WooCommerce buttons.
3.1 Add Custom CSS
Navigate to Appearance → Customize → Additional CSS, or add the following stylesheet to your child theme:
/* WooCommerce Buy Now Button */
.single-product .pnet-buy-now-button {
    background-color: #2563eb;
    color: #ffffff;
    border: 1px solid #2563eb;
    border-radius: 5px;
    padding: 12px 24px;
    font-size: 15px;
    font-weight: 600;
    line-height: 1.4;
    margin-left: 8px;
    cursor: pointer;
    transition: background-color 0.2s ease,
                border-color 0.2s ease;
}

/* Hover effect */
.single-product .pnet-buy-now-button:hover {
    background-color: #1d4ed8;
    border-color: #1d4ed8;
    color: #ffffff;
}

/* Keyboard focus */
.single-product .pnet-buy-now-button:focus-visible {
    outline: 3px solid rgba(37, 99, 235, 0.35);
    outline-offset: 3px;
}

/* Small-screen layout */
@media screen and (max-width: 480px) {

    .single-product .pnet-buy-now-button {
        margin-left: 0;
        margin-top: 10px;
    }
}
This CSS gives the Buy Now button a blue background and a clear visual distinction from the standard Add to Cart button. The hover and keyboard-focus states also improve interaction feedback.
Depending on your theme’s layout, both buttons may not fit on the same line on smaller screens. If necessary, adjust the button padding or use a responsive flex layout in your theme’s product form. Always test the final appearance on desktop, tablet, and mobile devices.
Step 4: Test the Buy Now Button
Once you have added the PHP functions and CSS, clear your website cache and open a WooCommerce product page. You should now see two purchasing options: the existing Add to Cart button and the newly added Buy Now button.
Do not assume the implementation is complete simply because the button appears. Test the entire purchase workflow to ensure the product is added correctly and the checkout redirection works without affecting the original cart functionality.
4.1 Test a Simple Product
Start with a simple product that is in stock and available for purchase. Select a quantity greater than one and click Buy Now. WooCommerce should add the selected quantity to the cart and redirect you directly to the configured checkout page.
Verify that the checkout order summary contains the correct product, quantity, price, and applicable taxes or shipping calculations. Also test the standard Add to Cart button to ensure it still follows your store’s original cart workflow.
4.2 Test a Variable Product
Variable products require additional testing because customers must select attributes such as size, color, or material before purchasing. Select a valid variation, change the quantity, and click Buy Now.
The checkout page should display the exact variation selected on the product page. If the customer has not selected a required variation, WooCommerce should display its normal validation message instead of adding an incomplete product to the cart.
4.3 Test Stock and Cart Behavior
Test the implementation with products that have limited stock, products that are out of stock, and products with quantity restrictions. Confirm that WooCommerce’s standard validation rules continue to work.
Also test the Buy Now button when the customer already has other products in the cart. Our implementation redirects to checkout but does not clear the existing cart. This is intentional because deleting existing cart items would be a separate and potentially destructive purchasing behavior.
Testing Required
You might also like:

Step 5: Complete PHP Code
If you followed the previous steps, you should now have two PHP functions and one action/filter registration. For convenience, here is the complete PHP implementation in a single code block.
You can copy this code into your site-specific plugin or child theme’s functions.php file. Do not add the same functions twice, as duplicate function declarations can cause fatal PHP errors.
/**
 * Add a Buy Now button to supported single product pages.
 */
function pnet_add_buy_now_button() {

    global $product;

    if ( ! $product || ! is_a( $product, 'WC_Product' ) ) {
        return;
    }

    if ( ! $product->is_type( array( 'simple', 'variable' ) ) ) {
        return;
    }

    wp_nonce_field(
        'pnet_buy_now_action',
        'pnet_buy_now_nonce',
        false
    );

    echo '<button type="submit"
        name="pnet_buy_now"
        value="1"
        class="button pnet-buy-now-button">
        Buy Now
    </button>';
}
add_action(
    'woocommerce_after_add_to_cart_button',
    'pnet_add_buy_now_button'
);


/**
 * Redirect Buy Now requests directly to checkout.
 *
 * @param string $url Redirect URL.
 * @return string
 */
function pnet_buy_now_redirect( $url ) {

    if (
        ! isset( $_REQUEST['pnet_buy_now'] ) ||
        '1' !== sanitize_text_field(
            wp_unslash( $_REQUEST['pnet_buy_now'] )
        )
    ) {
        return $url;
    }

    $nonce = isset( $_REQUEST['pnet_buy_now_nonce'] )
        ? sanitize_text_field(
            wp_unslash( $_REQUEST['pnet_buy_now_nonce'] )
        )
        : '';

    if ( ! wp_verify_nonce( $nonce, 'pnet_buy_now_action' ) ) {
        return $url;
    }

    return wc_get_checkout_url();
}
add_filter(
    'woocommerce_add_to_cart_redirect',
    'pnet_buy_now_redirect',
    10,
    1
);
Common Errors and Troubleshooting
Although this implementation uses native WooCommerce hooks, some themes, plugins, caching systems, or custom checkout configurations may affect the final behavior. Below are common problems you may encounter while implementing a WooCommerce Buy Now Button and how to resolve them.
1. Buy Now Button Is Not Displaying
Possible cause: The theme may have overridden the default WooCommerce single-product template or removed the woocommerce_after_add_to_cart_button action hook.
Solution: Check whether your active theme’s single-product/add-to-cart templates contain the relevant WooCommerce action. If the hook is missing, you may need to update the template override or select an alternative hook that is executed inside the product form. Also verify that the current product is a simple or variable product.
2. Clicking Buy Now Adds the Product but Does Not Redirect
Possible cause: The custom request parameter is missing, the nonce is not submitted, or another plugin overrides the add-to-cart redirect.
Solution: Inspect the submitted form request and verify that both pnet_buy_now and pnet_buy_now_nonce are present. Check for conflicting redirect filters from other plugins. Make sure the button is inside the original WooCommerce product form.
3. Variable Products Are Not Added Correctly
Possible cause: The customer has not selected all required product attributes, or the theme uses a customized variation form.
Solution: Confirm that the form submits the correct variation ID and selected attributes. Test with the default WooCommerce theme temporarily to identify whether the issue is caused by a theme override or a third-party variation plugin.
4. Both Buttons Trigger Unexpected Behavior
Possible cause: A theme or plugin modifies the product form submission or intercepts button clicks using JavaScript.
Solution: Inspect the browser console for JavaScript errors and verify that the standard Add to Cart button does not submit the custom Buy Now parameter. The Buy Now identifier should be submitted only when the Buy Now button is clicked.
5. Customer Is Redirected to the Wrong Checkout Page
Possible cause: WooCommerce has a different checkout page configured, or a multilingual or checkout customization plugin modifies the destination URL.
Solution: Navigate to WooCommerce → Settings → Advanced → Page setup and verify the assigned checkout page. Our implementation uses wc_get_checkout_url(), so the correct configured checkout URL should be returned.
6. Existing Cart Products Are Still Visible at Checkout
Possible cause: This is the intended behavior of our implementation. The Buy Now button redirects to checkout without emptying the existing cart.
Solution: If your business requires a completely separate single-product checkout, you will need an additional cart-management implementation. Do not automatically empty the cart without considering existing customer selections, subscriptions, and other cart-related extensions.
You might also like: Stop WordPress Cron Job Not Working: The Ultimate Reliability Guide
Conclusion
Adding a WooCommerce Buy Now Button is a practical way to simplify the purchasing journey for customers who want to buy individual products without visiting the shopping cart first. By using WooCommerce’s native product form, the woocommerce_after_add_to_cart_button action, and the woocommerce_add_to_cart_redirect filter, we can implement this functionality with a small amount of custom PHP code.
The best part is that the standard Add to Cart functionality remains intact. Simple and variable products continue to use WooCommerce’s native validation, stock checks, quantity handling, and variation processing. The only change is the final destination after a successful Buy Now request: customers proceed directly to checkout.
For developers, this is a lightweight and maintainable alternative to installing another plugin for a relatively straightforward feature. Test the implementation with your theme, payment gateways, caching configuration, and other WooCommerce extensions before deploying it to a live store.
With the implementation complete, your WooCommerce Buy Now Button provides customers with two clear purchasing choices: continue shopping with Add to Cart or proceed directly to checkout with Buy Now.