Are you struggling with vulnerabilities and unauthorized requests hitting your custom endpoints? The foundation of any robust plugin or theme lies in mastering WordPress AJAX security. When developers expose server-side functions to the front-end without proper validation, they open the door to Cross-Site Request Forgery (CSRF) and malicious data injection. In this comprehensive guide, we will solve this exact problem by exploring how to properly generate, pass, and verify WordPress nonces in your asynchronous calls, ensuring your application remains bulletproof.
Before diving into the code, you need to ensure your development environment is properly set up. Implementing strict WordPress AJAX security requires a modern stack and a fundamental understanding of how client-server communication operates within the CMS ecosystem.
Prerequisites
- PHP 8.0+ running on your local or staging server.
- WordPress 6.0 or higher installed.
- A foundational understanding of PHP and JavaScript (ES6+).
- Active backup of your site (database and files).
- A custom plugin or child theme to safely add PHP functions.

Step 1: Understanding Nonces and CSRF Protection
A “nonce” stands for “number used once.” In the context of WordPress AJAX security, it is a cryptographic token generated by the server, passed to the client, and then sent back to the server with any subsequent AJAX request. If a malicious actor tries to trick an authenticated administrator’s browser into executing an unwanted action (a CSRF attack), the attack will fail because the attacker cannot guess the dynamically generated nonce required to validate the request.
It is critical to note that WordPress nonces are not strictly used only once; they are time-dependent tokens valid for a specific timeframe (defaulting to 24 hours). A deep understanding of the WordPress Nonce system is the cornerstone of protecting your custom endpoints.
The Anatomy of a WordPress Nonce
Unlike standard PHP sessions, WordPress generates nonces based on an action name, the current user ID, and a time tick. This means a nonce generated for a logged-in administrator will be entirely different from a nonce generated for a subscriber, even for the exact same action. This user-specific binding is a massive advantage for WordPress AJAX security.
Security Note
Did you know: You can dramatically improve user experience for your custom web tools by seamlessly injecting WordPress Plugin Action Links right inside the admin dashboard? Check out the full guide!
Step 2: Generating and Localizing the Nonce in PHP
To use a nonce in your front-end JavaScript, you must first generate it on the server-side using PHP. You cannot implement effective WordPress AJAX security if your JavaScript does not have access to a freshly minted token. We achieve this by utilizing the wp_create_nonce() function and securely passing it to our enqueued scripts using WordPress localization functions.
Historically, developers used wp_localize_script() to pass data to JavaScript. While still valid, the modern and preferred approach for passing arbitrary data is using wp_add_inline_script(), though we will demonstrate a clean implementation of localized variables which remains the industry standard for bridging PHP and JS in themes and plugins.
Enqueueing Scripts and Passing Data
Below is the code to enqueue your JavaScript file and attach the necessary localized object containing the AJAX URL and our security nonce.
function pnet_enqueue_ajax_scripts() {
    // Only load scripts where needed to save bandwidth
    if ( ! is_singular() ) {
        return;
    }

    // Register and enqueue the custom JavaScript file
    wp_enqueue_script(
        'pnet-ajax-script',
        plugin_dir_url( __FILE__ ) . 'assets/js/pnet-ajax.js',
        array(), // No dependencies, we will use Vanilla JS
        '1.0.0',
        true
    );

    // Generate the nonce for WordPress AJAX security
    $nonce = wp_create_nonce( 'pnet_secure_action_nonce' );

    // Localize the script to pass PHP variables to JavaScript
    wp_localize_script(
        'pnet-ajax-script',
        'pnetAjaxObj',
        array(
            'ajax_url' => admin_url( 'admin-ajax.php' ),
            'nonce'    => $nonce,
        )
    );
}
add_action( 'wp_enqueue_scripts', 'pnet_enqueue_ajax_scripts' );
Step 3: Passing the Nonce via JavaScript
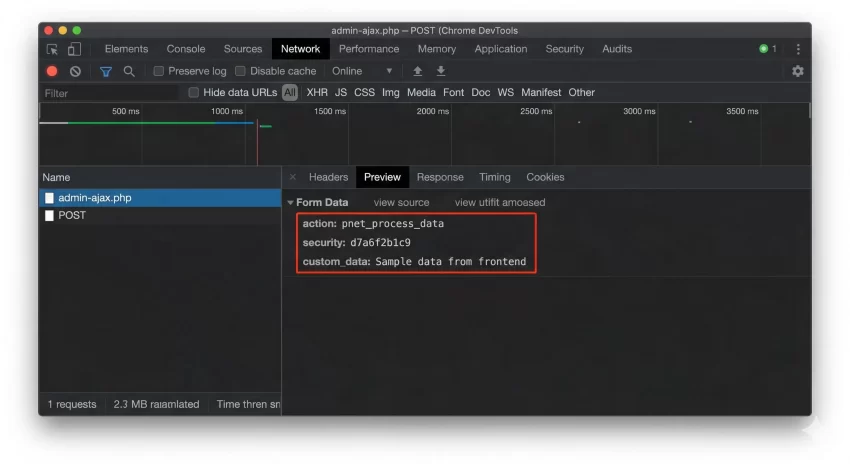
Now that our localized object pnetAjaxObj is available in the browser’s global scope, we need to intercept a user action (like a button click) and construct an asynchronous request. Proper WordPress AJAX security mandates that this nonce is appended to the payload of every POST request interacting with admin-ajax.php.
We will use the modern, native Fetch API instead of jQuery. This reduces dependencies and ensures better performance across your WordPress application.
Implementing the Fetch API Request
Create your pnet-ajax.js file. We will listen for a form submission or button click, prevent the default behavior, and send our data seamlessly to the server.
document.addEventListener( 'DOMContentLoaded', function() {
    const triggerButton = document.getElementById( 'pnet-trigger-btn' );

    if ( ! triggerButton ) {
        return;
    }

    triggerButton.addEventListener( 'click', function( event ) {
        event.preventDefault();

        // Prepare the payload, ensuring the nonce is included
        const formData = new FormData();
        formData.append( 'action', 'pnet_process_data' );
        formData.append( 'security', pnetAjaxObj.nonce ); // Crucial for WordPress AJAX security
        formData.append( 'custom_data', 'Sample data from frontend' );

        // Execute the fetch request
        fetch( pnetAjaxObj.ajax_url, {
            method: 'POST',
            body: formData
        } )
        .then( response => {
            if ( ! response.ok ) {
                throw new Error( 'Network response was not ok' );
            }
            return response.json();
        } )
        .then( data => {
            if ( data.success ) {
                console.log( 'Success:', data.data.message );
            } else {
                console.error( 'Server rejected request:', data.data );
            }
        } )
        .catch( error => {
            console.error( 'Fetch error:', error );
        } );
    } );
} );
Step 4: Verifying the Nonce on the Server Side
Generating and sending the nonce is only half the battle. The core of WordPress AJAX security happens on the server, where you must rigorously verify the incoming token before executing any logic. If a request arrives without a valid nonce, your application must immediately terminate the script to prevent unauthorized access.
WordPress provides the handy check_ajax_referer() function specifically for this purpose. It checks the nonce, and if it fails, it automatically kills the PHP execution and returns a 403 Forbidden HTTP response, ensuring malicious scripts are stopped dead in their tracks.
Writing the Secure AJAX Handler
In your plugin or functions.php, register the AJAX action hooks. Notice we use both wp_ajax_ (for logged-in users) and optionally wp_ajax_nopriv_ (for guests) depending on your needs. For administrative actions, never use the nopriv hook.
// Hook for logged-in users
add_action( 'wp_ajax_pnet_process_data', 'pnet_ajax_handler' );

function pnet_ajax_handler() {
    // 1. Verify the Nonce - Core WordPress AJAX security step
    if ( ! isset( $_POST['security'] ) || ! check_ajax_referer( 'pnet_secure_action_nonce', 'security', false ) ) {
        wp_send_json_error( 'Invalid security token. Request denied.', 403 );
        wp_die();
    }

    // 2. Verify User Capabilities (Defense in depth)
    if ( ! current_user_can( 'manage_options' ) ) {
        wp_send_json_error( 'Insufficient permissions.', 403 );
        wp_die();
    }

    // 3. Process the data safely
    $custom_data = isset( $_POST['custom_data'] ) ? sanitize_text_field( wp_unslash( $_POST['custom_data'] ) ) : '';

    if ( empty( $custom_data ) ) {
        wp_send_json_error( 'No data provided.', 400 );
        wp_die();
    }

    // Perform database operations here safely...

    // 4. Send successful response
    wp_send_json_success( array(
        'message' => 'Data processed successfully!',
        'received' => $custom_data
    ) );

    wp_die(); // Always kill the script at the end of an AJAX call
}
Defense in Depth
check_ajax_referer() with current_user_can() for flawless WordPress AJAX security. Step 5: Advanced Security Measures and Sanitization
Even with strict nonce verification, your application is vulnerable to Cross-Site Scripting (XSS) and SQL Injection if you fail to sanitize incoming data and escape outgoing data. Proper WordPress AJAX security dictates that you must never trust user input, regardless of how secure your nonce implementation is.
Every single variable pulled from the $_POST array must be cleaned. Use functions like sanitize_text_field(), absint(), or sanitize_email() depending on the expected data type. Furthermore, always utilize $wpdb->prepare() when interacting directly with the database within your AJAX handlers.
Applying Strict Data Sanitization
If your AJAX endpoint is meant to receive an array of data or complex nested objects, sanitization becomes slightly more complex but remains absolutely mandatory. Here is how you handle arrays safely within an AJAX callback.
function pnet_secure_array_handler() {
    // Nonce verification omitted for brevity, but assume it is here

    if ( isset( $_POST['complex_data'] ) && is_array( $_POST['complex_data'] ) ) {
        $clean_array = array();

        // Iterate and sanitize every single node
        foreach ( wp_unslash( $_POST['complex_data'] ) as $key => $value ) {
            $clean_key = sanitize_key( $key );
            $clean_value = sanitize_text_field( $value );
            $clean_array[ $clean_key ] = $clean_value;
        }

        // Process $clean_array safely...
        wp_send_json_success( 'Array sanitized and processed' );
    } else {
        wp_send_json_error( 'Invalid data format' );
    }
    wp_die();
}
Troubleshooting Common Errors
When implementing WordPress AJAX security protocols, you will likely run into a few common roadblocks. Below is a troubleshooting guide to help you debug failing requests quickly.
Why am I getting a 403 Forbidden error?
This usually means your nonce verification failed. Ensure that the action string passed to wp_create_nonce('my_action') perfectly matches the string passed to check_ajax_referer('my_action', 'security'). Also, verify that the logged-in user generating the nonce is the same user executing the AJAX call, as nonces are tied to user sessions.
Why does my AJAX call return a “0” instead of JSON?
If your response body is simply 0, it means your PHP function executed, but it reached the end of the admin-ajax.php file without firing wp_die(), wp_send_json_success(), or wp_send_json_error(). Always ensure your custom handler terminates the script explicitly.
Why is my POST data missing or empty on the server?
When using the Fetch API instead of jQuery, sending data as application/json won’t automatically populate the $_POST array in PHP. You must use the FormData object in JavaScript (as demonstrated in Step 3) or manually read the php://input stream if you prefer sending raw JSON strings.

Did you know: You can completely bypass the clunky wp-admin dashboard by choosing to Create Frontend Post Submission Form directly on your live pages, giving your users a dramatically faster and more secure authoring experience?
Conclusion
Securing your custom endpoints is not optional; it is a critical responsibility for any developer operating within the CMS. By implementing strict WordPress AJAX security, you safeguard your databases from unauthorized manipulations and protect your users from malicious cross-site attacks. Always remember the holy trinity of backend communication: generate a secure nonce, pass it seamlessly via JavaScript, and rigorously verify both the token and the user’s capabilities on the server before processing sanitized data.
By following the steps outlined in this guide, you have upgraded your development toolkit. Your forms, interactive elements, and backend data processing are now vastly more resilient. Keep practicing these WordPress AJAX security concepts until they become second nature in your daily coding workflow.


