Do you want to hide a specific plugin from your WordPress dashboard’s Plugins page? Whether you are developing a white-label WordPress solution, protecting a proprietary plugin, or simplifying the administration experience for clients, finding a reliable way to Hide Plugin from Plugins List can be challenging without interfering with WordPress functionality.
Fortunately, WordPress provides a convenient plugin filtering mechanism that allows developers to remove selected plugins from the administration list without deactivating them. In this tutorial, we will implement a lightweight stealth-mode solution using the WordPress all_plugins filter and a Must-Use plugin. You will learn how to hide a specific plugin, preserve its functionality, handle multisite considerations, and troubleshoot common implementation issues.
1. Understanding WordPress Plugin Stealth Mode
Before implementing a solution to hide a plugin from the Plugins list, it is important to understand how WordPress manages installed plugins. WordPress discovers standard plugins from the wp-content/plugins/ directory and maintains information about their headers, activation status, and available updates.
The administration interface uses this information to populate the Plugins screen. WordPress also provides several filters that allow developers to modify the information presented in different parts of the dashboard. One particularly useful filter is all_plugins, which allows developers to modify the plugin information array returned by the plugin discovery process.
How Does Plugin Hiding Work?
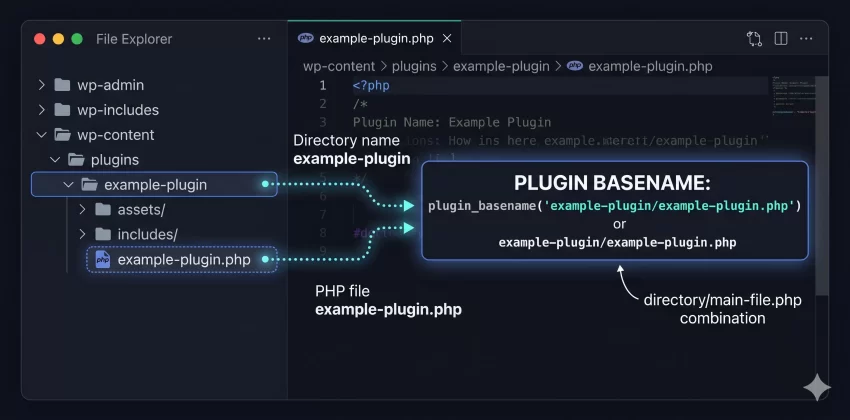
When WordPress retrieves installed plugin information, it creates an associative array where each entry is identified by its plugin basename. For example, a plugin installed at wp-content/plugins/example-plugin/example-plugin.php has the basename example-plugin/example-plugin.php.
By removing this particular array entry through the all_plugins filter, developers can prevent the corresponding plugin from appearing in the standard Plugins administration list. This is the foundation of our solution for hiding a plugin from the Plugins list.
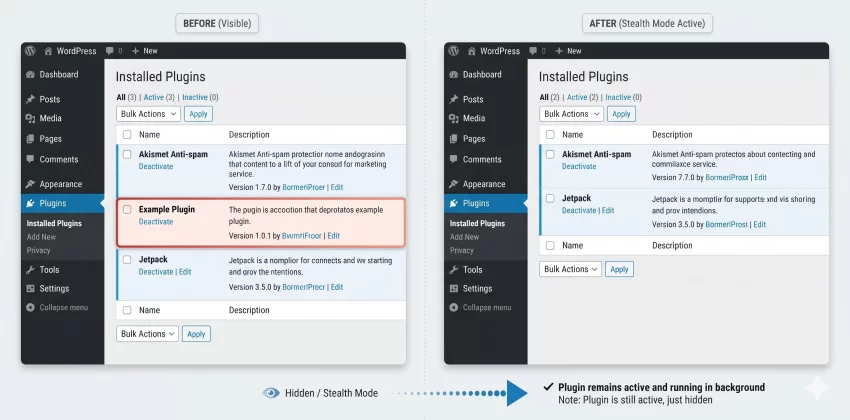
The important thing is that removing an entry from the displayed plugin information does not automatically deactivate the plugin. WordPress can continue loading an already activated plugin independently of whether its information appears in the administration table.
What Does This Stealth Mode Actually Do?
- Removes the selected plugin from the standard Plugins administration listing.
- Keeps the plugin installed in its original directory.
- Preserves the plugin’s active status and normal execution.
- Does not modify WordPress core files.
- Does not require editing the original plugin’s source code.
- Can be implemented independently using a Must-Use plugin.
However, this is an administrative presentation technique, not a security mechanism. It does not prevent administrators, hosting users, or developers with filesystem access from discovering the plugin.
2. Prerequisites
Before implementing the solution, make sure you have access to your WordPress installation and the ability to create PHP files inside the wp-content directory. A basic understanding of PHP and WordPress hooks will make the implementation easier.
- WordPress 6.0 or later (the approach also works with compatible earlier versions).
- PHP 8.0 or later recommended.
- Access to your website’s files through FTP, SFTP, SSH, or your hosting File Manager.
- A code editor such as Visual Studio Code or Notepad++.
- The exact plugin directory name and main PHP filename.
- A recent backup of your WordPress files and database.
- Administrator access to verify the result in the WordPress dashboard.
We will use a Must-Use plugin because it loads automatically and does not depend on a theme or another standard plugin remaining active. This makes it a suitable location for a small administrative customization.
3. Identify the Plugin Basename
The first step is to identify the exact plugin you want to hide. WordPress does not identify a plugin using only its display name. Instead, it uses the plugin basename, which consists of the plugin’s directory name followed by its main PHP file.
Step 1: Locate the Plugin Directory
Open your WordPress installation directory and navigate to wp-content/plugins/. You will find the installed standard plugins inside this directory.
For example, suppose you have installed a plugin with the following structure:
wp-content/
└── plugins/
    └── example-plugin/
        ├── assets/
        ├── includes/
        ├── languages/
        └── example-plugin.php
In this example, the plugin directory is example-plugin, and its main PHP file is example-plugin.php.
Step 2: Construct the Plugin Basename
Combine the directory name and the main PHP filename using a forward slash. The resulting plugin basename is:
example-plugin/example-plugin.php
This exact string is what we will use in our PHP implementation to hide the plugin from the Plugins list. Be careful with spelling, capitalization, and nested directory structures because an incorrect basename will prevent the filter from identifying the intended plugin.
For a single-file plugin located directly inside the plugins directory, the basename would simply be its PHP filename, such as my-custom-plugin.php
You might also like: The Ultimate WordPress Settings API Tutorial: Create a Powerful Settings Page Easily
4. Create a Must-Use Plugin
Now that you have identified the correct plugin basename, it is time to create the code responsible for hiding the selected plugin. We will place this code inside a Must-Use plugin rather than the theme’s functions.php file or the target plugin itself.
Step 1: Open the MU Plugins Directory
Navigate to the wp-content directory in your WordPress installation. Check whether a folder named mu-plugins already exists.
If it does not exist, create a new directory with the exact name:
wp-content/mu-plugins/
WordPress automatically loads PHP files placed directly inside this directory. Unlike ordinary plugins, Must-Use plugins do not need to be activated manually through the dashboard. They are loaded automatically on WordPress requests.
Step 2: Create the PHP File
Inside the mu-plugins directory, create a new PHP file named:
pnet-hide-plugin.php
You can use any suitable filename, but using a descriptive name makes the implementation easier to maintain. The pnet- prefix also helps distinguish your custom implementation from third-party files.
The resulting directory structure should look like this:
>wp-content/
└── mu-plugins/
    └── pnet-hide-plugin.php
If you already use an MU plugin for other custom functionality, you can integrate the following filter into that existing file instead of creating another one.
You might also like:
5. Implement the Plugin Hiding Filter
This is the main implementation step. We will register a callback on WordPress’s all_plugins filter and remove the selected plugin from the returned plugin information array. To avoid interfering with plugin discovery elsewhere, we will restrict the modification to the standard Plugins administration screen.
Step 1: Add the PHP Implementation
Open pnet-hide-plugin.php and insert the following code. Replace the example plugin basename with the actual basename identified earlier.
<?php
/**
 * Plugin Name: PNET - Hide Selected Plugin
 * Description: Hides a selected plugin from the standard WordPress Plugins screen.
 * Version: 1.0.0
 * Author: PNET
 */

if ( ! defined( 'ABSPATH' ) ) {
    exit;
}

/**
 * Hide a selected plugin from the Plugins administration list.
 *
 * @param array $plugins Installed plugin information.
 * @return array Filtered plugin information.
 */
function pnet_hide_plugin_from_plugins_list( $plugins ) {

    // Target plugin basename.
    $plugin_to_hide = 'example-plugin/example-plugin.php';

    // Only modify the standard Plugins administration screen.
    $current_page = $GLOBALS['pagenow'] ?? '';

    if (
        ! is_admin() ||
        'plugins.php' !== $current_page ||
        ! current_user_can( 'activate_plugins' )
    ) {
        return $plugins;
    }

    // Remove the selected plugin from the list.
    unset( $plugins[ $plugin_to_hide ] );

    return $plugins;
}

add_filter(
    'all_plugins',
    'pnet_hide_plugin_from_plugins_list',
    999
);
The code uses the all_plugins filter with a late priority of 999, allowing the callback to run after most other plugin information filters. It checks that the current request is an administration request and that the current page is plugins.php before removing the selected plugin from the array.
The current_user_can( 'activate_plugins' ) condition limits the modification to users who have plugin activation capabilities. This is a capability check rather than a hardcoded administrator-role check, making the implementation more compatible with custom roles and permission configurations.
Step 2: Understand the Important PHP Components
There are four important components in this implementation:
- ABSPATH: Prevents direct access to the PHP file outside a WordPress environment.
- all_plugins: The WordPress filter that provides the installed plugin information array.
- unset(): Removes the target plugin’s entry from the array using its basename.
- add_filter(): Registers the callback so WordPress executes it when the plugin information is filtered.
The implementation deliberately uses pnet_hide_plugin_from_plugins_list() instead of a generic function name. Prefixing custom functions helps reduce the possibility of naming conflicts with WordPress core, themes, and third-party plugins.
Step 3: Save and Upload the File
Save the PHP file and upload it to wp-content/mu-plugins/. If you are using a hosting File Manager, make sure the file is saved with the .php extension rather than .php.txt.
Because it is a Must-Use plugin, WordPress loads the file automatically. You do not need to visit the Plugins page to activate it. Once the MU plugin is loaded, its filter will execute when the standard Plugins screen retrieves the installed plugin information.
Implementation Tip
6. Verify That the Plugin Is Hidden
After uploading the MU plugin, open your WordPress administration dashboard and navigate to Plugins → Installed Plugins. The selected plugin should no longer appear in the standard plugin listing.
Step 1: Check the Installed Plugins Screen
Open the following administration URL:
https://yourwebsite.com/wp-admin/plugins.php
Replace yourwebsite.com with your actual domain. Check whether the target plugin has disappeared from the list. Other installed plugins should remain visible and continue working normally.
Step 2: Confirm That the Plugin Is Still Active
Hiding a plugin does not mean that WordPress has deactivated it. The target plugin should continue executing its normal hooks, filters, scheduled tasks, and other functionality as long as it remains active.
To verify this, test one or more features provided by the target plugin on your website. You can also inspect the active plugin information using a controlled administrative diagnostic or WP-CLI. Avoid relying on the standard Plugins screen as the only verification method because that is precisely the interface we have modified.
Step 3: Check Other Administration Areas
The implementation above targets the standard Plugins screen. Depending on your WordPress configuration and other installed plugins, the target plugin may still appear in other locations, including update notifications, custom dashboard widgets, plugin management tools, or third-party administration interfaces.
This is expected behavior. Our objective is to hide a plugin from the Plugins list, not to erase every reference to its existence throughout WordPress.
7. Hide Multiple Plugins or Customize the Target
If you are managing a white-label WordPress installation or developing a client-specific environment, you may need to hide more than one plugin. Instead of registering multiple filters, you can modify the implementation to accept an array of plugin basenames and remove all matching entries.
Step 1: Configure Multiple Plugin Basenames
Replace the single-plugin implementation with the following version if you want to hide multiple plugins from the standard Plugins list.
<?php

function pnet_hide_multiple_plugins_from_list( $plugins ) {

    $current_page = $GLOBALS['pagenow'] ?? '';

    if (
        ! is_admin() ||
        'plugins.php' !== $current_page ||
        ! current_user_can( 'activate_plugins' )
    ) {
        return $plugins;
    }

    // Plugin basenames to hide.
    $plugins_to_hide = array(
        'example-plugin/example-plugin.php',
        'another-plugin/another-plugin.php',
        'custom-tool/custom-tool.php',
    );

    foreach ( $plugins_to_hide as $plugin_basename ) {
        unset( $plugins[ $plugin_basename ] );
    }

    return $plugins;
}

add_filter(
    'all_plugins',
    'pnet_hide_multiple_plugins_from_list',
    999
);
In this version, the $plugins_to_hide array contains all the plugin basenames you want to remove from the list. The foreach loop processes each entry individually, removing matching plugins while leaving the rest of the installed plugin information untouched.
Step 2: Maintain the Plugin List
Whenever you install another plugin that should remain hidden, simply add its basename to the configuration array. Similarly, remove an entry from the array whenever you want the corresponding plugin to become visible again.
For larger WordPress deployments, you can maintain this configuration in a dedicated settings file or a controlled environment-specific configuration. However, avoid accepting arbitrary plugin basenames from untrusted users.
Both approaches use the same underlying mechanism to hide a plugin from the Plugins list. Choose the single-plugin version for a simple installation and the multiple-plugin version when maintaining several hidden plugins.
8. WordPress Multisite Considerations
WordPress Multisite introduces additional plugin management interfaces. A network administrator can manage network-activated plugins through the Network Admin dashboard, while individual site administrators may have different plugin management capabilities depending on the network configuration.
The implementation presented in this tutorial checks for plugins.php and does not explicitly exclude network administration requests. However, WordPress Multisite has separate site-level and network-level plugin management contexts, so you should test the behavior in both interfaces rather than assuming that every plugin management screen will behave identically.
Hide Plugins in Network Administration
If you want to explicitly restrict the filter to the Network Admin Plugins screen, you can extend the page condition to check the network administration context.
<?php

function pnet_hide_plugin_in_network_admin( $plugins ) {

    $current_page = $GLOBALS['pagenow'] ?? '';

    if (
        ! is_network_admin() ||
        'plugins.php' !== $current_page ||
        ! current_user_can( 'manage_network_plugins' )
    ) {
        return $plugins;
    }

    $plugin_to_hide = 'example-plugin/example-plugin.php';

    unset( $plugins[ $plugin_to_hide ] );

    return $plugins;
}

add_filter(
    'all_plugins',
    'pnet_hide_plugin_in_network_admin',
    999
);
This is an alternative implementation for a network-level administration context. Do not blindly combine it with the previous callback if you intend to use different visibility rules; instead, consolidate the conditions into one callback and test the exact multisite behavior.
Also remember that hiding a network-activated plugin from an administration list does not remove its network activation or prevent it from loading on the sites where it is active.
Next Read: Preload Critical CSS: Easily Boost WordPress Speed in 5 Simple Steps (2026)
9. Security Considerations and Limitations
Although hiding a plugin from the Plugins list is useful for presentation and white-label customization, developers should understand its limitations before deploying this approach on a production website.
Plugin Hiding Is Not Access Control
The all_plugins filter changes the plugin information returned to the relevant interface. It does not introduce an authorization boundary. A user with sufficient filesystem access can still inspect the plugin directory, read its source code, and identify the installed plugin.
If your objective is to protect proprietary code, consider appropriate file permissions, licensing controls, and server-side access restrictions. Never treat a hidden plugin as a secure plugin.
Plugin Updates Must Be Tested
WordPress uses installed plugin information in several internal workflows, including update discovery and plugin management. Because all_plugins is a broad filter, applying an unconditional removal can interfere with processes beyond the visible Plugins page.
That is why our implementation checks the current administration page before removing the entry. Nevertheless, test update availability, update notifications, and the actual update process on a staging environment before deploying the solution to production.
Keep in mind that the exact behavior can vary depending on WordPress versions, update integrations, and third-party plugin management tools.
Do Not Modify WordPress Core Files
Avoid editing files inside wp-admin/ or wp-includes/ to remove plugin rows. Core modifications are difficult to maintain and can be overwritten during WordPress updates. A small MU plugin provides a cleaner and more maintainable implementation.
Backup Required
10. Common Errors and Troubleshooting
If the target plugin is still visible or other unexpected behavior occurs, check the following common issues. Most implementation problems are related to an incorrect plugin basename, an incorrectly placed MU plugin file, or an overly broad filter condition.
Problem 1: The Plugin Is Still Visible
Possible cause: The plugin basename entered in the PHP code does not match its actual directory and main PHP filename.
Solution: Recheck the plugin directory under wp-content/plugins/ and confirm the main plugin PHP file. Update the $plugin_to_hide variable with the exact basename. Remember that the display name shown in the WordPress dashboard is not necessarily the plugin basename.
Problem 2: The MU Plugin Is Not Loading
Possible cause: The PHP file is placed in the wrong directory or nested inside another directory. WordPress automatically loads PHP files directly inside wp-content/mu-plugins/, but does not automatically discover PHP files inside arbitrary subdirectories.
Solution: Confirm that the file is located at wp-content/mu-plugins/pnet-hide-plugin.php. If you prefer to organize MU plugin code in subdirectories, create a loader PHP file directly inside mu-plugins and use it to include the nested implementation.
Problem 3: The Plugin Becomes Inaccessible or Update Information Changes
Possible cause: The filter has been implemented without checking the current administration page, or another callback is modifying the same plugin information.
Solution: Use the page-specific implementation provided in this tutorial. Check other callbacks attached to all_plugins, and test the plugin’s update behavior independently. Do not use an unconditional filter to hide a plugin from every WordPress workflow.
Problem 4: The Plugin Appears in Network Administration
Possible cause: The standard site administration and Network Admin interfaces use different management contexts.
Solution: Verify the network administration page separately. If network-level hiding is required, implement the appropriate is_network_admin() and capability checks. Remember that network activation remains unchanged.
Problem 5: A PHP Error Appears After Adding the Code
Possible cause: A missing semicolon, unmatched bracket, incorrect PHP opening tag, or conflicting function name may cause a PHP fatal error.
Solution: Review the PHP file carefully and check your server’s PHP error log. You can also validate the file using PHP’s command-line syntax checker:
php -l wp-content/mu-plugins/pnet-hide-plugin.php
If you cannot access the WordPress dashboard, use FTP, SFTP, or your hosting File Manager to temporarily rename the MU plugin PHP file. This will prevent that file from loading on subsequent requests, allowing you to investigate and correct the problem.
You might also like:
11. Conclusion
Hiding a selected plugin from the WordPress administration list does not require modifying WordPress core files or changing the original plugin’s source code. By using the all_plugins filter with a carefully scoped callback, developers can remove a specific plugin entry from the standard Plugins screen while preserving its installed files and active functionality.
For a maintainable implementation, we recommend placing the code inside a Must-Use plugin, using the correct plugin basename, and restricting the filter to the intended administration screen. Always test plugin updates, multisite behavior, and other plugin management workflows before deploying the customization on a live website.
Ultimately, Hide Plugin from Plugins List is a useful WordPress development technique for white-label projects, client dashboards, and controlled administration experiences. Just remember that stealth mode changes visibility, not security or access permissions.