Yoast SEO columns can crowd WordPress post and page lists, making it harder for editors to scan the information they need. To Remove Yoast SEO Columns, you can hide them with Screen Options for your own account or use a targeted PHP filter to remove them from selected admin lists wherever that code runs. The first option is a personal display preference; the second provides a consistent view for users on the screens you target.
This guide covers posts, pages, and custom post types, along with ways to verify the change and troubleshoot common problems. Hiding or removing columns affects the admin display only: it does not disable Yoast SEO analysis or delete saved SEO metadata. Before changing PHP, prepare a safe place to test and a way to roll back the change.
- A WordPress site with Yoast SEO active and access to the relevant admin list screens.
- Administrator access to the dashboard to adjust Screen Options.
- For the PHP method, access to a site-specific plugin or a child theme functions.php file.
- A recent backup and a staging site or safe testing window before deploying PHP changes.
- Basic familiarity with PHP and WordPress filters for the programmatic approach.
Identify the Yoast columns and choose the right approach
Before changing the list view, identify which columns are actually taking up space. Depending on your Yoast SEO version, settings, and content type, a list may show an SEO score, readability score, focus keyphrase, SEO title, meta description, or internal-link information. Labels and available fields can vary, and a column shown for posts may not appear on pages or a custom post type. Check the specific list screen you want to tidy rather than assuming every content table uses the same set.
Choose the method based on who should see the change. Screen Options is the quickest choice when one user wants a cleaner view: it saves that user’s display preference and leaves other accounts unchanged. Use PHP when you need to remove selected columns consistently for everyone who visits targeted admin lists. The code approach can be limited to posts, pages, or chosen custom post types, but should be tested against the column keys used by your installed Yoast version. In either case, hiding columns changes only the table display. Yoast can continue its analysis, and existing SEO metadata remains saved. The steps below show how to Remove Yoast SEO Columns using either approach.
Hide Yoast columns with Screen Options
For a quick, no-code change, use Screen Options on the WordPress admin list where the columns appear. You can adjust the view on Posts > All Posts, Pages > All Pages, or a custom post type list. Each list screen has its own display settings, so changing the Posts table does not automatically change the Pages table.
This setting applies only to your WordPress user account. It hides the selected columns from your view but does not remove them from WordPress, change Yoast SEO behavior, or affect what another user sees. If the goal is a consistent view for an editorial team, use the PHP method covered later; for a personal preference, Screen Options is usually the simplest choice.
Personal Display Setting
Open the correct admin list and Screen Options panel
Start on the list where you want to hide the columns. In the WordPress dashboard, select Posts > All Posts for posts or Pages > All Pages for pages. For a custom post type, find its own menu item in the left-hand dashboard navigation and open its list screen. Use the same account and screen where you noticed the Yoast columns; each content type list can have separate display preferences.
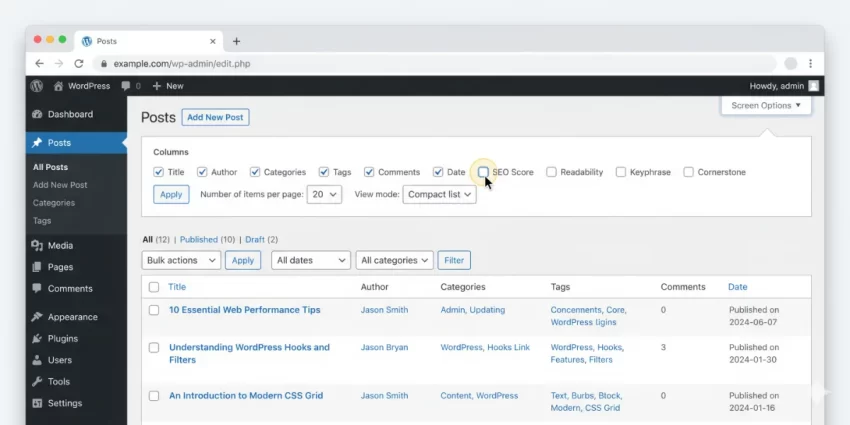
Once the list table is open, look near the top-right of the page for Screen Options. Select it to expand the panel above the table. If you cannot see the control, confirm you are on a supported dashboard list screen, widen the browser window, and scroll to the top. A narrow viewport or dashboard customization may make the control less obvious. Your account also needs permission to access the relevant admin screen.
Keep this panel open for the next step, where you will identify and uncheck the Yoast fields shown on this particular list. Repeat the process separately for posts, pages, or each custom post type whose table you want to adjust.
Uncheck the Yoast fields and save the display preference
In the expanded Screen Options panel, review the available checkboxes and uncheck the Yoast-related columns you want to hide. The labels vary by Yoast version, configuration, and content type, so use the names actually displayed on your screen. They may refer to SEO or readability scores, keyphrases, SEO titles, meta descriptions, or link information. Avoid unchecking unrelated options if you only want to change the Yoast portion of the table.
Close the panel or click outside it, then check the list table. Some WordPress screens update as soon as you change a checkbox; others may need the panel closed or the page refreshed before the columns disappear. If they remain, reopen Screen Options, confirm the relevant boxes are unchecked, and refresh the list. To restore a column later, return to the same screen, open Screen Options, and check its box again. This preference applies only to your account and this particular content list. Repeat the adjustment for each other post type list, and for each user who wants the same personal view. This completes the manual way to Remove Yoast SEO Columns from your own list table without changing Yoast settings or saved metadata.
Did you know: You can use Hide Plugin from Plugins List to create a cleaner, white-label WordPress dashboard while keeping essential functionality running in the background? Discover this useful developer technique.
Remove Yoast columns programmatically with a WordPress filter
A PHP filter changes the columns WordPress makes available on the targeted admin list, so the result is consistent for users who view that screen. Unlike Screen Options, it is not a personal preference. This is useful when an editorial team should work with the same uncluttered table, or when you want selected Yoast fields unavailable on specific lists while leaving other content types unchanged.
For maintainability, add the callback to a small site-specific plugin or your child theme rather than editing a parent theme. A plugin keeps the behavior in place if you change themes; a child theme is also suitable when the code belongs with that theme. The WordPress admin column filters let you receive and modify a list table column array. Target only the post types you intend to change, and unset specific, confirmed Yoast column identifiers instead of removing any column whose name happens to contain a broad term such as SEO. That precision helps preserve useful columns added by WordPress or other plugins.
Test Before Deployment
The next steps provide a focused implementation for posts and pages, then show how to extend it to selected custom post types. Column keys can differ across Yoast versions, so verify the keys used on your own screens. See the official WordPress reference for the manage_posts_columns filter. With a precise callback, you can Remove Yoast SEO Columns from the intended lists without changing SEO analysis or stored metadata.
You might also like:

Add a focused callback for posts and pages
Add this code to a site-specific plugin or a child theme. It registers separate filters for the Posts and Pages list tables, then removes only column identifiers in an explicit Yoast allowlist. The callback returns the modified array so WordPress can render the remaining columns normally.
<?php
/**
 * Remove selected Yoast SEO columns from Posts and Pages admin lists.
 */
function pnet_remove_yoast_columns() {
    add_filter( 'manage_edit-post_columns', 'pnet_filter_yoast_columns', 20 );
    add_filter( 'manage_edit-page_columns', 'pnet_filter_yoast_columns', 20 );
}
add_action( 'admin_init', 'pnet_remove_yoast_columns' );

function pnet_filter_yoast_columns( $columns ) {
    $yoast_column_keys = array(
        'wpseo-score',
        'wpseo-score-readability',
        'wpseo-focuskw',
        'wpseo-title',
        'wpseo-metadesc',
        'wpseo-links',
        'wpseo-linked',
        'wpseo-cornerstone',
    );

    foreach ( $yoast_column_keys as $column_key ) {
        unset( $columns[ $column_key ] );
    }

    return $columns;
}
The first function attaches the same callback to the standard post and page column filters. The second checks each confirmed key and unsets it only when it exists. This avoids broad substring matching that could accidentally remove another plugin’s column. The snippet changes the available table columns for all users on those two screens; it does not disable Yoast analysis or alter saved metadata.
Yoast column identifiers can differ by version or configuration. If a field remains, inspect the live column array for that screen and add only its exact Yoast key to the allowlist. Keep the post and page hooks separate from custom post type hooks; those require their own screen-specific filters.
You might also like:

Extend the filter to selected custom post types
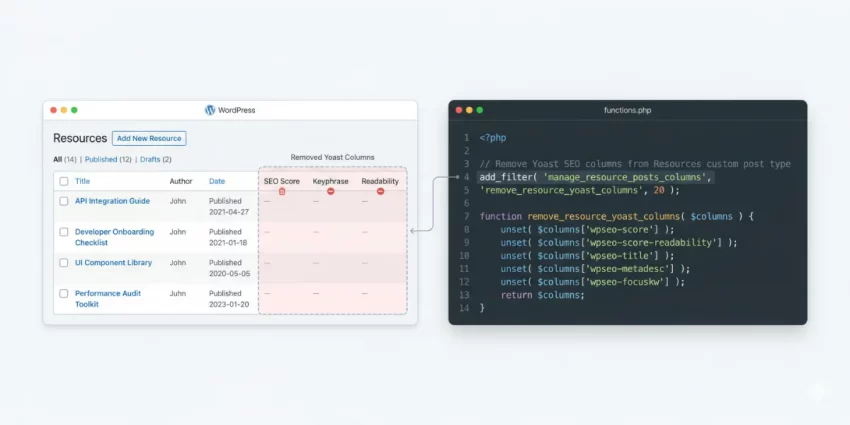
Custom post type list tables use a filter name based on the post type slug. For example, a type registered as resource uses the manage_resource_posts_columns filter. Use a short, explicit list of slugs so the change affects only the content types you intend; avoid registering it for every post type on the site.
Add this extension alongside the earlier posts-and-pages code. Replace resource and case_study with the actual slugs registered by your site. The post type must be registered before the callback runs; admin_init is late enough for typical plugins and themes to register their types.
<?php
/**
 * Remove selected Yoast columns from chosen custom post type lists.
 */
function pnet_register_custom_yoast_column_filters() {
    $post_types = array( 'resource', 'case_study' );

    foreach ( $post_types as $post_type ) {
        if ( post_type_exists( $post_type ) ) {
            add_filter(
                'manage_' . $post_type . '_posts_columns',
                'pnet_filter_custom_yoast_columns',
                20
            );
        }
    }
}
add_action( 'admin_init', 'pnet_register_custom_yoast_column_filters' );

function pnet_filter_custom_yoast_columns( $columns ) {
    $yoast_column_keys = array(
        'wpseo-score',
        'wpseo-score-readability',
        'wpseo-focuskw',
        'wpseo-title',
        'wpseo-metadesc',
        'wpseo-links',
        'wpseo-linked',
        'wpseo-cornerstone',
    );

    foreach ( $yoast_column_keys as $column_key ) {
        unset( $columns[ $column_key ] );
    }

    return $columns;
}
The existence check prevents adding a filter for an unavailable type, while the explicit slug list keeps unrelated admin tables untouched. Confirm each slug and the live column keys on your installation; a custom post type plugin may use different names or register additional Yoast columns. Test each targeted list after deployment and add only verified Yoast identifiers to the allowlist.
Install, test, and maintain the code change
Place the finished snippet in a small site-specific plugin or your child theme, not the parent theme, so a theme update does not erase it. Back up the site and test on staging before deploying. A PHP syntax error can disrupt dashboard access; keep a copy of the original file and a reliable way to restore it, such as hosting file access, before making the change. For details on the standard list-table column filter, see the official WordPress manage_posts_columns reference.
After deployment, inspect Posts, Pages, and every targeted custom post type while logged in as a representative user. Confirm the intended Yoast columns are gone and unrelated columns remain. Check that pagination and sorting still work, and verify that Yoast analysis and saved SEO data are unaffected. If one column remains, confirm its exact key on that screen and add only the verified Yoast identifier to the allowlist.
Remember that the PHP filter controls which columns are available on the targeted list, while users may also have saved Screen Options preferences. Test with a user whose preferences you understand, and distinguish a hidden personal setting from a column removed by code. Recheck the target lists after Yoast or other relevant plugins are updated, since column identifiers can change.
You might also like:

Common Errors
When a Yoast column remains visible or the wrong column disappears, first identify whether the change was made through Screen Options or a PHP filter. The checks below distinguish per-user display settings from code that changes the columns available on a particular admin list.
Screen Options is missing or a column returns
Screen Options appears on supported admin list screens, not every dashboard page. Open the relevant Posts, Pages, or custom post type list, scroll to the top, and widen the browser if the control is obscured. If another user still sees the columns, that is expected: Screen Options preferences belong to each user. Repeat the change while signed in as that user, or use a targeted PHP filter if the site needs a consistent view.
The PHP snippet has no effect
Confirm the code is loaded without a syntax error and that its registration runs during the admin request. Check that the filter matches the screen: posts, pages, and custom post types use different hooks. Then inspect the column keys actually supplied on that list and compare them with the allowlist. Add only a confirmed Yoast key; remove any temporary debugging output when finished.
A non-Yoast column disappears or the admin reports a fatal error
For an unrelated column disappearing, replace broad matching with exact Yoast keys and remove the incorrect entry. If a fatal error follows deployment, use hosting file access to revert or disable the changed plugin or child-theme code, then correct and retest it on staging. Removing a table column affects the admin display only; it does not delete Yoast metadata or disable SEO features.
Screen Options is missing or a column returns
First confirm that you are on the relevant admin list: Posts > All Posts, Pages > All Pages, or the list for the custom post type. Screen Options is not shown on every dashboard screen. On the correct list, scroll to the top and widen the browser window; a narrow viewport, browser zoom, or dashboard customization can make the control difficult to see. If it still does not appear, check whether an admin interface plugin or custom dashboard code is hiding it, and confirm your account can access that list screen.
If you hid the columns but they appear for another account, that is normal. Screen Options saves display preferences for the current user, so repeat the selection while signed in as each person who wants the same view. Also check that you changed the settings on the specific content type list: Posts, Pages, and custom post type screens keep separate preferences. Reopen Screen Options and confirm the relevant Yoast checkboxes are still unchecked; then refresh the list.
If columns return for multiple users or the site requires one consistent layout, use the targeted PHP filter described earlier, and verify it is attached to the correct list-screen hook. Keep Screen Options for individual preferences; use code only when the shared behavior is intentional.
The PHP snippet has no effect
Start by confirming the code is in an active site-specific plugin or child theme and that no PHP syntax error prevents it from loading. Check the server PHP error log after loading the dashboard; if the changed file reports an error, correct it before testing the filter. Also verify the exact list screen and its hook: standard posts and pages use separate filters, and a custom post type uses a hook built from its own post type slug. A callback attached to the Posts filter will not affect Pages or a custom post type.
If the hook is correct, the Yoast column key may differ from the key in your removal list. Temporarily log the keys supplied to the Posts columns filter:
<?php
function pnet_log_post_admin_column_keys( $columns ) {
    error_log( 'Post list columns: ' . print_r( array_keys( $columns ), true ) );
    return $columns;
}
add_filter( 'manage_edit-post_columns', 'pnet_log_post_admin_column_keys', 999 );
Open the Posts list and review the PHP error log, then compare the exact keys with your allowlist. For Pages or a custom type, temporarily use that screen’s corresponding filter instead. Add only a confirmed Yoast key to the removal callback; do not permanently remove columns through broad name matching. Once verified, delete the diagnostic function and filter, then reload and retest the target list.
A non-Yoast column disappears or the admin reports a fatal error
If a column from another plugin vanishes, inspect the callback before changing anything else. A broad rule that removes keys containing terms such as seo, score, or link can match unrelated columns. Replace it with an explicit allowlist of confirmed Yoast column keys, and remove any mistaken key from that list. Retest the affected admin table and verify that its title, author, date, and other plugin columns remain.
If the dashboard reports a fatal error after deployment, revert the change rather than continuing to edit a broken admin screen. Use your hosting file manager, SFTP, or other available file access to disable the site-specific plugin or restore the previous child-theme file. If the code is in a plugin, renaming that plugin directory can temporarily deactivate it. Correct the PHP on staging, check for syntax errors, and redeploy only after the admin loads normally.
After recovery, test each targeted post type list and confirm the removal callback unsets only the intended keys. Removing a column changes what appears in the admin table; it does not delete Yoast metadata, alter SEO settings, or stop Yoast analysis.
Choose the method that fits your workflow
For a quick personal adjustment, use Screen Options on each relevant Posts, Pages, or custom post type list. Uncheck the Yoast fields you do not need, remembering that this preference applies only to your account and that each content list has its own settings. This is the simplest option when individual editors want to tailor their workspace without changing what colleagues see.
When the same columns should be unavailable to everyone on selected lists, use the targeted PHP filters in a site-specific plugin or child theme. Back up the site, test the code on staging, and confirm the exact Yoast column keys before deployment; keep the filter limited to the intended post types so unrelated columns remain intact. Afterward, check each target list with a representative user. Both approaches change the admin table display only: Yoast SEO analysis, settings, and stored metadata remain unchanged. Choose the level of control that suits your team, and use Remove Yoast SEO Columns without disrupting the SEO workflow.