If you have ever copy-pasted a code snippet into your theme’s functions.php file, you are playing a dangerous game. We have all been there: you find a great tutorial to tweak your site, you paste the code, and everything works perfectly—until you update your theme or switch to a new one. Suddenly, all your hard work vanishes, or worse, your site crashes.
This is a rite of passage for many WordPress users, but it doesn’t have to be your reality. There is a professional, secure, and surprisingly simple solution that most beginners overlook: the Site Specific WordPress Plugin.
It is not just a “good practice”; it is the absolute safest way to manage custom code snippets. In this comprehensive guide, we will break down exactly what a Site Specific WordPress Plugin is, why every serious WordPress site needs one, and how you can build yours from scratch in less than five minutes—even if you have never written a line of code before.
What is a Site Specific WordPress Plugin?
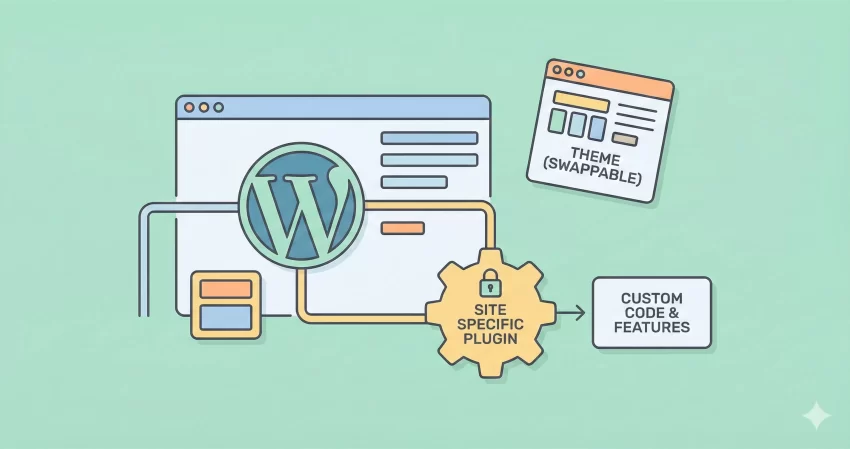
A Site Specific WordPress Plugin is essentially a custom plugin you create exclusively for your website. Unlike plugins you download from the repository that add generic features (like contact forms or SEO tools), this plugin is a dedicated home for your site’s unique customizations.
Think of it as a “backpack” for your code. If your website is a traveler and the theme is the traveler’s clothes, the Site Specific WordPress Plugin is the backpack. You can change your clothes (theme) as often as you like, but your backpack (custom functionality) stays with you, keeping your important items safe.
The Problem with functions.php
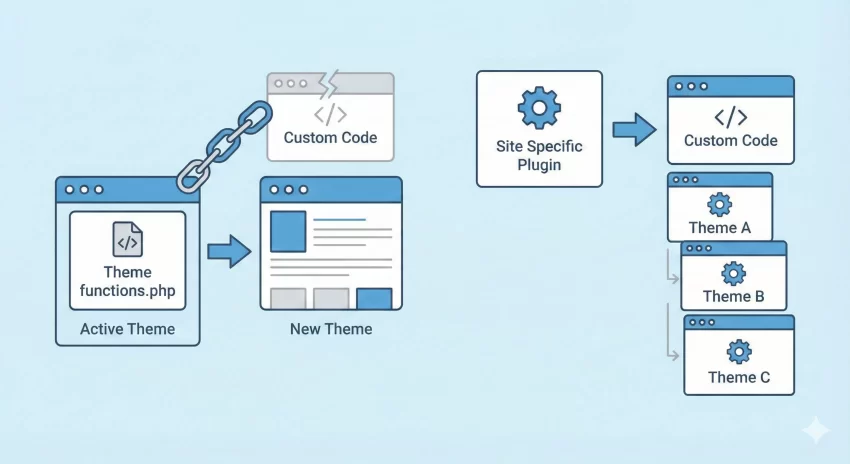
The most common mistake beginners make is adding custom functionality—like registering a custom post type, adding Google Analytics code, or creating shortcodes—directly into the active theme’s functions.php file.
While this works initially, it ties that functionality to that specific theme. If you ever switch themes, that code stops running, and your features disappear. Furthermore, if you make a syntax error in your theme’s functions file, you can “white screen” your entire site, making it difficult to log back in and fix it.
Why This Plugin is Critical for Your Site
Using a Site Specific WordPress Plugin separates functionality from design. This is a core principle of good WordPress development. Here is why having this setup is incredibly good for your WordPress site:
- Theme Independence: You can switch themes freely (e.g., from Astra to GeneratePress) without losing your custom post types, shortcodes, or tracking scripts.
- Organization: Instead of hunting through a massive theme file filled with thousands of lines of code, you know exactly where your custom code lives.
- Security & Safety: If a snippet creates an error, you can simply deactivate your custom plugin via FTP rather than crashing your entire site structure.
- Portability: If you manage multiple sites, you can easily copy your standard customizations plugin to a new project.
- Performance: It is lightweight. It only runs the exact code you need, unlike bloated multipurpose plugins that load hundreds of unused files.
Pros and Cons
Before we dive into the “how-to,” let’s honestly weigh the benefits against the drawbacks to ensure this is the right method for you.
Pros
- Persistence: Your code survives theme updates and changes.
- Simplicity: It creates a single location for all your tweaks.
- Control: You have full ownership of the code; no waiting for developer updates.
- Learning: It is a fantastic, low-risk way to learn how WordPress works under the hood.
Cons
- Initial Setup: It takes about 5 minutes to set up initially, whereas editing functions.php takes seconds.
- Access Requirement: You need basic access to your files (via FTP, cPanel File Manager, or a plugin like WP File Manager) to create it initially.
You might also like:

How to Create Your First Site Specific WordPress Plugin
Creating a Site Specific WordPress Plugin is easier than you think. You don’t need to be a developer wizard. Just follow these steps strictly, and you will be up and running.
Step 1: Create a Folder
First, access your site’s files. You can do this via FTP (using a tool like FileZilla) or your hosting Control Panel’s File Manager. Navigate to the /wp-content/plugins/ directory.
Create a new folder here and give it a unique name. For this example, let’s call it pnet-site-customizations.
Step 2: Create the PHP File
Inside that new folder, create a text file and name it the exact same name as your folder, but with a .php extension. So, your file will be named pnet-site-customizations.php.
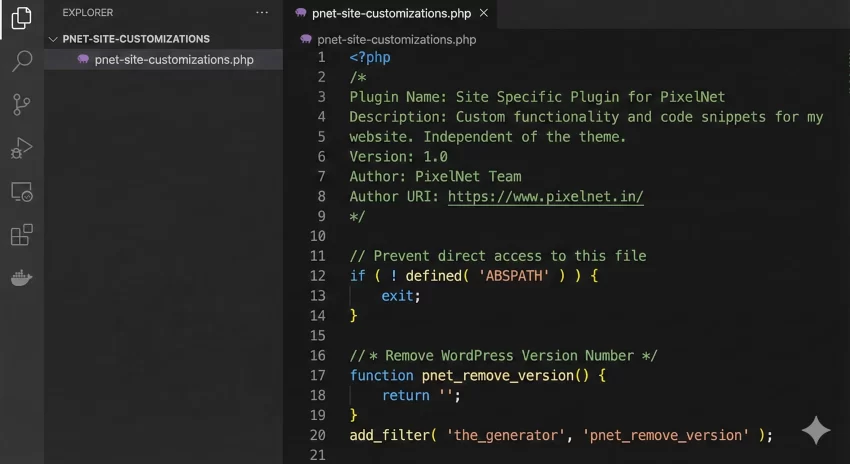
Step 3: Add the Plugin Header
Open that file in any text editor (like Notepad, TextEdit, or VS Code) and paste the following standard WordPress plugin header. This comment block tells WordPress “Hey, I am a plugin!”
<?php
/*
Plugin Name: Site Specific Plugin for PixelNet
Description: Custom functionality and code snippets for my website. Independent of the theme.
Version: 1.0
Author: PixelNet Team
Author URI: https://www.pixelnet.in/
*/

// Prevent direct access to this file
if ( ! defined( 'ABSPATH' ) ) {
    exit;
}
Step 4: Add Your Custom Code
Now, you can paste any custom code snippet below that header. Let’s try a real-world example. Suppose you want to remove the WordPress version number from your site’s header code (a common security practice) and perhaps add a custom footer message.
You would add the following functions, using our custom prefix pnet_ to ensure we don’t conflict with other plugins:
/* * 1. Remove WordPress Version Number
 */
function pnet_remove_version() {
    return '';
}
add_filter( 'the_generator', 'pnet_remove_version' );

/* * 2. Add Custom Text to Admin Footer
 */
function pnet_custom_admin_footer() {
    echo 'Designed and Developed by <a href="https://www.pixelnet.in" target="_blank">PixelNet</a>';
}
add_filter( 'admin_footer_text', 'pnet_custom_admin_footer' );
You can continue adding as many different functions as you need to this single file.
Step 5: Zip, Upload, and Activate
If you created this on your computer locally:
- Compress (Zip) the
pnet-site-customizationsfolder. - Go to your WordPress Dashboard > Plugins > Add New.
- Click Upload Plugin and select your zip file.
- Click Install Now and then Activate.
If you created it directly on your server using File Manager, simply go to your Plugins list in the WordPress dashboard, find “Site Specific Plugin for PixelNet,” and click Activate.
You might also like:
What Can You Put In This Plugin?
Now that you have the plugin, what should you actually put in it? Here are the most common use cases that belong here rather than in your theme:
1. Custom Post Types
If you run a portfolio or a movie review site, you don’t want to lose your “Movies” or “Projects” just because you changed your design. Registering CPTs here ensures your data structure remains intact forever.
2. Shortcodes
Do you use a specific shortcode to display an ad or a call-to-action button? Define it here. If you define it in your theme and then switch themes, all your posts will show raw text like [my_custom_ad_shortcode] instead of the actual ad.
3. Tracking Scripts
Google Analytics, Facebook Pixel, or custom CSS for the admin panel should all live here. This prevents you from having to re-verify your domain ownership every time you update your site design.
Troubleshooting: What If Something Breaks?
One of the biggest fears of editing code is breaking the site. The beauty of a Site Specific WordPress Plugin is how easy it is to fix.
If you paste a bad snippet into this plugin and your site goes blank:
- Open your FTP client or File Manager.
- Navigate to
/wp-content/plugins/. - Rename your folder from
pnet-site-customizationstopnet-site-customizations-off.
This instantly deactivates the plugin, and your site will come back online immediately. You can then fix the code error and rename the folder back.
Conclusion
Transitioning from editing functions.php to using a Site Specific WordPress Plugin is a milestone in any WordPress user’s journey. It separates your design from your functionality, secures your hard work against theme updates, and keeps your site organized.
It takes five minutes to set up, but it saves hours of headache down the road. For more details on plugin structures, you can always check the official WordPress Plugin Handbook.
Start building your backpack today, and stop worrying about your next theme update!


