
Let’s face it: page reloads are the enemy of user engagement. In the era of instant messaging and real-time feeds, a full page refresh just to say “Great post!” feels archaic. This is where AJAX WordPress comments come into play to save the day.
By default, WordPress handles comments in a traditional way. A user types a message, hits submit, and the entire page reloads to show their new comment. This interrupts the reading flow and adds unnecessary server load. If you want to modernize your blog and keep users glued to your content, learning how to implement AJAX WordPress comments is one of the best upgrades you can make.
In this comprehensive guide, we will walk through the code required to submit comments asynchronously. This means your visitors can post comments instantly without the page ever refreshing. It’s smoother, faster, and significantly more professional.
Why You Should Switch to AJAX WordPress Comments
Before we dive into the code, let’s understand the “Why.” Utilizing AJAX WordPress comments isn’t just a technical flex; it has tangible benefits for your site’s performance and user experience (UX).
- Better User Experience: Instant feedback makes the site feel app-like and responsive.
- Reduced Server Load: You aren’t reloading the whole page (header, footer, sidebar, widgets) just to process a text field.
- Higher Conversion: Less friction means users are more likely to leave a second comment or stay on the page longer.
When you optimize your site for AJAX WordPress comments, you are signaling to search engines and users alike that you care about speed and modern web standards.
Step 1: Prepare Your Child Theme
As with any customization, safety comes first. Do not edit your parent theme files directly. If you update the theme, your changes will be lost. Always use a child theme or a custom functionality plugin.
We will be working primarily with two files:
functions.php(to handle the server-side logic)- A new JavaScript file we will create, named
pnet-ajax-comments.js.
Step 2: Enqueue the JavaScript
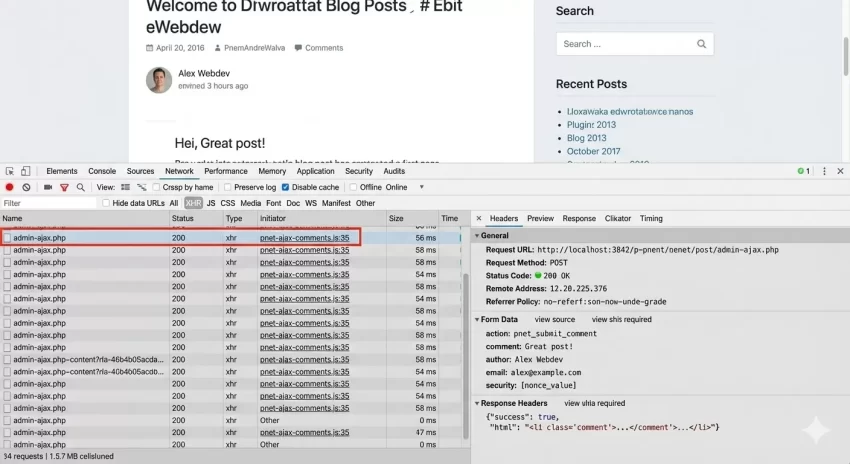
First, we need to tell WordPress to load our custom JavaScript file. However, simply loading the file isn’t enough. We also need to use wp_localize_script to pass data from PHP to JavaScript, specifically the URL for the AJAX handler (admin-ajax.php) and a security nonce.
Add the following code to your functions.php file:
function pnet_enqueue_ajax_scripts() {
    // Only load on single posts/pages where comments are open
    if ( is_singular() && comments_open() ) {

        wp_enqueue_script(
            'pnet-ajax-comments',
            get_stylesheet_directory_uri() . '/js/pnet-ajax-comments.js',
            array('jquery'),
            '1.0.0',
            true
        );

        // Localize script to pass server data to JS
        wp_localize_script( 'pnet-ajax-comments', 'pnet_ajax_obj', array(
            'ajax_url' => admin_url( 'admin-ajax.php' ),
            'nonce'    => wp_create_nonce( 'pnet_comment_nonce' )
        ));
    }
}
add_action( 'wp_enqueue_scripts', 'pnet_enqueue_ajax_scripts' );
This function ensures that our script only loads when necessary, keeping your site lean. The pnet_ajax_obj object will be accessible in our JavaScript, containing the critical endpoints we need to make AJAX WordPress comments work.
You might also like:
Step 3: The jQuery Script
Now, create a folder named js inside your child theme directory, and inside that, create a file named pnet-ajax-comments.js.
This script needs to do three things:
- Listen for the comment form submission.
- Prevent the default page reload.
- Send the form data to the server via AJAX.
jQuery(document).ready(function($) {
    var commentForm = $('#commentform');

    commentForm.submit(function(e) {
        e.preventDefault();

        var formdata = commentForm.serialize();

        // Add our AJAX action and nonce to the form data
        formdata += '&action=pnet_submit_comment';
        formdata += '&security=' + pnet_ajax_obj.nonce;

        // Show a loading status (Optional: You can add a spinner here)
        var submitButton = commentForm.find('input[type="submit"]');
        var originalButtonText = submitButton.val();
        submitButton.val('Posting...').attr('disabled', 'disabled');

        $.ajax({
            type: 'post',
            url: pnet_ajax_obj.ajax_url,
            data: formdata,
            error: function(XMLHttpRequest, textStatus, errorThrown) {
                alert('Connection error. Please try again.');
                submitButton.val(originalButtonText).removeAttr('disabled');
            },
            success: function(response) {
                // Parse the JSON response
                var result = JSON.parse(response);

                if (result.success) {
                    // Append the new comment to the list
                    // Note: Check your theme's comment list class, usually .comment-list or .commentlist
                    var commentList = $('.comment-list');

                    if (commentList.length > 0) {
                        commentList.append(result.html);
                    } else {
                        // If no comments exist yet, we might need to create the list structure
                        commentForm.before('<ol class="comment-list">' + result.html + '</ol>');
                    }

                    // Clear the textarea
                    $('#comment').val('');
                    submitButton.val(originalButtonText).removeAttr('disabled');
                } else {
                    // Handle errors (like validation issues)
                    alert(result.error);
                    submitButton.val(originalButtonText).removeAttr('disabled');
                }
            }
        });

        return false;
    });
});
The code above is the engine behind your AJAX WordPress comments. It intercepts the user’s click and communicates silently with the server.
Step 4: The PHP Handler
We have the data leaving the browser, but now WordPress needs to catch it. We need to create the pnet_submit_comment action we referenced in the JavaScript.
Add this block to your functions.php file. This function verifies the security nonce, processes the comment, and returns the HTML of the new comment to be displayed.
Note: We are using wp_handle_comment_submission to ensure all standard WordPress checks (like blacklists and required fields) are respected.
function pnet_handle_ajax_comments() {
    // 1. Verify Nonce
    check_ajax_referer('pnet_comment_nonce', 'security');

    // 2. Set up the comment data
    $comment = wp_handle_comment_submission( wp_unslash( $_POST ) );

    if ( is_wp_error( $comment ) ) {
        $error_data = intval( $comment->get_error_data() );
        if ( ! empty( $error_data ) ) {
            echo json_encode( array(
                'success' => false,
                'error'   => $comment->get_error_message()
            ));
        } else {
             echo json_encode( array(
                'success' => false,
                'error'   => 'Unknown error occurred.'
            ));
        }
        wp_die();
    }

    // 3. If successful, get the comment cookies so the user appears logged in for the next comment
    $user = wp_get_current_user();
    do_action( 'set_comment_cookies', $comment, $user );

    // 4. Retrieve the HTML for the single comment
    // We use a custom callback or default to retrieve just this new comment markup
    $comment_depth = 1;
    $GLOBALS['comment'] = $comment;

    // Start output buffering to capture the HTML
    ob_start();
    ?>
    <li <?php comment_class('', $comment->comment_ID); ?> id="comment-<?php echo $comment->comment_ID; ?>">
        <div class="comment-body">
            <div class="comment-author vcard">
                <?php echo get_avatar( $comment, 64 ); ?>
                <cite class="fn"><?php echo get_comment_author_link( $comment ); ?></cite>
            </div>
            <div class="comment-content">
                <?php comment_text( $comment ); ?>
            </div>
            <div class="comment-metadata">
                <a href="<?php echo esc_url( get_comment_link( $comment->comment_ID ) ); ?>">
                    <?php printf( __( '%1$s at %2$s' ), get_comment_date( '', $comment ),  get_comment_time( '', $comment ) ); ?>
                </a>
                <?php if ( $comment->comment_approved == '0' ) : ?>
                    <em class="comment-awaiting-moderation"><?php _e( 'Your comment is awaiting moderation.' ); ?></em>
                <?php endif; ?>
            </div>
        </div>
    </li>
    <?php
    $comment_html = ob_get_clean();

    // 5. Return the JSON response
    echo json_encode( array(
        'success' => true,
        'html'    => $comment_html
    ));

    wp_die();
}

add_action( 'wp_ajax_pnet_submit_comment', 'pnet_handle_ajax_comments' );
add_action( 'wp_ajax_nopriv_pnet_submit_comment', 'pnet_handle_ajax_comments' );
Understanding the PHP Logic
The code is doing the heavy lifting here. When the AJAX WordPress comments request hits the server, we validate it using check_ajax_referer. If the nonce is invalid, the script dies immediately, protecting you from spam bots bypassing the form.
If the comment is valid, we generate the HTML. Note that in the example above, I used a simplified HTML structure for the comment <li>. In a production environment, you might want to replicate the exact HTML structure your theme uses in its comments.php file so the new comment looks identical to the old ones.
You might also like:
Handling Errors and Validation
One of the biggest challenges with AJAX WordPress comments is error handling. If a user forgets to type their email, or if the CAPTCHA fails, you can’t just reload the page with an error message at the top. You must pass that error back to the JavaScript.
In our PHP function, we check is_wp_error( $comment ). If WordPress rejects the comment, we send that specific error message back in our JSON object. The JavaScript then displays this in an alert() box, but you could easily improve this by injecting a <div class="error"> above the form for a better UI.
Styling the Experience
Because the new comment is appended dynamically, it can be nice to add a CSS animation to highlight it. This gives the user visual confirmation that their action succeeded.
Add this to your stylesheet:
@keyframes flash-comment {
    0% { background-color: #ffff99; }
    100% { background-color: transparent; }
}

.comment-list li.new-ajax-comment {
    animation: flash-comment 2s ease-out;
}
Then, update your JavaScript success function to add this class when appending the HTML:
var newComment = $(result.html).addClass('new-ajax-comment');
commentList.append(newComment);
[Screenshot Here: Screenshot showing a newly added comment with a yellow highlight effect to indicate it was just posted via AJAX.]
Troubleshooting Common Issues
Implementing AJAX WordPress comments can sometimes conflict with other plugins. Here are common pitfalls:
- Anti-Spam Plugins: Some plugins like Akismet or ReCaptcha rely on JavaScript that runs on page load. When you switch to AJAX WordPress comments, you may need to manually trigger their re-verification functions after a successful post.
- jQuery Version: Ensure your theme is loading jQuery. While WordPress includes it by default, some optimization plugins strip it out.
- ID Conflicts: Ensure your
comments.phpuses standard IDs like#commentformand#submit. If your theme uses custom classes, update the jQuery selectors in Step 3 accordingly.
Conclusion
Upgrading to AJAX WordPress comments is a fantastic way to polish your website. It reduces server strain and keeps the conversation flowing without the jarring interruption of a page reload. While it requires a bit of code wrangling in functions.php and JavaScript, the result is a professional, high-performance comment section.
Remember, the code provided here uses the prefix pnet_ to ensure no conflicts with your existing plugins. Test this on a staging site first, and enjoy the speed boost!


