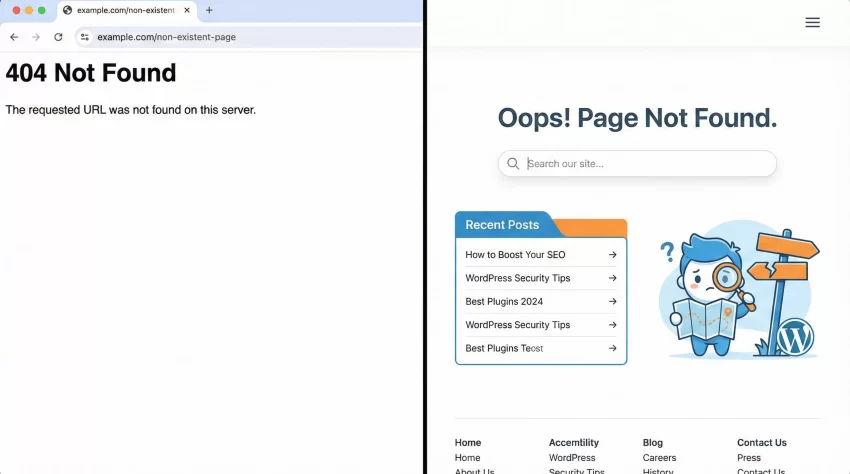
We have all been there. You click a link expecting a helpful article or a product page, and instead, you are greeted by a generic, lifeless error message: “Page Not Found.” It is frustrating, isn’t it? As a site owner, that moment is a critical leak in your traffic bucket. If you do not have a Custom 404 Page WordPress setup, you are essentially telling your visitors to go away.
But it does not have to be like that. A well-crafted 404 page can actually be a goldmine for user retention. Instead of a dead end, it can be a helpful guide that redirects lost visitors back to your best content. In this guide, we are going to dive deep into how to create a high-converting Custom 404 Page WordPress template from scratch. We will cover the code, the logic, and the styling to ensure your error page works as hard as the rest of your site.
Why You Need a Custom 404 Page WordPress Solution
You might be thinking, “It is just an error page, does it really matter?” The short answer is: absolutely. A default 404 page is usually ugly and unhelpful. It disrupts the user journey. When a visitor hits a standard error page, they typically hit the “Back” button immediately. This increases your bounce rate, which sends a negative signal to search engines like Google.
By implementing a Custom 404 Page WordPress strategy, you can:
- Reduce Bounce Rate: Keep users on your site by offering them alternative paths.
- Boost SEO: Internal linking on 404 pages helps crawlers find your content even when a link is broken.
- Strengthen Branding: Show off your brand’s personality even when things go wrong.
Creating a Custom 404 Page WordPress layout is not just about aesthetics; it is about saving a lost interaction and turning a negative experience into a positive one.
Step 1: The Child Theme (Safety First)
Before we touch any code to build our Custom 404 Page WordPress file, ensure you are using a child theme. If you edit your parent theme directly, your custom 404 page will vanish the next time the theme updates. If you do not have one, create a folder in /wp-content/themes/ and add a style.css and functions.php. This ensures your Custom 404 Page WordPress changes are permanent.
You might also like:

Step 2: Creating the 404.php File
WordPress uses a template hierarchy to decide which file to load. When it cannot find the content requested, it looks for a file named 404.php in your theme folder. If it does not find one, it falls back to index.php.
To start your Custom 404 Page WordPress design, create a new file named 404.php in your child theme’s root directory.
Paste the following basic structure into the file. This pulls in your site’s header and footer so the 404 page looks like it belongs on your website.
<?php
/**
* The template for displaying 404 pages (not found)
*/
get_header();
?>
<div id="primary" class="content-area">
<main id="main" class="site-main">
<section class="error-404 not-found">
<header class="page-header">
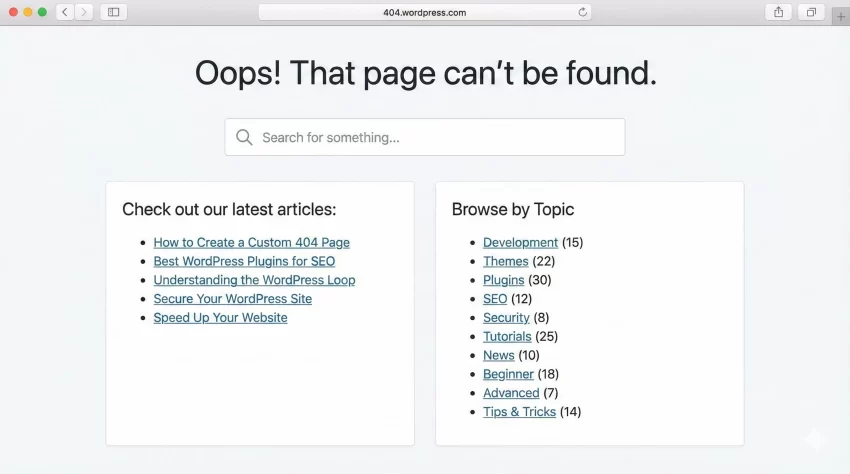
<h1 class="page-title"><?php esc_html_e( 'Oops! That page can’t be found.', 'textdomain' ); ?></h1>
</header><div class="page-content">
<p><?php esc_html_e( 'It looks like nothing was found at this location. Maybe try a search?', 'textdomain' ); ?></p>
<?php get_search_form(); ?>
</div></section></main></div><?php
get_footer();
This snippet is the foundation of any Custom 404 Page WordPress template. It maintains your site’s navigation and branding while delivering a clear message.
Step 3: Adding Helpful Content to Retain Users
A search bar is great, but we can do better. A truly effective Custom 404 Page WordPress layout should actively guide the user. Let’s add a list of your most recent posts so the user has something immediate to click on.
We will create a custom function to fetch these posts. Remember, we are using the prefix pnet_ to avoid conflicts with other plugins.
Add the following code inside the .page-content div, right after the search form in your 404.php file:
<div class="pnet-404-suggestions">
    <h3><?php esc_html_e( 'Check out our latest articles:', 'textdomain' ); ?></h3>
    <ul>
        <?php
        // pnet_ custom query for recent posts
        $pnet_recent_args = array(
            'post_type'      => 'post',
            'posts_per_page' => 5,
            'post_status'    => 'publish',
        );

        $pnet_recent_query = new WP_Query( $pnet_recent_args );

        if ( $pnet_recent_query->have_posts() ) :
            while ( $pnet_recent_query->have_posts() ) : $pnet_recent_query->the_post();
                ?>
                <li>
                    <a href="<?php the_permalink(); ?>"><?php the_title(); ?></a>
                </li>
                <?php
            endwhile;
            wp_reset_postdata();
        endif;
        ?>
    </ul>
</div>
This code block uses the standard WP_Query class (link opens in new window) to fetch the 5 most recent posts. Including this in your Custom 404 Page WordPress strategy ensures that even if a visitor gets lost, they are immediately presented with fresh content.
You might also like:
Step 4: Suggesting Content Based on Category
To take your Custom 404 Page WordPress development to the next level, you might want to display categories. This gives users a broad overview of what your site offers. Here is how we can add a neat list of categories to the page.
<div class="pnet-404-categories">
    <h3><?php esc_html_e( 'Browse by Topic', 'textdomain' ); ?></h3>
    <ul>
        <?php
        wp_list_categories( array(
            'orderby'    => 'count',
            'order'      => 'DESC',
            'show_count' => 1,
            'title_li'   => '',
            'number'     => 10,
        ) );
        ?>
    </ul>
</div>
By organizing content this way, your Custom 404 Page WordPress interface becomes a helpful sitemap rather than a dead end.
Step 5: Styling Your Custom 404 Page
Now that we have the structure, we need to make it look good. A broken layout on a 404 page is a double disaster. We will use some CSS to style the elements we added. You can add this to your child theme’s style.css file.
We want a clean, centered look that focuses attention on the search bar and the links. Here is the CSS to polish your Custom 404 Page WordPress design:
.error-404 {
    text-align: center;
    padding: 60px 20px;
}

.error-404 .page-title {
    font-size: 3rem;
    color: #333;
    margin-bottom: 20px;
}

.error-404 .page-content p {
    font-size: 1.2rem;
    color: #666;
    margin-bottom: 30px;
}

.pnet-404-suggestions,
.pnet-404-categories {
    margin-top: 40px;
    text-align: left;
    display: inline-block;
    vertical-align: top;
    width: 45%;
    box-sizing: border-box;
}

.pnet-404-suggestions h3,
.pnet-404-categories h3 {
    font-size: 1.5rem;
    border-bottom: 2px solid #eee;
    padding-bottom: 10px;
    margin-bottom: 20px;
}

.pnet-404-suggestions ul,
.pnet-404-categories ul {
    list-style: none;
    padding: 0;
}

.pnet-404-suggestions li,
.pnet-404-categories li {
    margin-bottom: 10px;
}

.pnet-404-suggestions li a,
.pnet-404-categories li a {
    text-decoration: none;
    color: #0073aa;
    font-weight: 500;
}

.pnet-404-suggestions li a:hover,
.pnet-404-categories li a:hover {
    color: #005177;
}

@media (max-width: 768px) {
    .pnet-404-suggestions,
    .pnet-404-categories {
        width: 100%;
        display: block;
        margin-bottom: 40px;
    }
}
This CSS ensures that your Custom 404 Page WordPress layout is responsive. It splits the suggestions and categories into two columns on desktop and stacks them neatly on mobile devices.
Tip: Easily Remove Unused CSS and JS in WordPress for Blazing Fast Speed
Advanced Method: Redirecting 404s to the Homepage (Use with Caution)
Sometimes, site owners prefer to skip the error page entirely and redirect users to the homepage. While I generally recommend a specific Custom 404 Page WordPress template because it explains why the error happened, there are cases where a redirect is preferred.
If you want to do this, open your 404.php file and replace all the code with this simple PHP redirect snippet:
<?php
// pnet_ redirect logic
header("HTTP/1.1 301 Moved Permanently");
header("Location: " . get_bloginfo('url'));
exit();
?>
Warning: While this prevents the user from seeing an error, it can be confusing. They clicked a link to a specific article and ended up on the homepage without explanation. A dedicated Custom 404 Page WordPress design is almost always the better user experience (UX) choice.
Testing Your New Page
Once you have uploaded your 404.php and style.css, it is time to test. Do not just assume it works. Type a nonsense URL into your browser (e.g., yourdomain.com/this-page-does-not-exist-123).
Verify the following on your Custom 404 Page WordPress screen:
- Does the search bar work?
- Are the “Recent Posts” links active and correct?
- Is the layout responsive on your phone?
- Does the header and footer match the rest of your site?
Conclusion
Building a Custom 404 Page WordPress template is one of those small details that separate professional sites from amateur ones. It shows your visitors that you care about their experience, even when things go wrong. By following this guide, you have turned a potential exit point into a navigation hub.
Remember, the goal of a Custom 404 Page WordPress setup is to be helpful, not just apologetic. Give your users the tools they need to find what they were looking for, and you will see those bounce rates drop.
Do you have a unique 404 page design? Share your thoughts or link to your Custom 404 Page WordPress examples in the comments below!