Repeated login failures and automated brute-force attacks can put your WordPress website at risk. By default, WordPress does not impose a strict limit on how many times someone can attempt to log in, allowing automated scripts to repeatedly test usernames and passwords. In this guide, you will learn how to Limit Login Attempts without installing a third-party plugin by implementing a lightweight PHP-based IP throttling mechanism. We will track failed authentication attempts, temporarily block suspicious IP addresses, and automatically reset the restrictions after a specified period.
WordPress provides several authentication hooks that developers can use to extend the default login process. By combining these hooks with the WordPress Transients API, we can build a simple login protection mechanism that requires no additional database tables or external dependencies.
1. Why Limit Login Attempts in WordPress?
WordPress powers millions of websites, making its standard login endpoint a frequent target for automated attacks. A brute-force attack occurs when an attacker repeatedly submits different username and password combinations until valid credentials are discovered.
Without login throttling, an attacker can send hundreds or thousands of authentication requests to your website. Even when those attempts fail, they consume server resources and can contribute to unnecessary database activity. Implementing a mechanism to Limit Login Attempts helps reduce this exposure by restricting repeated failures from the same IP address.
Understanding IP-based throttling
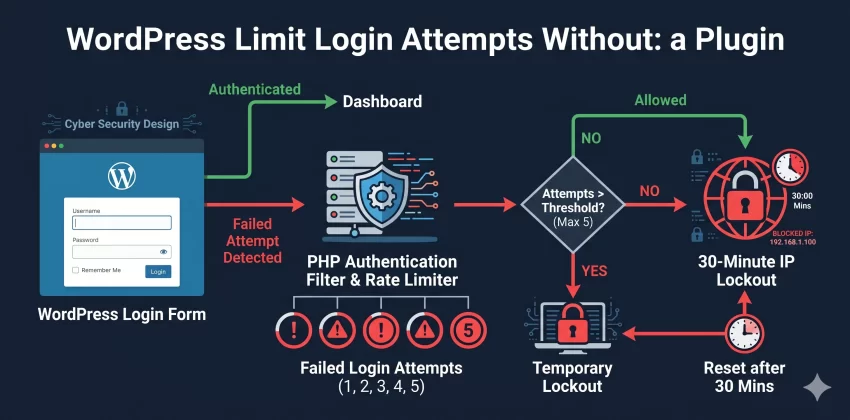
IP-based throttling monitors failed login attempts originating from a particular IP address. When the number of failures reaches a predefined threshold, the system temporarily prevents further authentication attempts from that address.
For example, you can configure your website to allow five failed login attempts within a fifteen-minute window. After the fifth failure, the IP address is temporarily blocked for thirty minutes. Once the restriction expires, the visitor can attempt to log in again.
- Attempt tracking: Counts unsuccessful authentication attempts.
- IP identification: Associates failed attempts with the requesting IP address.
- Temporary restrictions: Blocks authentication requests after the configured threshold.
- Automatic recovery: Removes restrictions after the lockout period expires.
This approach is useful for basic protection, although it is not a replacement for a comprehensive security solution, a web application firewall, or server-level rate limiting.
2. Prerequisites
Before implementing the custom login throttling mechanism, make sure you have the following requirements in place. The implementation uses standard WordPress functionality and does not require any additional PHP libraries.
- WordPress 6.0 or later (a recent supported WordPress release is recommended).
- PHP 8.0 or later.
- Administrator access to your WordPress installation.
- Access to your website’s filesystem through FTP, SFTP, or your hosting control panel.
- A complete backup of your website and database.
- A staging environment for testing the authentication changes.
- Basic knowledge of PHP and WordPress hooks.
We recommend implementing this functionality through a small custom must-use plugin (MU-plugin). Although the solution does not require a third-party plugin, an MU-plugin keeps the security logic independent of your active theme. It also ensures that the functionality remains available when you change themes.
Backup Required
3. Create the Custom Login Throttling File
First, we need a dedicated PHP file to store our login protection functionality. WordPress automatically loads PHP files placed inside its must-use plugins directory, making it a convenient location for site-wide custom functionality.
Create the mu-plugins directory
Connect to your website using SFTP or your hosting file manager and navigate to the wp-content directory.
Check whether a directory named mu-plugins already exists. If it does not, create one manually.
Your directory structure should look like this:
public_html/
├── wp-admin/
├── wp-content/
│   ├── mu-plugins/
│   │   └── pnet-login-throttling.php
│   ├── plugins/
│   └── themes/
└── wp-includes/
Create the PHP file
Inside the mu-plugins directory, create a new file named pnet-login-throttling.php. This file will contain all the functions required to track authentication failures and temporarily restrict suspicious login requests.
Start with the following PHP opening tag and plugin header:
<?php
/**
 * Plugin Name: PNET Basic Login Throttling
 * Description: Basic IP-based login throttling without third-party plugins.
 * Version: 1.0.0
 * Author: PNET
 */

if ( ! defined( 'ABSPATH' ) ) {
    exit;
}
The ABSPATH check prevents direct access to the PHP file outside the WordPress environment. The must-use plugin does not require activation through the Plugins screen because WordPress loads files from the MU-plugin directory automatically.
Once the file is created, we can begin adding the actual throttling functionality.
You might also like: Create a Powerful WordPress Custom Dashboard Widget: The Ultimate Guide
4. Configure Login Throttling Settings
Before writing the authentication logic, define the limits that control how many failed login attempts are permitted and how long an IP address remains restricted.
Keeping these settings in one place makes it easier to adjust the protection according to your website’s requirements without modifying multiple functions.
Define the attempt threshold and time windows
Add the following constants below the plugin header in your PHP file:
define( 'PNET_LOGIN_MAX_ATTEMPTS', 5 );

define( 'PNET_LOGIN_ATTEMPT_WINDOW', 15 * MINUTE_IN_SECONDS );

define( 'PNET_LOGIN_LOCKOUT_DURATION', 30 * MINUTE_IN_SECONDS );
These constants define three important parameters:
- PNET_LOGIN_MAX_ATTEMPTS: Allows a maximum of five failed login attempts before restricting the IP address.
- PNET_LOGIN_ATTEMPT_WINDOW: Tracks failed attempts within a fifteen-minute rolling window.
- PNET_LOGIN_LOCKOUT_DURATION: Temporarily blocks the IP address for thirty minutes after the threshold is reached.
WordPress provides time-related constants such as MINUTE_IN_SECONDS, which makes these settings easier to understand and maintain.
Understand the throttling configuration
Consider a visitor who enters an incorrect password five times within fifteen minutes. The fifth failed authentication attempt triggers the lockout mechanism. Subsequent login requests from the same IP address will be rejected until the thirty-minute restriction expires.
These values are starting points rather than universal security recommendations. For a membership website or a website with many users behind a shared office network, you may need to adjust the thresholds to reduce accidental lockouts.
Pro Tip
5. Identify the Visitor’s IP Address
IP identification is an essential part of any IP-based throttling mechanism. We need to identify the source address of each login request so that failed authentication attempts can be associated with the correct visitor.
However, IP detection requires care. Many tutorials use HTTP headers such as HTTP_X_FORWARDED_FOR to identify visitors behind proxies. These headers can be supplied or manipulated by clients when they are not inserted and sanitized by a trusted proxy.
Create a secure IP detection function
For a basic implementation, use PHP’s REMOTE_ADDR server variable. It contains the address of the direct network peer connecting to your web server.
Add the following function to your custom MU-plugin:
function pnet_get_client_ip() {

    if ( empty( $_SERVER['REMOTE_ADDR'] ) ) {
        return '';
    }

    $ip = sanitize_text_field(
        wp_unslash( $_SERVER['REMOTE_ADDR'] )
    );

    if ( ! filter_var( $ip, FILTER_VALIDATE_IP ) ) {
        return '';
    }

    return $ip;
}
The function retrieves the direct peer IP address, sanitizes the input, and validates it using PHP’s built-in IP validation filter. Both IPv4 and IPv6 addresses are supported.
Why avoid blindly trusting forwarded IP headers?
Headers such as HTTP_X_FORWARDED_FOR, HTTP_CLIENT_IP, and HTTP_X_REAL_IP are not automatically trustworthy. If your website accepts these values without verifying the proxy that supplied them, an attacker may spoof their IP address and bypass basic throttling.
If your website operates behind Cloudflare, a reverse proxy, or a load balancer, configure IP identification using the documented trusted-proxy configuration provided by that infrastructure. Do not simply trust the first IP address in a forwarded header.
Special Note
6. Track Failed Login Attempts
Now that we can identify the visitor’s IP address, the next step is to count unsuccessful authentication attempts. WordPress provides the wp_login_failed action hook, which runs when authentication fails.
We will use this hook to store the failure count in WordPress transients. Transients are temporary data storage mechanisms provided by WordPress and can use the database or an external object cache.
Generate a unique transient key
Instead of storing raw IP addresses directly in transient names, we will generate a SHA-256 hash of each IP address. This creates a consistent identifier without exposing the original IP address in the transient key.
function pnet_get_login_transient_key( $ip ) {

    return 'pnet_login_' . hash( 'sha256', $ip );
}
The resulting key is unique for each validated IP address. It allows us to track different visitors independently without creating custom database tables.
Record unsuccessful authentication attempts
Add the following function to increment the failed login counter whenever WordPress reports an unsuccessful authentication attempt:
function pnet_record_failed_login( $username ) {

    $ip = pnet_get_client_ip();

    if ( empty( $ip ) ) {
        return;
    }

    $key = pnet_get_login_transient_key( $ip );

    $attempts = (int) get_transient( $key );

    $attempts++;

    set_transient(
        $key,
        $attempts,
        PNET_LOGIN_ATTEMPT_WINDOW
    );

    if ( $attempts >= PNET_LOGIN_MAX_ATTEMPTS ) {

        $lockout_key = $key . '_lockout';

        set_transient(
            $lockout_key,
            1,
            PNET_LOGIN_LOCKOUT_DURATION
        );
    }
}

add_action(
    'wp_login_failed',
    'pnet_record_failed_login'
);
Each failed authentication event increases the transient counter by one. The counter is stored for the configured fifteen-minute period. When the maximum number of permitted failures is reached, the function creates a separate lockout transient with a thirty-minute expiration period.
Notice that the attempt counter and lockout status use separate transient keys. This makes it possible to manage the tracking window and the actual restriction independently.
Understand the rolling attempt window
In this implementation, each failed attempt refreshes the transient’s expiration time. Therefore, the fifteen-minute tracking period is a rolling inactivity window rather than a fixed calendar window. If another failed attempt occurs, the counter receives a fresh fifteen-minute expiration period.
WordPress transients are temporary storage, not a transactional rate-limiting system. Concurrent authentication requests may occasionally race when reading and updating counters. For high-traffic websites or strict enforcement requirements, use an atomic counter in Redis, a dedicated rate-limiting service, or server-level controls.
You might also like:
7. Block Excessive Login Attempts
Tracking failures is not sufficient on its own. We must also prevent further authentication attempts when an IP address has reached the configured threshold.
WordPress provides the authenticate filter, which allows developers to modify the authentication result. We will use this filter to check whether the requesting IP address has an active lockout before normal username and password authentication proceeds.
Create the authentication restriction function
Add the following function to your MU-plugin:
function pnet_check_login_lockout(
    $user,
    $username,
    $password
) {

    $ip = pnet_get_client_ip();

    if ( empty( $ip ) ) {
        return new WP_Error(
            'pnet_invalid_ip',
            'Unable to verify your connection. Please try again later.'
        );
    }

    $key = pnet_get_login_transient_key( $ip );

    $lockout_key = $key . '_lockout';

    if ( get_transient( $lockout_key ) ) {

        return new WP_Error(
            'pnet_login_locked',
            'Too many failed login attempts. Please try again later.'
        );
    }

    return $user;
}

add_filter(
    'authenticate',
    'pnet_check_login_lockout',
    5,
    3
);
The filter runs at priority 5, before WordPress’s standard username/password authentication callbacks, which normally execute at priority 20. This allows the throttling mechanism to reject a blocked IP before the normal password verification process takes place.
If an active lockout transient exists, the function returns a WP_Error object. WordPress then treats the authentication request as unsuccessful and displays the corresponding login error. Otherwise, the original authentication result is returned unchanged.
Understand how the lockout works
Once an IP address reaches five failed attempts, its lockout transient becomes active. Any subsequent login request from that address is rejected, regardless of whether the submitted username or password is correct.
This is important because the purpose of throttling is to stop repeated authentication requests from a source that has exceeded the permitted failure threshold.
8. Reset Failed Attempts After Successful Login
A legitimate visitor may occasionally enter an incorrect password before successfully authenticating. We should ensure that successful authentication clears the previously accumulated failure counter.
WordPress provides the wp_login action hook, which runs after a successful login. We can use this hook to delete the transient associated with the visitor’s IP address.
Create the reset function
Add the following function to your custom MU-plugin:
function pnet_reset_failed_login_attempts(
    $user_login,
    $user
) {

    $ip = pnet_get_client_ip();

    if ( empty( $ip ) ) {
        return;
    }

    $key = pnet_get_login_transient_key( $ip );

    delete_transient( $key );
}

add_action(
    'wp_login',
    'pnet_reset_failed_login_attempts',
    10,
    2
);
Whenever a visitor successfully logs in, the function retrieves their IP address, generates the corresponding transient key, and removes the failed login counter.
The successful login reset does not remove an active lockout. In the normal authentication flow, a blocked IP cannot reach successful authentication until its lockout expires. This prevents the reset mechanism from becoming an unintended lockout bypass.
9. Test the Login Throttling Mechanism
After implementing the functions, testing is essential. A small mistake in an authentication filter can affect every login request, so verify both normal authentication and the temporary restriction before deploying the code on a production website.
Test normal login functionality
Open your WordPress login page and attempt to authenticate using a valid username and password. Confirm that you can log in successfully and access the administration dashboard.
Next, log out and deliberately submit an incorrect password once or twice. Confirm that WordPress displays its normal authentication error and that the login page continues functioning correctly.
Test the failed attempt threshold
Using a test account, submit an incorrect password five times from the same IP address within the configured tracking window.
After the fifth unsuccessful attempt, try submitting the correct password. The authentication filter should reject the request and display the temporary lockout message.
To verify automatic recovery, wait for the configured thirty-minute lockout period to expire. Attempt to log in again using valid credentials. The authentication request should now proceed normally.
Test different IP addresses
If possible, repeat the test from a separate network connection. For example, you can use a mobile data connection instead of your regular broadband connection.
The second connection should have a different IP address and should not inherit the first connection’s lockout status. This confirms that the transient keys are being generated independently for different addresses.
Testing Tip
10. Common Errors and Troubleshooting
Although the implementation uses standard WordPress hooks and APIs, certain hosting configurations and authentication workflows can produce unexpected results. The following troubleshooting points will help you identify and resolve common problems.
Login attempts are not being counted
If repeated incorrect passwords do not increase the failure counter, first verify that the MU-plugin is being loaded. Open the WordPress administration area and navigate to Plugins → Must-Use. Confirm that PNET Basic Login Throttling appears in the list.
Also verify that the wp_login_failed action is not being bypassed by a custom authentication integration. Some third-party login systems use alternative authentication workflows that do not trigger the standard WordPress failure hook.
All visitors are being blocked after five attempts
This can happen when multiple visitors share the same public IP address. Office networks, schools, and mobile carrier networks frequently use shared public IP addresses through network address translation (NAT).
Because the implementation tracks failures by IP address, one visitor’s failed attempts can affect other users behind the same network connection. Consider increasing the attempt threshold or using a more sophisticated rate-limiting system for websites with shared-network users.
The website identifies the wrong IP address
If your hosting environment uses Cloudflare or another reverse proxy, REMOTE_ADDR may identify the proxy rather than the original visitor.
Configure your hosting infrastructure to supply the original client address through a trusted proxy mechanism. Never accept arbitrary forwarded IP headers without validating the source proxy.
Login throttling does not work with custom login forms
Some membership plugins, custom login forms, and external authentication providers may not use the standard WordPress authentication workflow. As a result, they may not trigger the authenticate filter or wp_login_failed action in the expected way.
Inspect the authentication implementation used by your custom form and integrate the throttling checks into its authentication process. Avoid assuming that every login system automatically follows the default WordPress login flow.
Lockout expires earlier than expected
WordPress transients are designed for temporary storage and their expiration represents a maximum lifetime, not a guaranteed minimum lifetime. An external object cache, database cleanup process, or cache eviction may remove a transient before its scheduled expiration.
If you require strict lockout enforcement, consider using a dedicated persistent rate-limiting store or a web server-level mechanism instead of relying exclusively on transients.
Visitors cannot log in after changing their network
IP-based throttling identifies visitors by their current network address rather than their WordPress account. A visitor who changes networks may receive a different IP address and therefore a different attempt counter.
Similarly, a shared network may cause multiple users to inherit the same counter. This is an inherent limitation of basic IP throttling rather than a PHP implementation error.
You might also like:
11. Security Considerations and Limitations
Our custom implementation provides basic protection against repeated login failures, but developers should understand its limitations before relying on it as the primary security mechanism for a production website.
IP rotation can bypass basic throttling
Attackers can distribute authentication requests across multiple IP addresses using proxies, botnets, or other network infrastructure. Since our implementation tracks attempts independently for each IP address, rotating addresses can reduce the effectiveness of this particular control.
Transient storage is not an atomic rate limiter
The WordPress Transients API is convenient for lightweight implementations, but its ordinary read-and-write operations are not guaranteed to be atomic. Concurrent login requests may occasionally update the same counter incorrectly.
For more demanding environments, consider Redis with atomic increment and expiration operations, server-level rate limiting, or a dedicated web application firewall.
Consider additional authentication protection
For stronger WordPress security, combine IP throttling with other protective measures:
- Enable two-factor authentication for administrator accounts.
- Enforce strong, unique passwords.
- Use HTTPS across the entire website.
- Keep WordPress core, themes, and plugins updated.
- Restrict administrative access where appropriate.
- Use a web application firewall to filter malicious traffic.
- Monitor unusual authentication activity and server logs.
For additional technical information, refer to the official WordPress documentation:
- WordPress authenticate Filter
- WordPress wp_login_failed Action
- WordPress Transients API
- PHP filter_var() Documentation
12. Conclusion
Protecting the WordPress login page against repeated password attempts is an important part of website security. By using the built-in authenticate, wp_login_failed, and wp_login hooks alongside the WordPress Transients API, developers can implement a lightweight IP-based throttling mechanism without installing a third-party security plugin.
This implementation tracks failed authentication attempts, temporarily blocks IP addresses after five failures, and automatically removes the restriction when the lockout expires. It is a practical starting point for developers who want to Limit Login Attempts using custom PHP code. However, remember that IP-based throttling has limitations involving shared networks, proxy configurations, concurrent requests, and IP rotation. For production websites requiring stronger protection, combine this approach with two-factor authentication, trusted-proxy configuration, and server-level rate limiting.