Have you ever uploaded an image to your WordPress site, only to find that the default “Thumbnail,” “Medium,” or “Large” sizes just don’t fit your layout? You are not alone. Many developers and site owners struggle with this limitation. The good news is that you can add custom image size WordPress functionality directly to your theme, giving you pixel-perfect control over your visuals.
In this guide, we will walk you through the process of registering a new image size and, crucially, making it selectable in the WordPress Media Library “Attachment Display Settings.” As a bonus, we will also cover how to regenerate your thumbnails so your old images adapt to these new settings instantly.
Why You Should Add Custom Image Size WordPress
By default, WordPress offers a few standard sizes. However, modern themes often require specific dimensions for sliders, portfolio grids, or sidebar widgets. Relying on CSS to resize large images down slows your website. When you add custom image size WordPress recognizes, the server creates a physical file at those exact dimensions.
- Improved Performance: Faster load times because you are serving the exact size needed.
- Better SEO: Google favors fast-loading sites with properly sized images.
- Workflow Efficiency: Select your custom size directly from the editor without manual cropping.
Step 1: Registering the Custom Image Size
To begin, we need to tell WordPress that a new image size exists. We will use the add_image_size() function. This code should be placed in your theme’s functions.php file or a custom site-specific plugin.
We will prefix our custom functions with pnet_ to avoid conflicts.
The Code Snippet:
/**
 * Register custom image sizes.
 */
function pnet_register_custom_sizes() {
    // Parameters: Name, Width, Height, Crop (true = hard crop, false = soft crop)
    add_image_size( 'pnet-sidebar-widget', 350, 250, true );
    add_image_size( 'pnet-full-width-banner', 1200, 400, array( 'center', 'center' ) );
}
add_action( 'after_setup_theme', 'pnet_register_custom_sizes' );
Explanation:
pnet-sidebar-widget: This creates a size of 350×250 pixels. Thetrueparameter enables “Hard Crop,” meaning WordPress will cut the image to fit these dimensions exactly.pnet-full-width-banner: This creates a larger banner. The arrayarray( 'center', 'center' )tells WordPress to crop from the exact center of the image if it needs to be trimmed.
Note: Simply adding this code creates the size in the background, but it won’t appear in the WordPress admin dropdown yet. That is our next step.
Step 2: Displaying the Size in Attachment Settings
This is the step most tutorials miss. To make your new size selectable when you insert media into a post, you must filter the image_size_names_choose hook. This connects your code-friendly ID (e.g., pnet-sidebar-widget) to a human-readable name (e.g., “Sidebar Widget”).
The Code Snippet:
/**
 * Add custom image sizes to the Media Library display settings.
 *
 * @param array $sizes Current list of image sizes.
 * @return array Modified list of image sizes.
 */
function pnet_add_custom_sizes_to_admin( $sizes ) {
    $custom_sizes = array(
        'pnet-sidebar-widget'    => __( 'Sidebar Widget', 'pnet-textdomain' ),
        'pnet-full-width-banner' => __( 'Full Width Banner', 'pnet-textdomain' ),
    );

    return array_merge( $sizes, $custom_sizes );
}
add_filter( 'image_size_names_choose', 'pnet_add_custom_sizes_to_admin' );
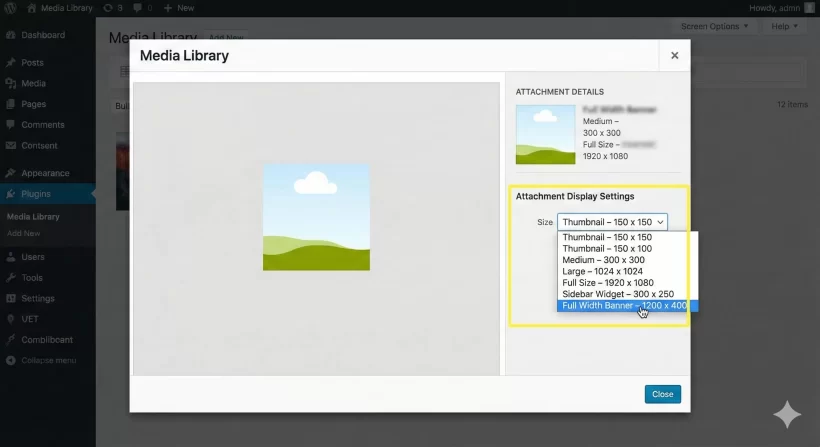
You effectively add custom image size WordPress users can easily select without touching a single line of code!
Step 3: Regenerating Thumbnails (Crucial Step)
If you add custom image size WordPress logic to an existing site, you might notice that your old images don’t have these new sizes generated yet. WordPress only creates sizes at the moment of upload.
To fix this, you need to “regenerate” your thumbnails.
- Install and activate the Regenerate Thumbnails plugin (or use a similar tool like “Force Regenerate Thumbnails“).
- Go to Tools > Regenerate Thumbnails.
- Click the button to regenerate images for all attachments.
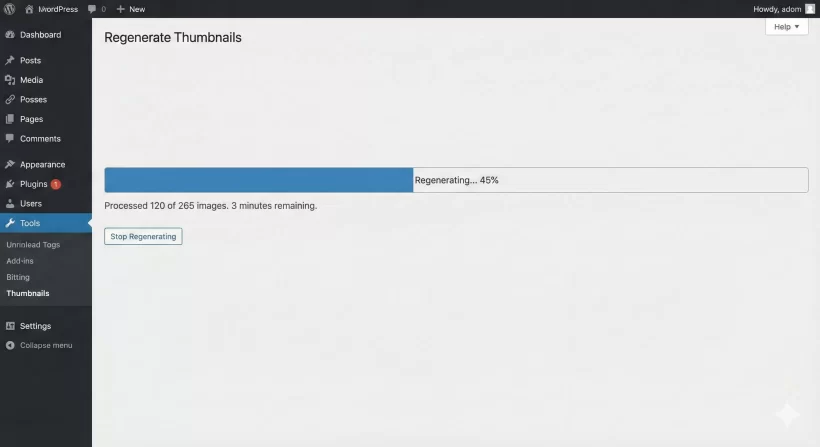
This process will create the pnet-sidebar-widget and pnet-full-width-banner versions for every image already in your library.
You might also like:

Bonus Feature: Removing Default WordPress Sizes
Sometimes, you want to clean up the interface. If you add custom image size WordPress options specifically for your theme, you might want to hide the defaults (like Medium or Large) to prevent clients from using the wrong dimensions.
Here is how you can remove default sizes from that same dropdown list:
/**
 * Remove default image sizes from the selection list.
 */
function pnet_remove_default_sizes( $sizes ) {
    // Unset the sizes you do not want to show
    unset( $sizes['medium'] );
    unset( $sizes['large'] );

    return $sizes;
}
add_filter( 'image_size_names_choose', 'pnet_remove_default_sizes' );
Note: This only hides them from the dropdown selector; it does not stop WordPress from generating the files.
Step 4: Displaying the Custom Size in Your Theme
Registering the size is only half the battle; now you need to output it on the front end. The primary reason developers add custom image size WordPress configurations is to ensure the image fits the layout perfectly without using CSS to stretch or squash it.
You can display your new sizes using standard WordPress functions. Here are the two most common scenarios:
Scenario A: Displaying the Featured Image
If you are editing a template file like single.php or archive.php, you likely want to show the specific size you created for the post thumbnail.
<?php
// Check if the post has a featured image first
if ( has_post_thumbnail() ) {
    // Output the specific custom size we registered earlier
    the_post_thumbnail( 'pnet-sidebar-widget', array( 'class' => 'pnet-custom-class' ) );
}
?>
Scenario B: Displaying an Image by ID
If you are working with custom fields or getting an image ID from a database query, you should use wp_get_attachment_image(). This is superior to standard HTML tags because it automatically handles responsive attributes (srcset).
<?php
// Assume we have an attachment ID
$pnet_image_id = 10; //10 is the attachment ID of the image

if ( $pnet_image_id ) {
    echo wp_get_attachment_image( $pnet_image_id, 'pnet-full-width-banner' );
}
?>
By using these functions, you allow WordPress to serve the optimized, cropped version of the file. This creates a faster, cleaner user experience compared to relying on full-size images scaled down by the browser.
Conclusion
Controlling your media assets is a hallmark of a professional WordPress site. When you add custom image size WordPress functionality, you ensure that your design remains consistent, your layout never breaks, and your pages load quickly.
By following this guide, you have successfully:
- Registered new image dimensions in your theme.
- Added a user-friendly selector to the Media Library.
- Regenerated your old thumbnails to match the new specs.
- Implemented the code to display these sizes in your theme templates.
Now, go ahead and update your theme specifically to fit your content’s needs!