
Every WordPress developer eventually hits a wall where standard plugins just don’t cut it. You need to display specific, changing information—like a logged-in user’s name, the current date, or a specialized database query—inside a post or page. This is where the ability to create custom WordPress shortcode becomes your most valuable asset.
As a WordPress Developer and the author of PixelNet, I often find that beginners are intimidated by the Shortcode API. They assume it requires complex programming knowledge. The reality? It is surprisingly logical. Whether you are building a client site or tweaking your own blog, mastering this skill allows you to inject dynamic logic anywhere content resides.
In this comprehensive guide, we will walk through exactly how to create custom WordPress shortcode functionality from scratch. We will cover everything from the basic syntax to handling attributes and ensuring your code is secure. By the end, you will have a reusable toolset to display dynamic data effortlessly.
What is a Shortcode and Why Go Custom?
Before we dive into the code, it is vital to understand the mechanism. A shortcode is essentially a macro—a small text tag enclosed in square brackets (like [myshortcode]) that WordPress replaces with content when a visitor loads the page. While themes come bundled with many, the real magic happens when you create custom WordPress shortcode functions tailored to your specific needs.
Why not just use a plugin? Performance and control. Plugins often load unnecessary assets (CSS/JS) globally, slowing down your site. Writing your own lightweight function ensures you only load exactly what you need. Furthermore, when you create custom WordPress shortcode logic yourself, you have total control over the HTML output, ensuring it aligns perfectly with your theme’s design.
The Anatomy of a Shortcode Function
To create custom WordPress shortcode functionality, you need to interact with the WordPress Shortcode API. This involves two main steps: writing the PHP function that returns your content, and registering that function using add_shortcode().
We will place our code in the theme’s functions.php file or a site-specific plugin. For this tutorial, we will use the prefix pnet_ (for PixelNet) to prevent conflicts with other plugins.
Step 1: The Basic “Hello World” of Dynamic Data
Let’s start with a simple goal: displaying the current logged-in user’s username. This is a classic example of dynamic data because it changes depending on who is viewing the page.
Here is the code to create custom WordPress shortcode for a user greeting:
/**
 * Shortcode to display current user's display name.
 * Usage: [pnet_greeting]
 */
function pnet_get_current_user_greeting() {
    // Check if user is logged in
    if ( is_user_logged_in() ) {
        $current_user = wp_get_current_user();
        return 'Hello, ' . esc_html( $current_user->display_name ) . '!';
    } else {
        return 'Hello, Guest!';
    }
}
add_shortcode( 'pnet_greeting', 'pnet_get_current_user_greeting' );
Notice that we use return, not echo. This is a golden rule when you create custom WordPress shortcode functions. If you echo the content, it will appear at the very top of your page content area, regardless of where you placed the shortcode tag. Using return ensures it renders exactly where you placed it in the editor.
You might also like:
Advanced: Adding Parameters (Attributes)
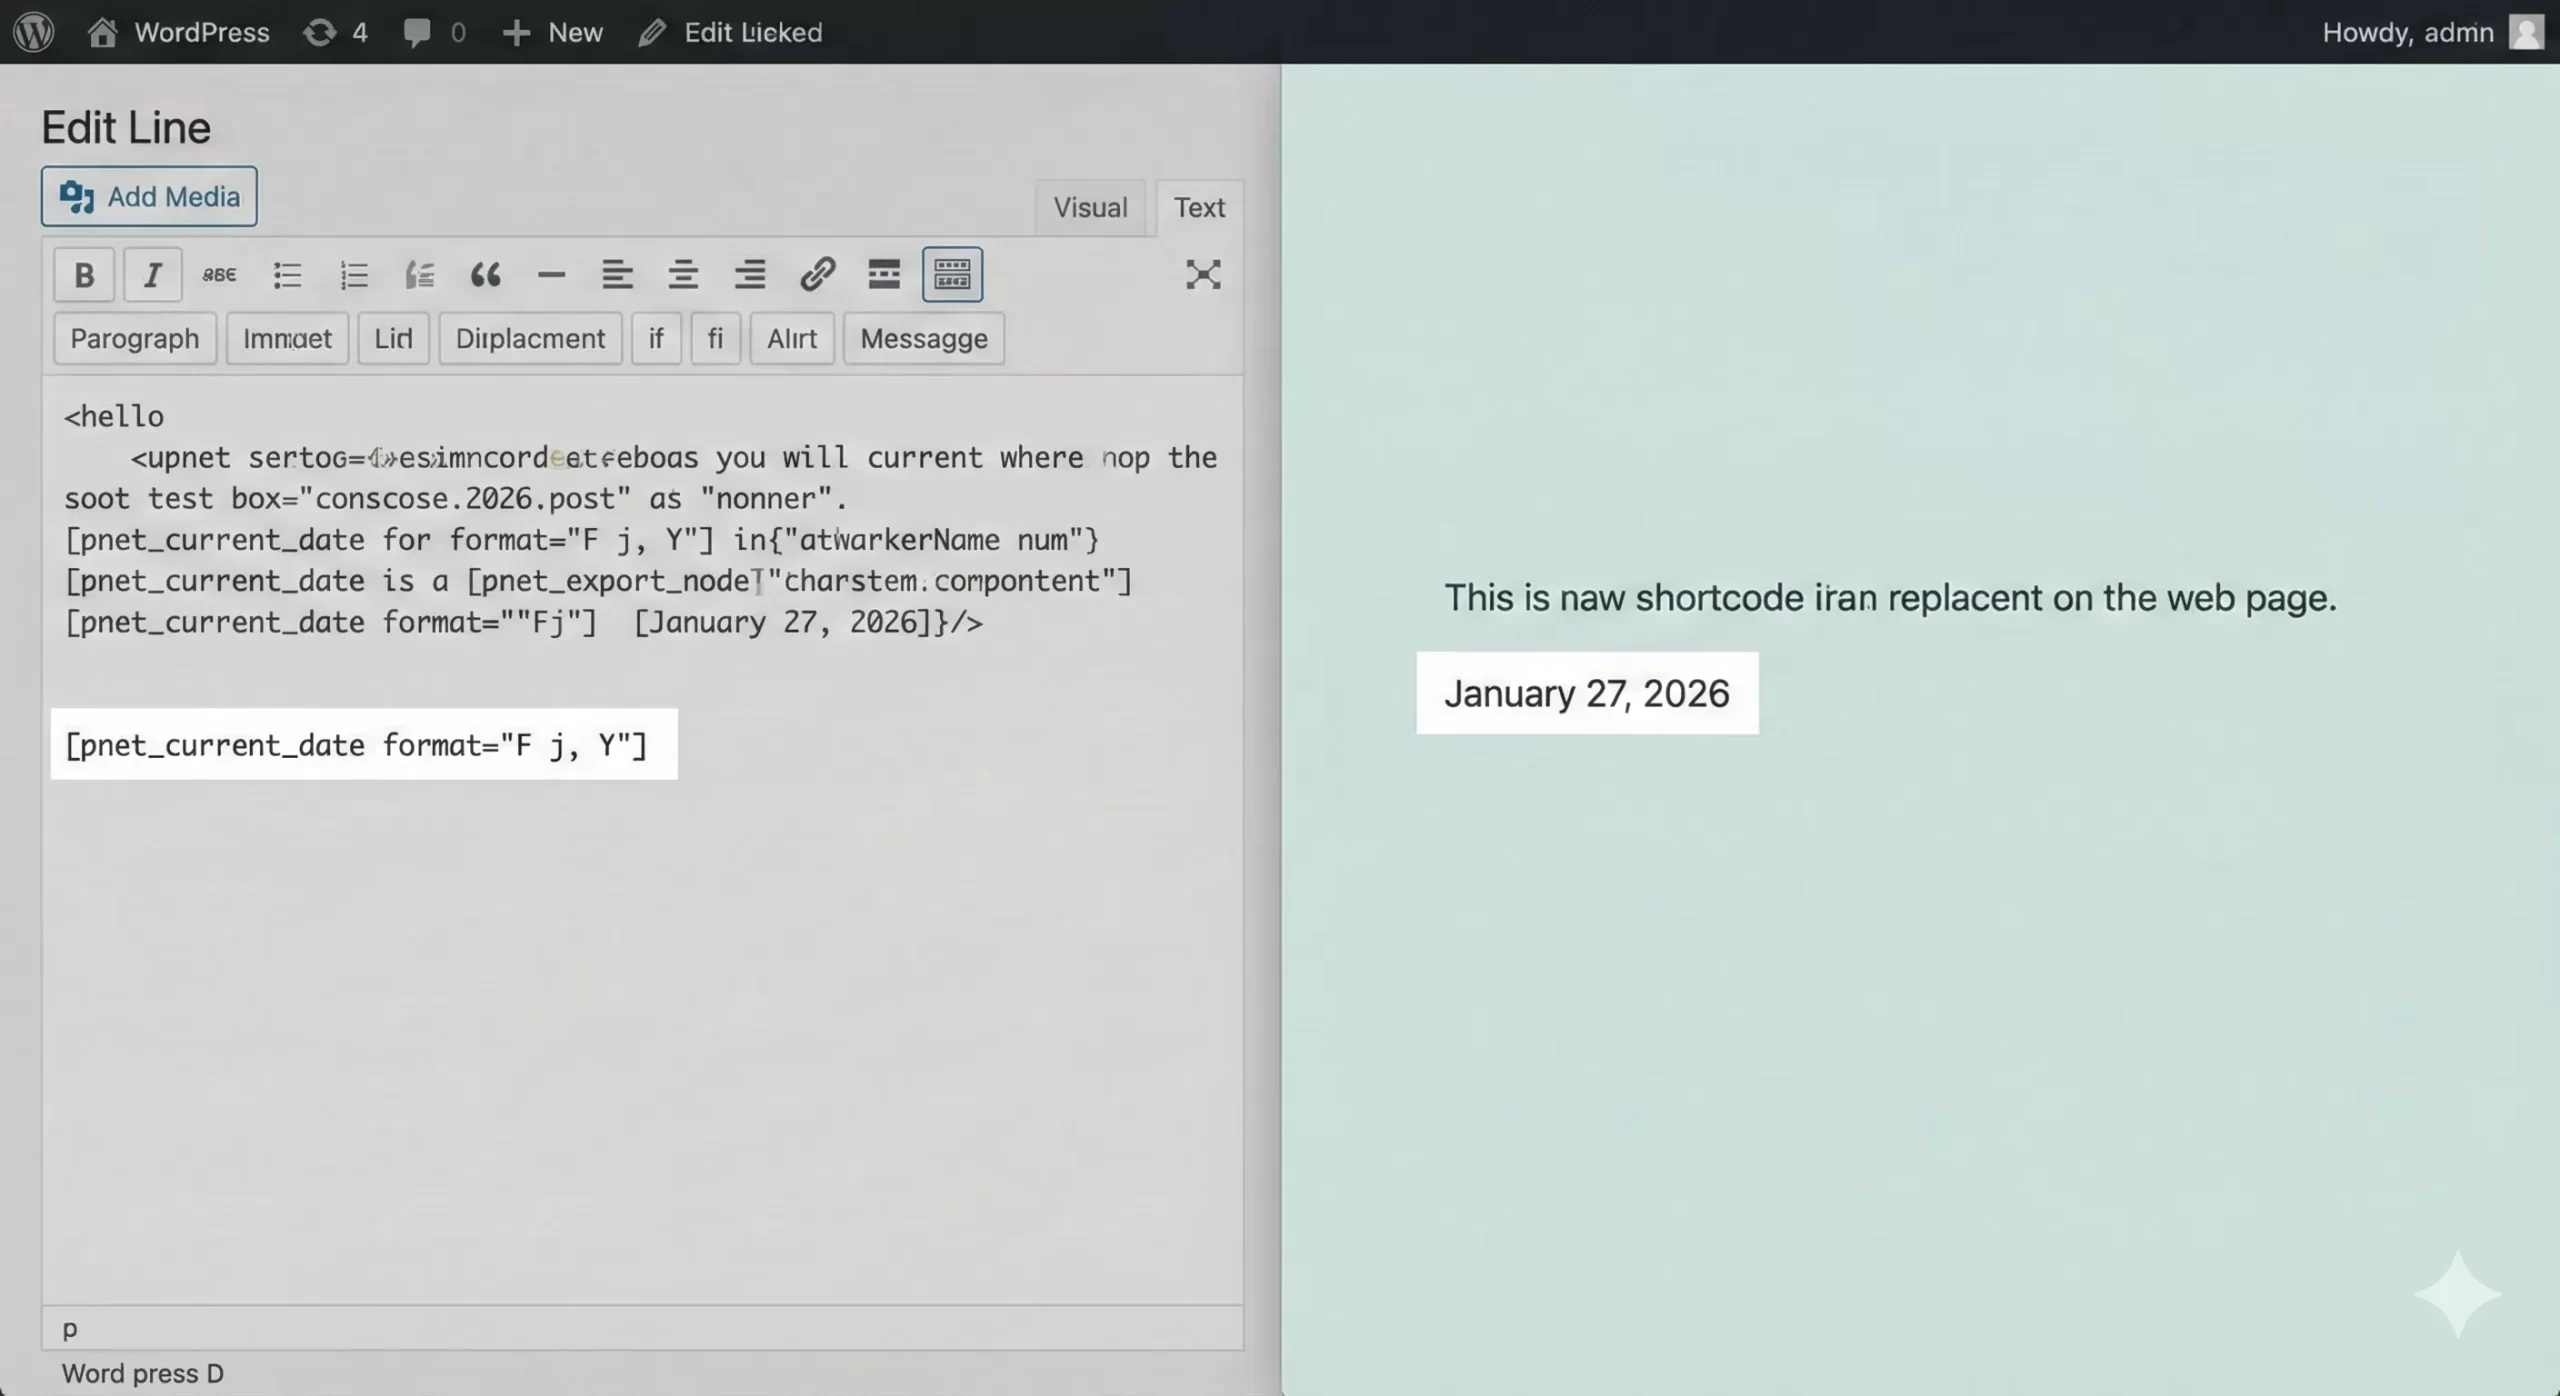
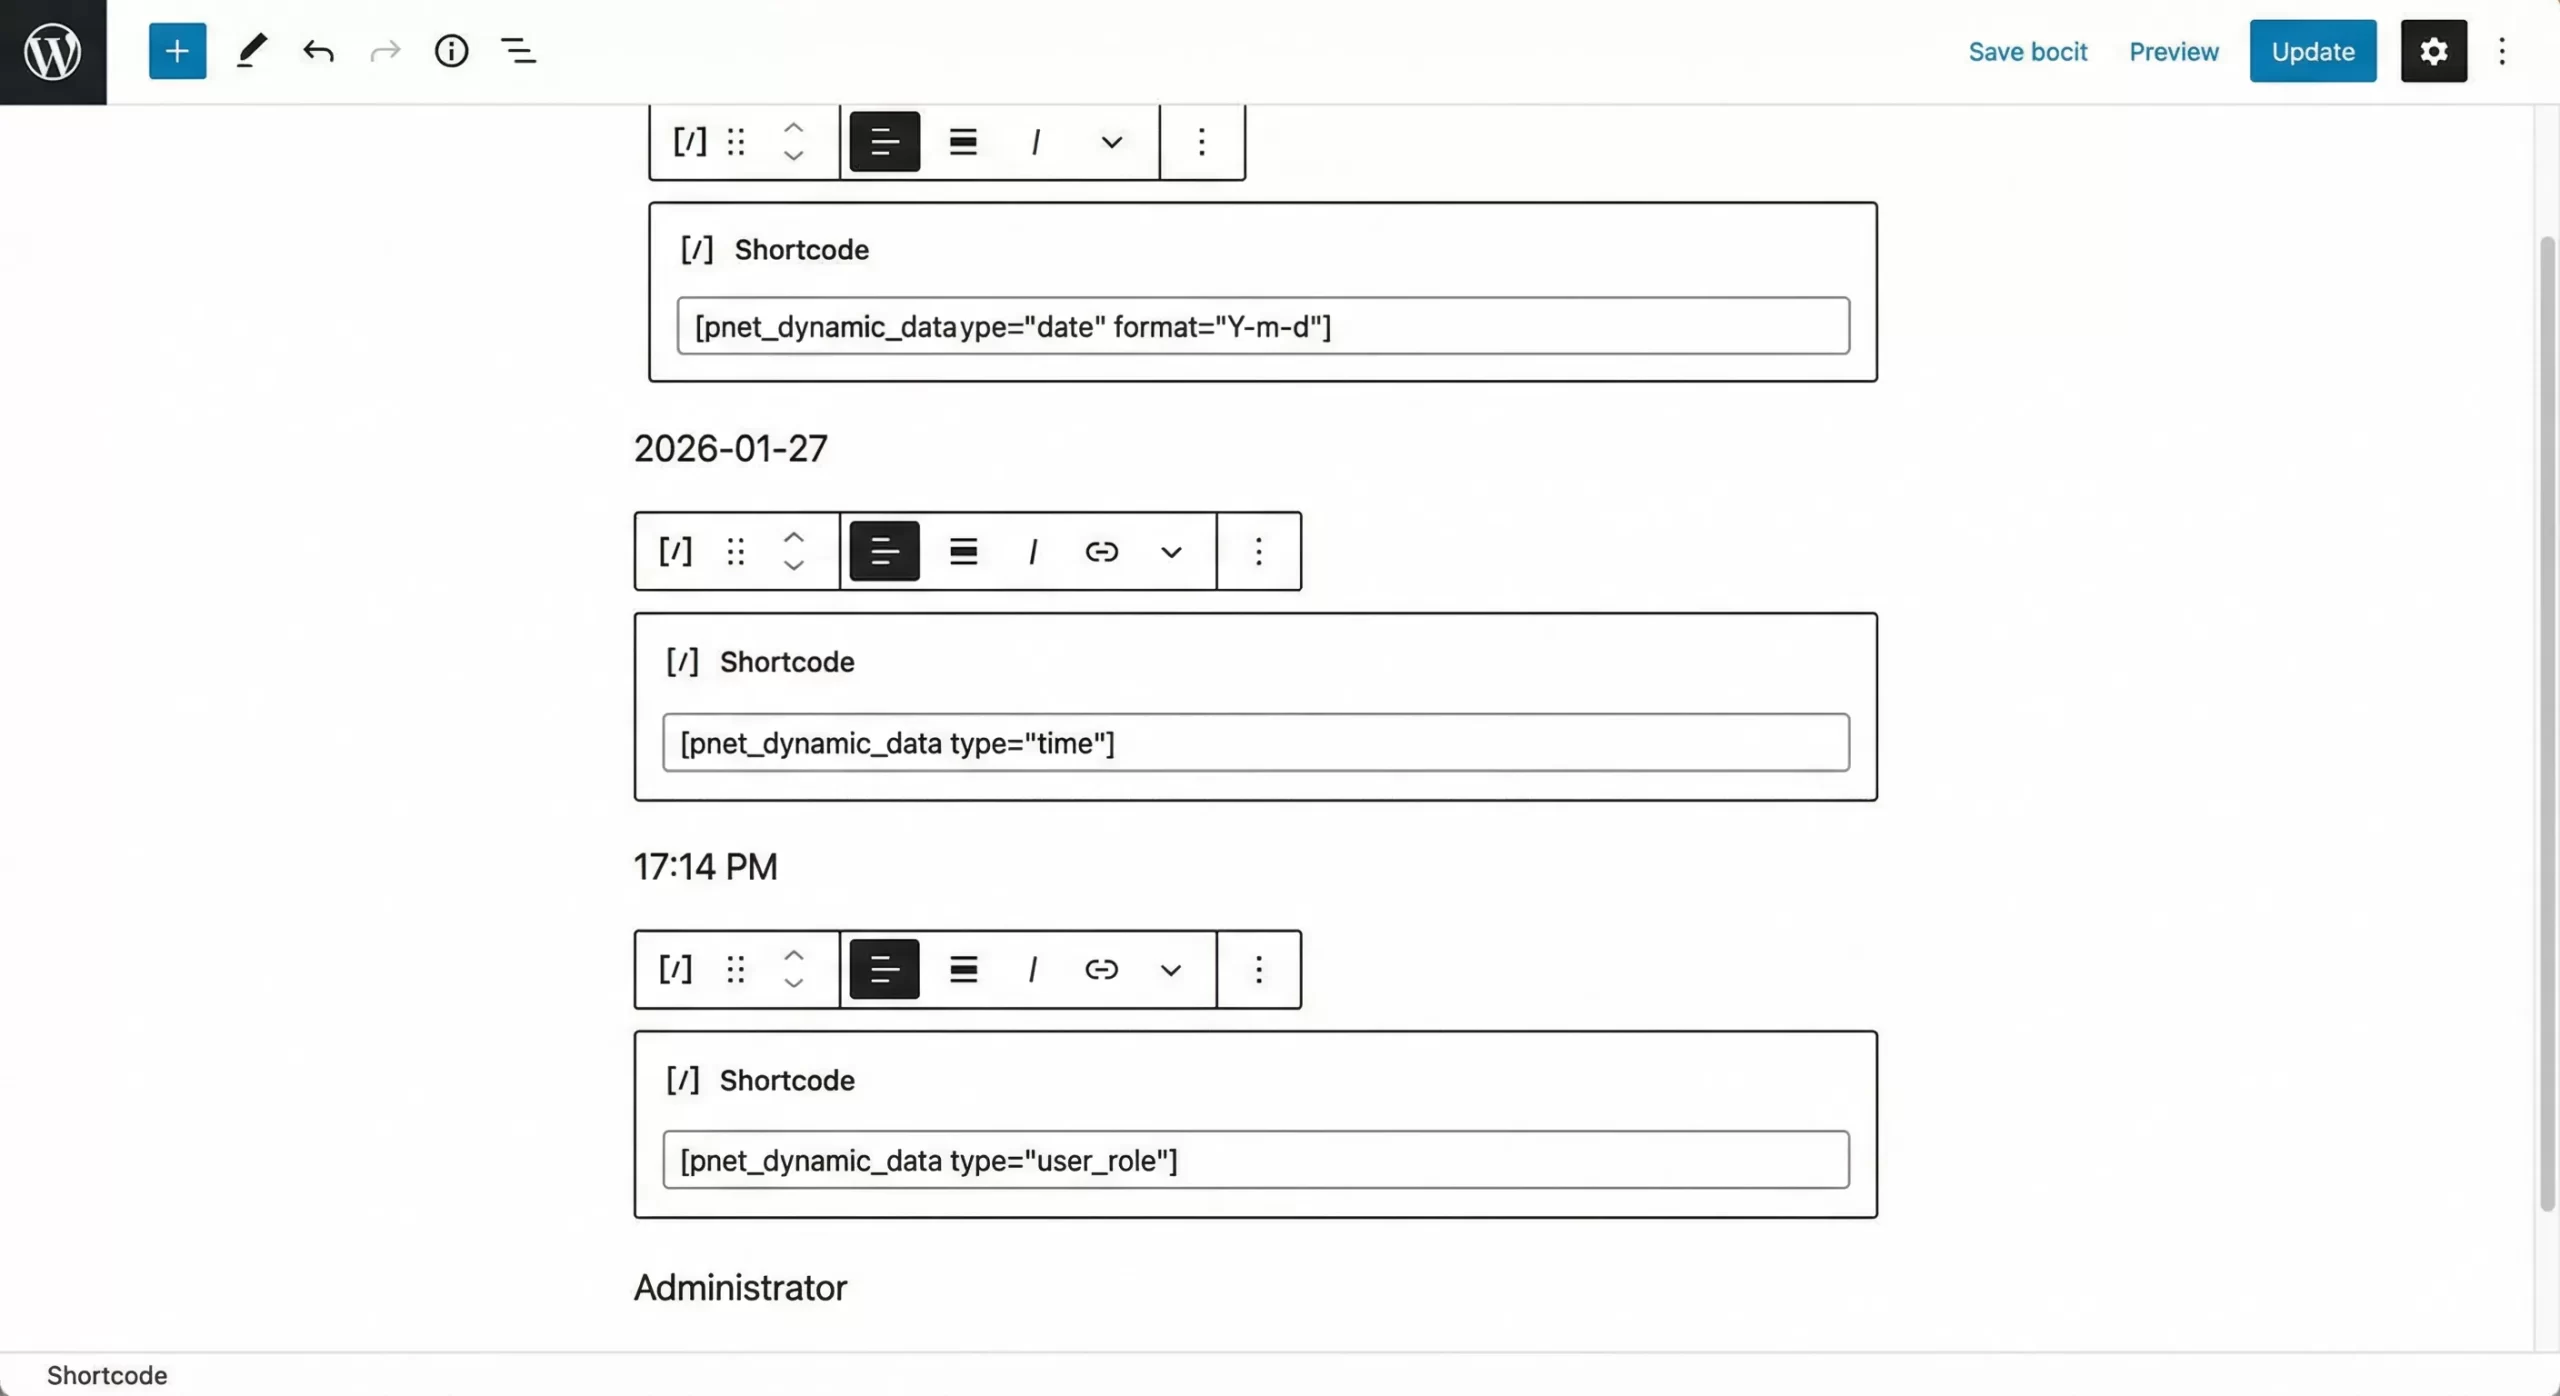
A static shortcode is useful, but a flexible one is powerful. To truly master the ability to create custom WordPress shortcode logic, you need to handle attributes. Attributes allow you to pass data into your shortcode from the editor, like [pnet_data type="date" format="Y-m-d"].
WordPress provides a native function called shortcode_atts() to handle this. It merges user-provided attributes with your defaults, ensuring your code never breaks if a user forgets a parameter.
Developing a Flexible Data Shortcode
Let’s build a more robust example. We will create custom WordPress shortcode logic that can display different types of dynamic data based on an attribute.
/**
 * Shortcode to display dynamic data based on type attribute.
 * Usage: [pnet_dynamic_data type="date"] or [pnet_dynamic_data type="time"]
 */
function pnet_display_dynamic_data( $atts ) {
    // Normalize attribute keys, lowercase
    $atts = array_change_key_case( (array) $atts, CASE_LOWER );

    // Override defaults with user attributes
    $pnet_atts = shortcode_atts(
        array(
            'type'   => 'date',
            'format' => 'F j, Y',
        ),
        $atts,
        'pnet_dynamic_data' // Tag for filtering
    );

    $output = '';

    switch ( $pnet_atts['type'] ) {
        case 'date':
            $output = date( $pnet_atts['format'] );
            break;

        case 'time':
            $output = date( 'g:i a' );
            break;

        case 'blogname':
            $output = get_bloginfo( 'name' );
            break;

        default:
            $output = 'Invalid Data Type';
            break;
    }

    return '<span class="pnet-dynamic-data">' . esc_html( $output ) . '</span>';
}
add_shortcode( 'pnet_dynamic_data', 'pnet_display_dynamic_data' );
By using shortcode_atts, we have made our code robust. Now, if you want to create custom WordPress shortcode variations for different parts of your site, you don’t need new functions—you just change the parameters in the post editor.
Must Read: Easily Display Related Posts in WordPress: Boost Engagement Without Bloat
Sanitization and Security
Security is paramount in WordPress development. When you create custom WordPress shortcode scripts that accept user parameters, you are opening a door for input. You must always sanitize your output.
In the examples above, you might have noticed functions like esc_html(). This prevents Cross-Site Scripting (XSS) attacks by ensuring that any data returned by your shortcode is rendered as text, not executable HTML. For more details on standard practices, you should verify the specifications on the WordPress Codex add_shortcode documentation.
You might also like:
Common Mistakes to Avoid
As you begin to create custom WordPress shortcode implementations for PixelNet or your clients, watch out for these common pitfalls:
- Echoing Output: As mentioned, always
returnyour data. Echoing breaks the page layout. - Forgetting Unique Names: Always prefix your shortcode tag. Using a generic name like
[button]will likely conflict with themes or other plugins. Using[pnet_button]is safe. - Ignoring Case Sensitivity: While WordPress attributes are generally handled well, it is best practice to code defensively using
array_change_key_caseas shown in our example.
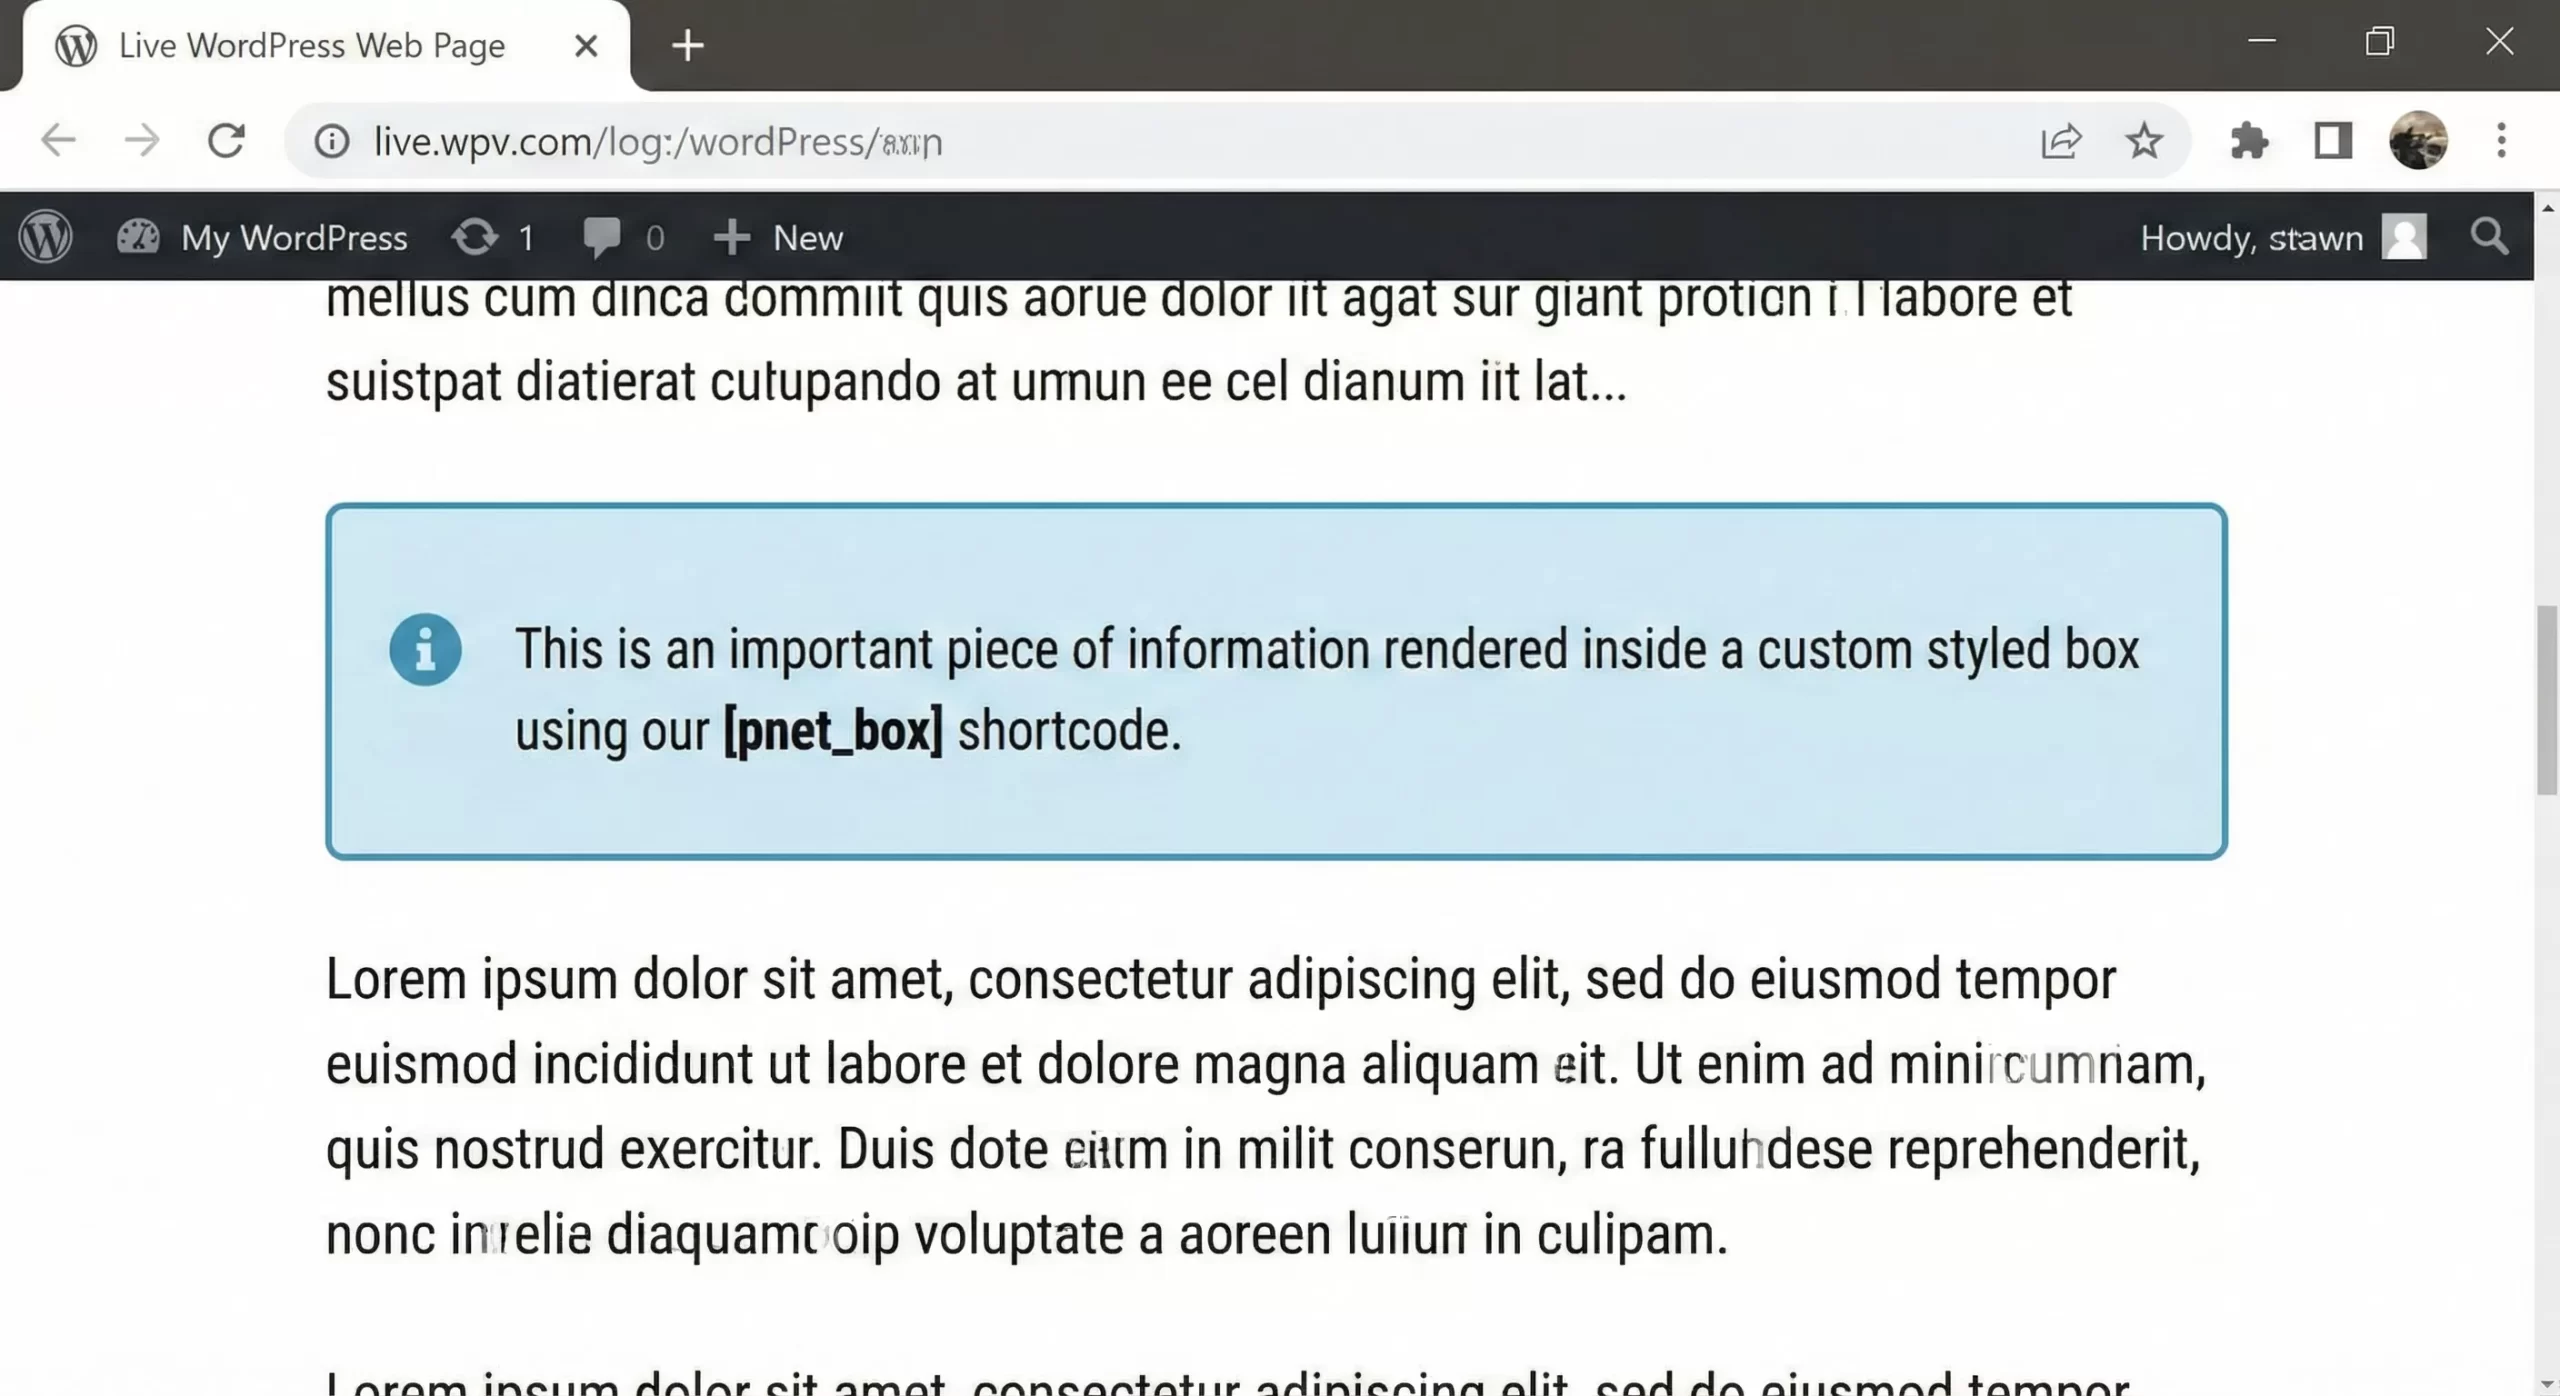
Enclosing Shortcodes
Sometimes you need to wrap content, like [pnet_box]My Content[/pnet_box]. This is called an enclosing shortcode. To create custom WordPress shortcode wrappers, you use the second parameter variable $content.
/**
 * Enclosing shortcode for a styled box.
 * Usage: [pnet_box style="info"]Content here[/pnet_box]
 */
function pnet_styled_box( $atts, $content = null ) {
    $pnet_atts = shortcode_atts(
        array(
            'style' => 'default',
        ),
        $atts
    );

    // Sanitize the style class to ensure it contains only safe characters
    $style_class = sanitize_html_class( $pnet_atts['style'] );

    return '<div class="pnet-box ' . $style_class . '">' . do_shortcode( $content ) . '</div>';
}
add_shortcode( 'pnet_box', 'pnet_styled_box' );
Note the use of do_shortcode( $content ). This function is critical. If you omit it, any other shortcodes nested inside your box will not render. This is a crucial detail when you create custom WordPress shortcode containers that need to support nested elements.
Conclusion
The ability to create custom WordPress shortcode functionality is a milestone for any WordPress developer. It moves you away from reliance on bloated plugins and gives you surgical precision over your site’s content. Whether you are pulling stock market data, user metadata, or simply formatting text, the Shortcode API is the bridge between your code and your content editor.
Start small with the pnet_greeting example we discussed. Once you are comfortable, try expanding it to pull data from custom fields or external APIs. The flexibility you gain when you finally create custom WordPress shortcode solutions is unmatched in the CMS world.