
Are you trying to automate your content migration or fetch external assets programmatically? Implementing a robust WordPress sideload image solution is often the most critical hurdle developers face when building custom REST API integrations, RSS aggregators, or automated blog importers. When you need to grab an image from a remote URL and securely store it locally within your own installation, relying on manual uploads is simply not an option. In this comprehensive developer guide, we will break down exactly how to create a custom WordPress sideload image function that securely fetches remote files, registers them into your database, and attaches them to your posts.
The standard WordPress sideload image functionality provided by core functions can sometimes feel limited if you require granular control over file naming, custom metadata injection, or specialized error handling. By writing your own WordPress sideload image script, you unlock the ability to bypass timeouts, handle custom post types, and seamlessly manage heavy bulk imports. Let us dive deep into the architecture of the WordPress sideload image process and build a bulletproof script.
Before You Begin: Technical Requirements
Before executing any WordPress sideload image code on a production server, ensure your environment is properly configured. Sideloading requires specific PHP extensions and server permissions to download files over HTTP/HTTPS.
- PHP 8.0 or higher for optimal performance and secure memory handling.
- WordPress 6.0+ installed and running.
- cURL extension enabled on your web server to allow remote URL fetching.
allow_url_fopenenabled in yourphp.ini(optional but recommended as a fallback).- Write permissions (755) configured for your
/wp-content/uploads/directory. - A complete database and file backup before running bulk WordPress sideload image scripts.
Backup Required
Step 1: Understanding the WordPress Sideload Image Mechanics
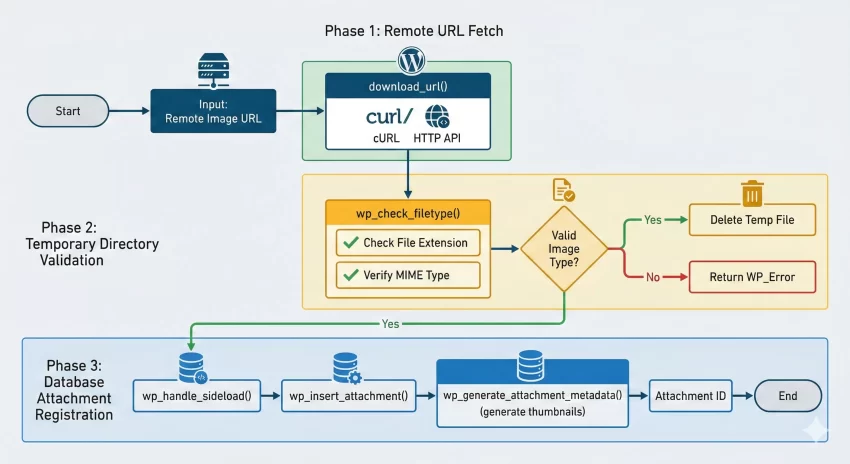
To successfully execute a WordPress sideload image operation, you must understand how the WordPress media library architecture handles attachments. In WordPress, an image is not just a file sitting in a folder; it is registered as a specific post type called attachment in the wp_posts database table. Whenever you trigger a WordPress sideload image event, the system must perform three distinct operations to ensure the image is correctly recognized by the media library.
1. Downloading the Remote File
The first phase of the WordPress sideload image process involves securely downloading the remote asset to your server’s temporary directory. We rely on the core download_url() function to handle this. It securely fetches the file using the HTTP API and places it in a temporary location, generating a unique temporary filename to prevent collisions. This ensures the WordPress sideload image routine does not accidentally overwrite existing files during simultaneous operations.
2. Validating the File Type and Name
The second phase of the WordPress sideload image execution is strict validation. Never trust a remote file blindly. We must extract the filename, check the file extension, and verify the MIME type. Using wp_check_filetype() allows our WordPress sideload image script to confirm that the downloaded asset is actually a valid image (like JPG, PNG, or WebP) and not a malicious script disguised with a fake extension.
3. Registering the Attachment Metadata
The final phase of a complete WordPress sideload image cycle is database insertion. We use wp_insert_attachment() to create the post record. However, inserting the record is only half the battle. A true WordPress sideload image operation must also generate the required thumbnails (thumbnails, medium, large, etc.) and save the EXIF data. This is achieved by including core administration files and firing wp_generate_attachment_metadata().
Do you want to setup WooCommerce Custom Email Notifications to alert your team or customers instantly?
Step 2: Writing the Custom WordPress Sideload Image Function
Now that we comprehend the underlying architecture, let us build our custom WordPress sideload image function. We will name this function pnet_sideload_remote_image(). This function will accept a remote URL and an optional Post ID to attach the image to. By modularizing the WordPress sideload image logic, you can reuse this function across themes, plugins, or WP-CLI commands.
The following code encapsulates the entire WordPress sideload image workflow. It handles the secure download, extracts the original filename, sanitizes the file array, inserts the attachment post, generates the cropped image sizes, and finally updates the post metadata. It also incorporates robust WP_Error handling so your WordPress sideload image script doesn’t silently fail during execution.
/**
 * Custom WordPress sideload image function.
 * Downloads an image from a remote URL and attaches it to the Media Library.
 *
 * @param string $url     The external URL of the image to sideload.
 * @param int    $post_id Optional. The post ID to attach the image to.
 * @param string $desc    Optional. Description for the media library item.
 * @return int|WP_Error   Attachment ID on success, WP_Error object on failure.
 */
function pnet_sideload_remote_image( $url, $post_id = 0, $desc = null ) {

    // Include required core files for the WordPress sideload image process
    require_once( ABSPATH . 'wp-admin/includes/media.php' );
    require_once( ABSPATH . 'wp-admin/includes/file.php' );
    require_once( ABSPATH . 'wp-admin/includes/image.php' );

    // Extract the filename and extension from the URL
    $parsed_url = parse_url( $url );
    $path       = $parsed_url['path'];
    $file_name  = basename( $path );

    // Execute the first phase of the WordPress sideload image routine: Downloading
    $tmp_file = download_url( $url );

    // Check if the download failed
    if ( is_wp_error( $tmp_file ) ) {
        return $tmp_file;
    }

    // Verify file type for security during the WordPress sideload image process
    $file_type = wp_check_filetype( $file_name, null );

    // If the file type is invalid, delete the temp file and abort
    if ( ! $file_type['type'] ) {
        @unlink( $tmp_file );
        return new WP_Error( 'invalid_file_type', 'The WordPress sideload image process failed: Invalid file type.' );
    }

    // Prepare the file array for wp_handle_sideload
    $file_array = array(
        'name'     => $file_name,
        'tmp_name' => $tmp_file
    );

    // Process the file and move it to the uploads directory
    $sideloaded_file = wp_handle_sideload(
        $file_array,
        array( 'test_form' => false ) // Necessary to bypass standard upload form validation
    );

    if ( isset( $sideloaded_file['error'] ) ) {
        @unlink( $tmp_file );
        return new WP_Error( 'sideload_error', $sideloaded_file['error'] );
    }

    // Setup attachment data for the database record
    $attachment_data = array(
        'post_mime_type' => $sideloaded_file['type'],
        'post_title'     => preg_replace( '/\.[^.]+$/', '', $file_name ),
        'post_content'   => '',
        'post_status'    => 'inherit'
    );

    if ( $desc ) {
        $attachment_data['post_excerpt'] = $desc;
    }

    // Insert the attachment into the WordPress database
    $attachment_id = wp_insert_attachment( $attachment_data, $sideloaded_file['file'], $post_id );

    if ( is_wp_error( $attachment_id ) ) {
        return $attachment_id;
    }

    // Finalize the WordPress sideload image process by generating metadata (thumbnails)
    $attachment_meta = wp_generate_attachment_metadata( $attachment_id, $sideloaded_file['file'] );
    wp_update_attachment_metadata( $attachment_id, $attachment_meta );

    return $attachment_id;
}
Pro Tip: Bypassing Form Tests
array( 'test_form' => false ) argument passed to wp_handle_sideload(). This is absolutely crucial for any background WordPress sideload image script. Because we are executing via code and not an actual HTML form submission, WordPress will throw a security error if we do not explicitly disable the form test. Step 3: Handling URLs with Complex Query Strings
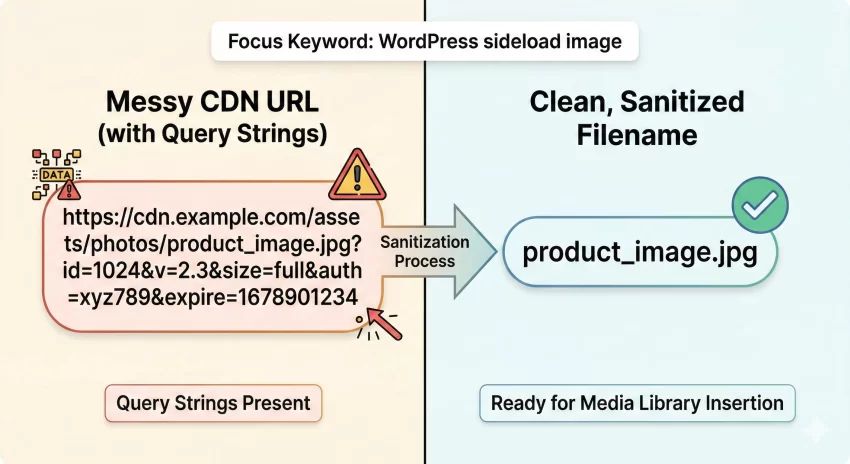
In real-world scenarios, a WordPress sideload image operation often targets URLs that do not have clean filenames. External APIs, CDNs, and image services like Unsplash or AWS S3 frequently append complex query strings to their image URLs (e.g., https://example.com/image.jpg?v=123&token=abc). If you run a standard WordPress sideload image function on such a URL, the basename() function might extract a messy string, leading to broken file extensions and failed uploads.
Cleaning the Filename
To ensure your WordPress sideload image script handles these messy URLs gracefully, you must strip the query parameters before extracting the filename. We can achieve this using standard PHP string manipulation functions like strtok() or by thoroughly parsing the URL array. Integrating this sanitization step guarantees that your WordPress sideload image routine always receives a clean .jpg, .png, or .webp extension, preventing fatal MIME type errors.
/**
 * Helper function to extract a clean filename for the WordPress sideload image process.
 *
 * @param string $url The messy remote URL.
 * @return string The sanitized filename.
 */
function pnet_clean_sideload_filename( $url ) {
    // Parse the URL to isolate the path from the query string
    $parsed = parse_url( $url );
    $path = isset( $parsed['path'] ) ? $parsed['path'] : '';

    // Extract the basename
    $filename = basename( $path );

    // Fallback if no extension is found (optional advanced logic)
    if ( ! strpos( $filename, '.' ) ) {
        $filename .= '.jpg'; // Highly simplified fallback
    }

    return $filename;
}
Step 4: Setting the Sideloaded Image as a Post Thumbnail
A very common requirement when executing a WordPress sideload image script is to instantly assign that newly downloaded media file as the Featured Image (Post Thumbnail) of a specific post, page, or custom post type. Once our custom WordPress sideload image function returns the new Attachment ID, linking it to a post is incredibly straightforward using core metadata functions.
Automating Featured Images
To integrate the WordPress sideload image output with the featured image system, we use set_post_thumbnail(). It is essential to first verify that the WordPress sideload image function did not return a WP_Error object. If the attachment ID is valid and numeric, we bind it to the target post ID. This automation is the backbone of auto-blogging plugins and external content synchronizers that rely heavily on bulk WordPress sideload image operations to maintain visual consistency.
/**
 * Executes a WordPress sideload image routine and sets it as the featured image.
 *
 * @param string $image_url The external image to fetch.
 * @param int    $post_id   The target post ID.
 */
function pnet_sideload_and_set_featured_image( $image_url, $post_id ) {

    // Execute our custom WordPress sideload image function
    $attachment_id = pnet_sideload_remote_image( $image_url, $post_id );

    // Validate the result
    if ( is_wp_error( $attachment_id ) ) {
        // Log the error or handle it gracefully
        error_log( 'WordPress sideload image failed: ' . $attachment_id->get_error_message() );
        return false;
    }

    // Set the successfully sideloaded image as the post thumbnail
    set_post_thumbnail( $post_id, $attachment_id );

    return true;
}

// Usage Example:
// pnet_sideload_and_set_featured_image( 'https://example.com/sample-pic.jpg', 142 );
Performance Gain
wp_defer_term_counting( true ); and wp_suspend_cache_invalidation( true ); before your loop. You might also like: Stop Struggling: Easily Disable Gutenberg Editor Programmatically
Step 5: Troubleshooting Common WordPress Sideload Image Errors
Even with a perfectly coded script, a WordPress sideload image process can fail due to server configuration limits or external network issues. Because you are relying on remote servers to provide the assets, your WordPress sideload image script must be resilient. Below are the most frequent bottlenecks developers encounter when running a high-volume WordPress sideload image queue, along with their precise solutions.
1. SSL Certificate Verification Failures
Often, when attempting a WordPress sideload image operation from a remote server with an expired or self-signed SSL certificate, the download_url() function will fail. This results in a cURL error (usually cURL error 60 or 28). If you absolutely trust the source, you can temporarily bypass SSL verification specifically for your WordPress sideload image request by hooking into the http_request_args filter, though this is heavily discouraged for untrusted domains.
2. PHP Memory Limit Exhaustion
A fatal flaw in many custom WordPress sideload image scripts is the failure to account for memory consumption during the metadata generation phase. When wp_generate_attachment_metadata() runs, WordPress uses the GD Library or ImageMagick to resize the image into multiple thumbnails. If you are sideloading a massive 8MB, 6000px wide high-resolution photo, the WordPress sideload image process will likely crash with a PHP Fatal Error: Allowed memory size exhausted. To fix this, ensure your memory_limit in php.ini is set to at least 256M, or ideally 512M, before initiating a heavy WordPress sideload image batch.
3. Server Execution Timeouts (HTTP 504)
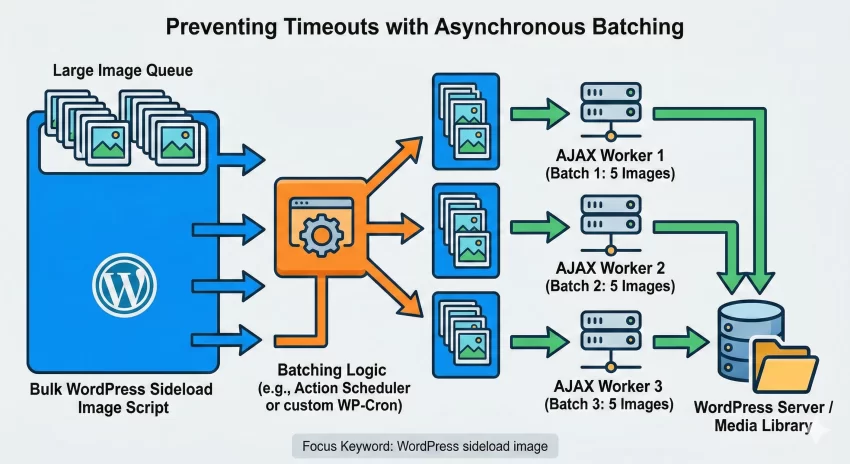
When executing a WordPress sideload image function on a slow external URL, the download might take longer than your server’s default max_execution_time (usually 30 seconds). The script will abruptly terminate, leaving orphaned temporary files in your directory. If you are building a bulk WordPress sideload image tool, you must implement background processing (like Action Scheduler or WP-Cron) or use AJAX batching so the WordPress sideload image queue processes one image per request, entirely circumventing the timeout limits.
Wrapping Up Your WordPress Sideload Image Mastery
Mastering the WordPress sideload image technique is a vital skill for any advanced WordPress developer dealing with API data aggregation, automated site migrations, or complex programmatic content creation. By understanding how to securely retrieve remote files via HTTP, validate their mime types, forcefully insert them into the wp_posts database table, and generate the necessary thumbnail metadata, you take complete control over your media architecture.
Remember that while executing a simple WordPress sideload image snippet is easy, building a production-ready system requires rigorous error handling, filename sanitization, and strict server resource management. Always monitor your PHP memory limits and execution times when dealing with large external files. By implementing the custom pnet_sideload_remote_image function provided in this guide, you now have a robust, reusable foundation for tackling any programmatic media upload challenge safely and efficiently.