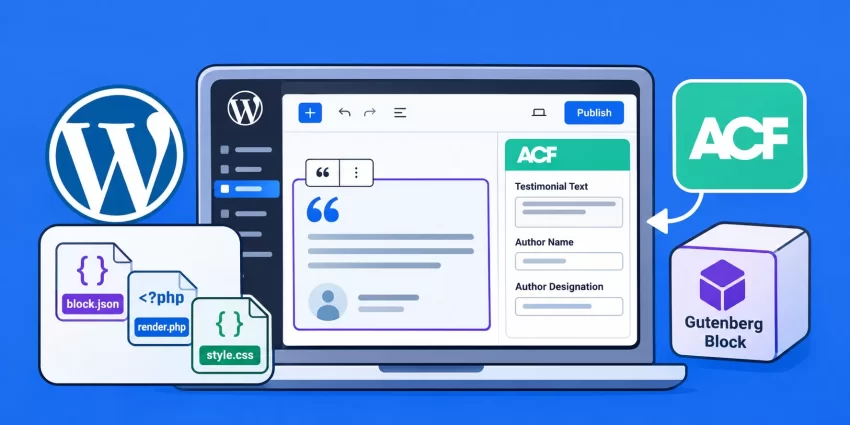
Building custom Gutenberg blocks traditionally requires knowledge of React, JSX, JavaScript, and the WordPress Block Editor API. This can make block development unnecessarily complicated for WordPress developers who primarily work with PHP. Fortunately, you can Create Gutenberg Block with ACF without writing a single line of React code. Advanced Custom Fields (ACF) provides a PHP-based approach that lets you register custom blocks, assign custom fields, and dynamically render content using familiar WordPress functions.
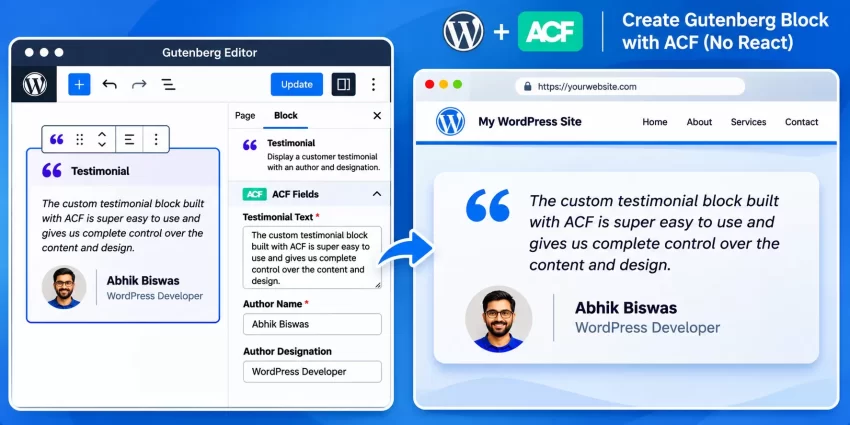
In this tutorial, we will build a reusable Testimonial Gutenberg Block using ACF Pro, PHP, and a simple block.json configuration file. You will learn how to register the block, create its custom fields, build a PHP rendering template, style the editor and frontend, and troubleshoot common errors.
Prerequisites
Before you start, make sure you have the following requirements in place:
- WordPress 6.3 or later (recommended for Block API version 3).
- PHP 8.0 or later.
- Advanced Custom Fields (ACF) Pro installed and activated. ACF Blocks require ACF Pro.
- A WordPress development environment or staging website.
- Basic knowledge of PHP, HTML, CSS, and WordPress hooks.
- Access to your active theme or custom plugin files.
- A complete backup of your website before making changes.
Important
Step 1: Create the Custom Block Directory
The first step in learning how to Create Gutenberg Block with ACF is organizing the block files. Keeping each custom block inside its own directory makes the implementation easier to maintain, extend, and reuse across different projects.
Create a blocks directory
For this tutorial, we will register our testimonial block inside the active WordPress theme. Navigate to your theme directory and create a new folder named blocks. Inside it, create another folder named testimonial.
Your directory structure should look like this:
your-theme/
├── functions.php
├── style.css
├── blocks/
│   └── testimonial/
│       ├── block.json
│       ├── render.php
│       └── style.css
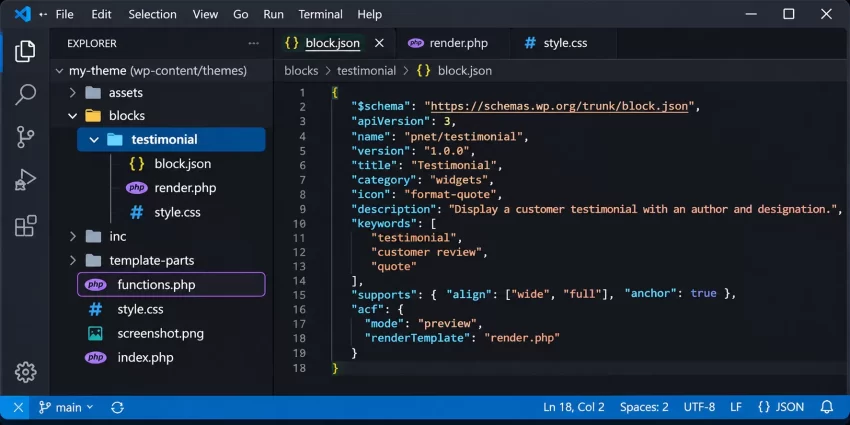
The block.json file will contain the block metadata and ACF configuration. The render.php file will retrieve custom field values and generate the block’s HTML. Finally, style.css will control the appearance of the block on the frontend.
Using a dedicated directory also makes it easier to add more custom blocks in the future without cluttering your theme’s main functions.php file.
Step 2: Create the Block Configuration File
WordPress recommends using block.json as the standard metadata configuration for registering custom blocks. ACF supports this approach and extends the configuration with its own acf properties, including the PHP rendering template.
Create block.json
Inside the testimonial directory, create a file named block.json and add the following configuration:
{
    "$schema": "https://schemas.wp.org/trunk/block.json",
    "apiVersion": 3,
    "name": "pnet/testimonial",
    "version": "1.0.0",
    "title": "Testimonial",
    "category": "widgets",
    "icon": "format-quote",
    "description": "Display a customer testimonial with an author and designation.",
    "keywords": [
        "testimonial",
        "customer review",
        "quote"
    ],
    "textdomain": "pnet",
    "supports": {
        "align": ["wide", "full"],
        "anchor": true,
        "jsx": false,
        "html": false
    },
    "acf": {
        "mode": "preview",
        "renderTemplate": "render.php"
    }
}
Let’s understand the important configuration properties:
- apiVersion: Specifies the WordPress Block API version used by the block.
- name: Defines the unique block identifier using the namespace/block-name format.
- title: Sets the name displayed in the Gutenberg block inserter.
- category: Determines where the block appears in the block inserter.
- icon: Specifies the Dashicon displayed alongside the block name.
- supports: Enables WordPress block features such as alignment and custom anchors.
- acf.mode: Sets the default editing experience to preview mode.
- acf.renderTemplate: Identifies the PHP file responsible for rendering the block.
The important part is the acf configuration. It tells ACF that this block should use a PHP template rather than a React-based editing interface.
Notice that the block name uses the pnet namespace. Always use a unique namespace for your custom blocks to reduce the possibility of naming conflicts with other plugins and themes.
Did you know: You can use WooCommerce Free GIFt to automatically reward customers who exceed a minimum spending threshold, encourage larger orders, and create attractive promotional campaigns without installing another WooCommerce plugin?
Step 3: Register the Gutenberg Block in WordPress
Creating the block configuration file is not enough. WordPress must also register the block so that Gutenberg can recognize it and display it in the editor. We will use the native register_block_type() function to register the block using its directory path.
Add the registration function
Open your active theme’s functions.php file and add the following code:
/**
 * Register custom ACF Gutenberg blocks.
 */
function pnet_register_acf_blocks() {

    // Register the testimonial block.
    register_block_type(
        get_template_directory() . '/blocks/testimonial'
    );

}
add_action( 'init', 'pnet_register_acf_blocks' );
The register_block_type() function reads the block metadata from the specified directory and registers the block with WordPress. Because our block.json contains an ACF configuration, ACF recognizes it as an ACF Block and connects it to the specified PHP rendering template.
We use the init action because it is the standard WordPress hook for registering block types. The function name also follows the pnet_ prefix convention to reduce the possibility of conflicts with other plugins or themes.
Verify block registration
Save your changes and open an existing post or create a new page using the Gutenberg editor. Click the block inserter (+) button and search for Testimonial.
If the registration is successful, the custom Testimonial block should appear under the Widgets category. You can now insert it into your content, although it will not display the testimonial fields until we create and assign an ACF Field Group.
Pro Tip
Step 4: Create and Assign ACF Custom Fields
Now that WordPress recognizes the custom block, the next step is creating the fields that users will interact with inside Gutenberg. This is where ACF makes it considerably easier to Create Gutenberg Block with ACF without developing custom React components or JavaScript input controls.
Create a new Field Group
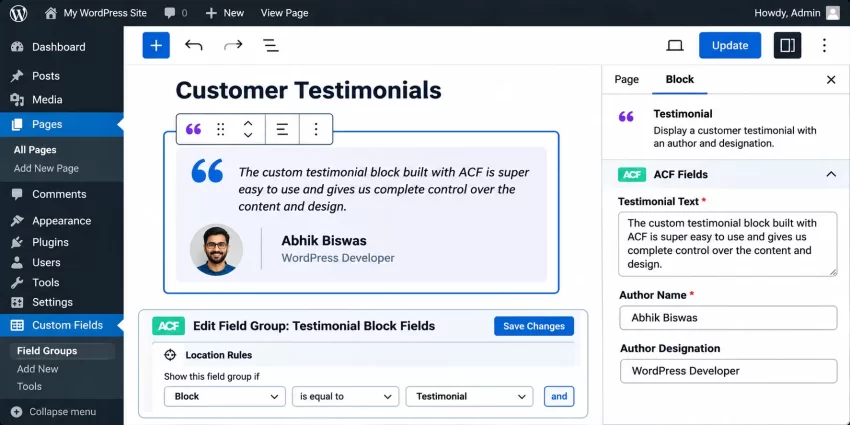
From your WordPress dashboard, navigate to Custom Fields → Field Groups → Add New. Give the Field Group a descriptive name, such as Testimonial Block Fields.
Add the following three custom fields:
- Testimonial Text: Field Type: Textarea. Field Name:
pnet_testimonial_text. - Author Name: Field Type: Text. Field Name:
pnet_author_name. - Author Designation: Field Type: Text. Field Name:
pnet_author_designation.
These fields will provide the information required to display a testimonial and its author. You can also configure required validation, character limits, placeholders, and instructions from the individual field settings.
Configure the location rule
After creating the fields, scroll down to the Location Rules section. Change the default location condition to the following:
- Show this field group if: Block
- Operator: is equal to
- Block: Testimonial
This location rule connects the Field Group specifically to our custom Testimonial block. As a result, the three custom fields will appear when someone selects the block in Gutenberg rather than appearing in the regular post editing interface.
Click Save Changes to publish the Field Group.
Step 5: Build the PHP Rendering Template
The next step is to create the frontend output for our custom block. ACF provides functions such as get_field() and the_field() that allow developers to retrieve custom field values directly inside a PHP template.
Create render.php
Open the testimonial block directory and create a file named render.php. Add the following code:
<?php
/**
* Testimonial Block Template.
*/
// Prevent direct access.
if ( ! defined( 'ABSPATH' ) ) {
exit;
}
// Retrieve ACF field values.
$testimonial = get_field( 'pnet_testimonial_text' );
$author = get_field( 'pnet_author_name' );
$designation = get_field( 'pnet_author_designation' );
// Stop rendering if required fields are empty.
if ( empty( $testimonial ) || empty( $author ) ) {
return;
}
?>
<div class="pnet-testimonial-block">
<div class="pnet-testimonial-content">
<span class="pnet-testimonial-icon" aria-hidden="true">
“
</span>
<blockquote>
<?php echo esc_html( $testimonial ); ?>
</blockquote>
</div>
<div class="pnet-testimonial-author">
<h3>
<?php echo esc_html( $author ); ?>
</h3>
<?php if ( ! empty( $designation ) ) : ?>
<span class="pnet-testimonial-designation">
<?php echo esc_html( $designation ); ?>
</span>
<?php endif; ?>
</div>
</div>
Let’s look at the important parts of the template:
- ABSPATH protection: Prevents the PHP template from being accessed directly outside WordPress.
- get_field(): Retrieves the values entered into the ACF fields assigned to the block.
- Validation: Prevents an incomplete testimonial from generating unwanted empty HTML.
- esc_html(): Escapes text output to help prevent HTML injection and cross-site scripting.
- Conditional rendering: Displays the designation only when the user has provided one.
One important advantage of this approach is that the block output is generated dynamically using PHP. The content does not need to be compiled into static markup using a JavaScript save function. WordPress stores the block reference and attributes, while ACF supplies the field values to the rendering template.
This makes the implementation especially useful for testimonials, pricing tables, feature boxes, team profiles, call-to-action sections, and other reusable website components.
Step 6: Style the Custom Gutenberg Block
Our testimonial block is now functional, but it needs styling to look professional on the frontend. We can add block-specific CSS without affecting unrelated Gutenberg blocks or other theme components.
Add frontend CSS
Open the style.css file inside the testimonial directory and add the following styles:
.pnet-testimonial-block {
    background: #f8fafc;
    border: 1px solid #e2e8f0;
    border-radius: 12px;
    padding: 30px;
    margin: 25px 0;
}

.pnet-testimonial-content {
    position: relative;
}

.pnet-testimonial-icon {
    display: block;
    color: #2563eb;
    font-size: 48px;
    line-height: 1;
    font-weight: 700;
}

.pnet-testimonial-content blockquote {
    margin: 10px 0 25px;
    padding: 0;
    border: 0;
    color: #334155;
    font-size: 18px;
    line-height: 1.7;
}

.pnet-testimonial-author h3 {
    margin: 0 0 5px;
    color: #0f172a;
    font-size: 17px;
    font-weight: 700;
}

.pnet-testimonial-designation {
    display: block;
    color: #64748b;
    font-size: 14px;
}
Load the stylesheet through block.json
To ensure WordPress loads the stylesheet when the block is used, update the block.json configuration by adding a style property:
"style": "file:./style.css",
Place this property alongside the other top-level block configuration properties, not inside the ACF configuration object.
WordPress will associate the stylesheet with the block and load it according to its block asset-loading behavior. This is preferable to globally enqueueing every custom block stylesheet on every page.
Editor and frontend styling
The style property is suitable when you want the same basic appearance in the editor and frontend. If you need editor-only styling, you can additionally create an editor stylesheet and register it using the editorStyle property in block.json.
This approach keeps the block’s CSS organized and makes it easier to maintain multiple custom ACF blocks within the same theme.
You might also like:

Step 7: Test the Custom Gutenberg Block
With the configuration, registration, custom fields, PHP template, and CSS in place, it is time to test the implementation. Testing both the Gutenberg editor and frontend is important because ACF Blocks render dynamically and may behave differently depending on the editing and display context.
Test inside Gutenberg
- Open a WordPress post or page.
- Click the Gutenberg block inserter (+).
- Search for the Testimonial block.
- Insert the block into the content area.
- Enter testimonial text, author name, and author designation.
- Verify that the preview displays the information correctly.
- Save or update the post.
Verify the frontend output
Open the published page in a new browser tab. Confirm that the testimonial appears with the expected styling and that the author information is displayed correctly.
Also test the following scenarios:
- Insert multiple testimonial blocks on the same page.
- Leave the optional designation field empty.
- Update the testimonial content and verify the changes.
- Check the layout on mobile, tablet, and desktop screens.
- Test the block using a different WordPress theme if you intend to distribute it as a plugin.
Common Errors and Troubleshooting
Although using ACF makes custom Gutenberg block development simpler, you may occasionally encounter configuration, registration, or rendering problems. The following troubleshooting tips address common issues when you Create Gutenberg Block with ACF.
1. Custom block does not appear in Gutenberg
Possible causes: The block registration function is not executing, the directory path is incorrect, the block.json file contains invalid JSON, or ACF Pro is inactive.
Solution: Verify the registration hook, confirm the directory path, validate the JSON configuration, and make sure ACF Pro is installed and activated. Check your PHP error log for additional details.
2. ACF fields are not appearing inside the block
Possible causes: The Field Group location rule is incorrect, the block name does not match the registered block, or the field group has not been saved.
Solution: Open the ACF Field Group settings and verify that the location rule targets the correct Testimonial block. Confirm that the registered block name is pnet/testimonial.
3. Custom fields return empty values
Possible causes: Incorrect field names, incorrect field group assignment, or retrieving fields outside the block rendering context.
Solution: Check that the field names in your PHP template exactly match the ACF field names. Use get_field() inside the block’s rendering template and verify that the fields have saved values.
4. PHP template is not rendering
Possible causes: The renderTemplate property contains an incorrect filename or the PHP file is located in a different directory.
Solution: Check the following configuration in block.json:
"acf": {
    "mode": "preview",
    "renderTemplate": "render.php"
}
Confirm that render.php exists in the same directory as block.json. Also inspect the PHP error log for syntax errors or missing functions.
5. Block styles are not loading
Possible causes: The style property is missing, the CSS file path is incorrect, or the browser is serving a cached stylesheet.
Solution: Verify that the following property exists at the top level of block.json:
"style": "file:./style.css",
Clear the browser cache and any caching plugin or CDN cache, then reload the page. Inspect the browser developer tools to check whether the stylesheet is being requested successfully.
6. Block content is missing after switching themes
Possible causes: The custom block is registered only by the previous theme and is no longer available after switching themes.
Solution: If the block must remain available across theme changes, move its registration and rendering files into a custom plugin rather than keeping them inside the theme. This separates content functionality from presentation.
You might also like:

Conclusion
Creating custom Gutenberg blocks does not always require React, JSX, or a complicated JavaScript development environment. With ACF Pro, PHP templates, and the modern block.json configuration format, WordPress developers can build reusable blocks using familiar tools and workflows.
In this tutorial, we learned how to Create Gutenberg Block with ACF by building a complete testimonial block. We created the directory structure, configured block metadata, registered the block with WordPress, assigned ACF custom fields, implemented dynamic PHP rendering, added block-specific styling, and tested the final output.
The same development approach can be extended to build custom hero sections, pricing cards, team profiles, feature grids, FAQs, call-to-action components, and other reusable Gutenberg blocks. It is an efficient and maintainable solution for PHP-focused WordPress developers who want to extend Gutenberg without building custom React interfaces.
For additional technical information, refer to the official ACF Blocks documentation and the WordPress Block Metadata documentation.