
Is your WordPress website struggling with poor Largest Contentful Paint (LCP) scores because WP Rocket is delaying the loading of your hero image? Although lazy loading improves performance by postponing off-screen image downloads, applying it to the main above-the-fold image can have the opposite effect. In this guide, you’ll learn how to Disable WP Rocket Lazy Load for your hero image without turning off lazy loading across your entire website. We’ll explore the built-in exclusion settings, template-level solutions, and practical ways to verify the improvement.
Prerequisites
- A WordPress website with WP Rocket installed and activated.
- Administrator access to the WordPress dashboard.
- Access to your theme or child theme files if you plan to modify image markup.
- A backup of your website before modifying PHP templates.
- Google PageSpeed Insights or Chrome DevTools for performance testing.
- Basic knowledge of HTML, PHP, and WordPress theme development.
Step 1: Understand Why Hero Images Affect LCP
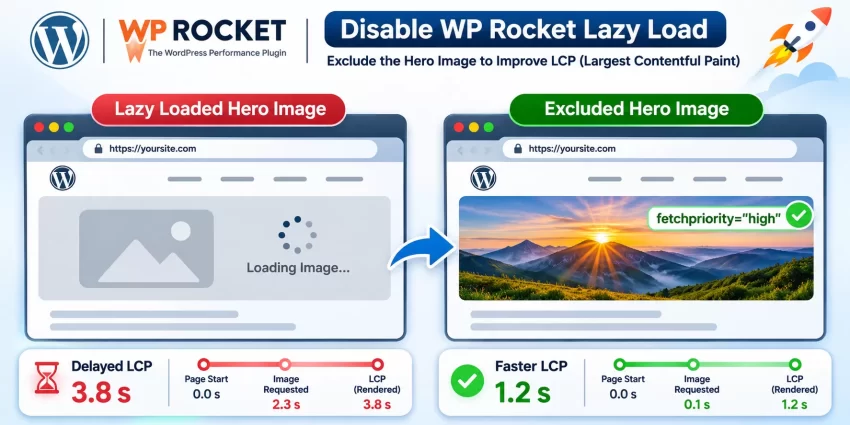
Largest Contentful Paint (LCP) measures how long it takes for the largest visible content element to render within the viewport. On many WordPress websites, this element is the hero image, featured image, or large banner displayed near the top of the page.
When WP Rocket applies lazy loading to this image, the browser may initially receive a placeholder instead of the actual image URL. The real image download then depends on the lazy-loading mechanism, potentially introducing unnecessary resource load delay. This is why you should Disable WP Rocket Lazy Load for critical above-the-fold images while keeping lazy loading enabled for images further down the page.
Google recommends making critical images discoverable early and avoiding lazy loading for images that are immediately visible. You can learn more about optimizing Largest Contentful Paint and browser-level image lazy loading.
Step 2: Identify the Hero Image Responsible for LCP
Before changing WP Rocket settings, identify the actual LCP element. Do not automatically assume that the first image in your page content is responsible. Depending on your theme and page builder, the LCP element might be a featured image, a background image, a slider image, or even a large text element.
2.1. Analyze the Page Using PageSpeed Insights
Open Google PageSpeed Insights and enter the URL of your WordPress page. Run the analysis separately for mobile and desktop because their LCP elements can differ.
Under the diagnostics section, inspect the Largest Contentful Paint element and LCP request discovery recommendations. If the hero image is identified as the LCP element, note its image filename, URL, and HTML attributes.
2.2. Inspect the Image Markup
Open your page in Chrome, right-click the hero image, and select Inspect. Locate the corresponding <img> element in the Elements panel.
Look for attributes such as src, data-lazy-src, loading, fetchpriority, and classes such as lazyloaded. If WP Rocket has transformed the image URL into a placeholder and stored the original URL in a data attribute, the image is being processed by its lazy-loading mechanism.
For a more reliable inspection, open the page source and search for the image filename. You can also append ?nowprocket to the page URL to inspect the page while bypassing WP Rocket’s optimizations.
Step 3: Exclude the Hero Image Using WP Rocket Settings
The simplest and recommended way to Disable WP Rocket Lazy Load for a particular hero image is to use the built-in exclusion field. This approach does not require modifying your theme files or writing custom PHP code.
3.1. Open WP Rocket Media Settings
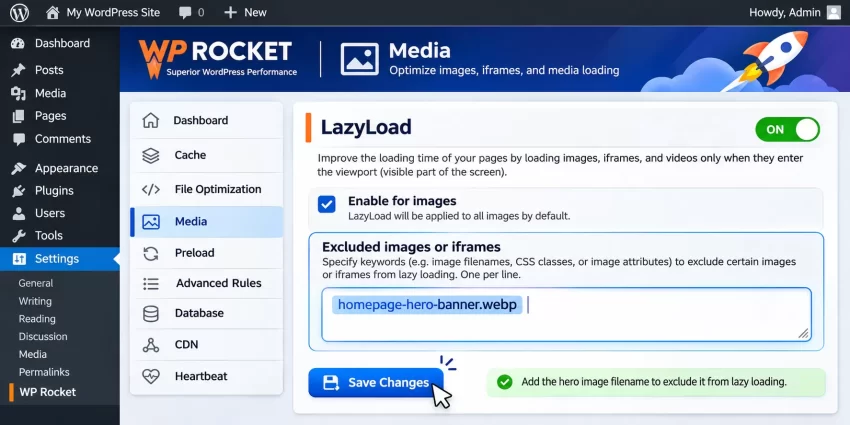
Log in to your WordPress dashboard and navigate to Settings > WP Rocket > Media. Locate the LazyLoad section and find the Excluded images or iframes field.
This field accepts image filenames, image attributes, CSS classes present on the actual image element, and other matching keywords. WP Rocket uses these entries to identify images that should bypass its lazy-loading process.
3.2. Add the Hero Image Filename
Suppose your hero image has the following filename:
homepage-hero-banner.webp
Add this filename to the Excluded images or iframes field. Enter one exclusion per line if you have multiple critical images.
For example:
homepage-hero-banner.webp
about-page-banner.webp
contact-hero-image.webp
You can also exclude an image using a distinctive CSS class that exists directly on its img element. Avoid using a class that exists only on a parent container because WP Rocket’s image exclusion matching requires the relevant class to be present in the image markup.
3.3. Save Changes and Clear Cache
Click Save Changes after adding the exclusion. Next, clear WP Rocket’s cache and any additional page cache or CDN cache that might be serving an older version of the HTML.
Visit the affected page in an incognito browser window and inspect the hero image again. The original image URL should be available immediately rather than being replaced with a lazy-loading placeholder.
You might also like: How to Easily Fix Broken Links in WordPress After a Site Migration
Step 4: Exclude the Hero Image Directly in Theme Markup
If you develop custom WordPress themes or control the hero image template, you can also exclude a specific image directly from WP Rocket’s lazy-loading process by adding the data-no-lazy="1" attribute to its image markup.
This approach is particularly useful when the hero image is dynamically generated through PHP and you want to make the exclusion explicit in the template rather than managing it through the WP Rocket dashboard.
4.1. Locate the Hero Image Template
Identify the PHP template responsible for rendering the hero image. Depending on your theme, this might be front-page.php, single.php, header.php, or a custom template part.
For example, a manually coded hero section might look like this:
<div class="hero-section">
    <img
        src="<?php echo esc_url( get_stylesheet_directory_uri() . '/assets/images/homepage-hero-banner.webp' ); ?>"
        alt="Homepage hero banner"
        width="1920"
        height="800"
    >
</div>
4.2. Add the data-no-lazy Attribute
Add data-no-lazy="1" directly to the image element. This tells WP Rocket’s lazy-loading functionality to leave that image out of its lazy-loading transformation.
The updated implementation looks like this:
<div class="hero-section">
    <img
        src="<?php echo esc_url( get_stylesheet_directory_uri() . '/assets/images/homepage-hero-banner.webp' ); ?>"
        alt="Homepage hero banner"
        width="1920"
        height="800"
        data-no-lazy="1"
        loading="eager"
        fetchpriority="high"
    >
</div>
Here, data-no-lazy="1" excludes the image from WP Rocket’s lazy loading, while loading="eager" explicitly requests immediate loading and fetchpriority="high" communicates its importance to the browser.
Use these attributes only when the image is genuinely a critical above-the-fold resource. Do not apply high fetch priority to every image on your page because doing so can compete with other important resources.
4.3. Use a Child Theme for Permanent Changes
If you are editing a theme template, implement the change in a child theme rather than modifying the parent theme directly. Otherwise, a theme update could overwrite your customization.
Alternatively, if your theme or page builder provides an image HTML attributes field, you may be able to add the exclusion attribute without editing PHP files.
Pro Tip
You might also like:

Step 5: Verify the Exclusion and Test LCP Performance
After configuring the exclusion, verify that WP Rocket is no longer lazy-loading the hero image. A successful configuration should make the actual image URL available during the initial HTML response, without waiting for the lazy-loading JavaScript to replace a placeholder.
5.1. Inspect the Final HTML
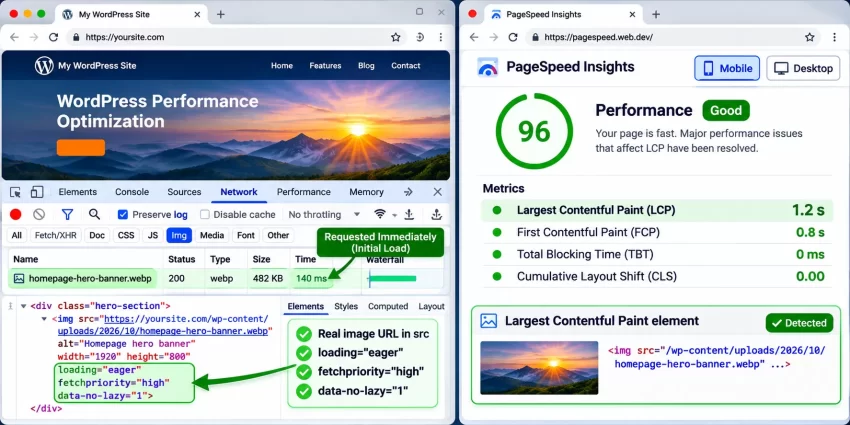
Open the affected page and inspect the hero image element. Check that it contains the correct image URL in the src attribute and does not contain WP Rocket’s lazy-loading placeholder or transformed lazy-loading attributes.
If you used the template-level approach, confirm that data-no-lazy="1" is present in the original image markup. Also verify that the image is not receiving an unwanted loading="lazy" attribute from another plugin or optimization layer.
5.2. Check the Network Tab
Open Chrome DevTools, select the Network tab, and filter the requests by Img. Reload the page and observe when the hero image request begins.
The hero image should be discovered and requested during the initial page loading process, rather than waiting for the browser to execute a lazy-loading script or approach the image’s viewport threshold.
5.3. Run PageSpeed Insights Again
Run a fresh PageSpeed Insights test for both mobile and desktop. Compare the LCP results with your earlier measurements and check whether the LCP request discovery warning has disappeared.
Remember that excluding an image from lazy loading does not automatically guarantee a better LCP score. Image dimensions, compression, server response time, caching, render-blocking CSS, and network conditions also affect the final result.
Common Errors When Disabling WP Rocket Lazy Load
Even after configuring the exclusion correctly, the hero image may continue to be lazy-loaded or the expected LCP improvement may not appear. The following are common issues to investigate when implementing this optimization.
1. The Hero Image Is Still Lazy-Loaded
Cause: The exclusion keyword does not match the actual image filename, attribute, or CSS class. Alternatively, another plugin or theme may be applying its own lazy-loading functionality.
Solution: Inspect the original HTML source and verify the exact image filename and attributes. Test the page with ?nowprocket appended to its URL to determine whether the lazy-loading behavior is coming from WP Rocket or another source.
2. The CSS Class Exclusion Does Not Work
Cause: The class was added to a parent container instead of the actual <img> element. This is particularly common with page builders such as Elementor.
Solution: Add the image filename to WP Rocket’s exclusion field or use a supported image-level attribute such as data-no-lazy="1" when you control the image markup.
3. The Image Is Excluded but LCP Is Still Poor
Cause: Lazy loading is no longer the bottleneck. The image might be too large, poorly compressed, served slowly, or discovered late because of CSS or JavaScript dependencies.
Solution: Optimize the hero image dimensions, use WebP or AVIF where appropriate, ensure the image URL is discoverable in the initial HTML, and investigate whether preloading or high fetch priority is appropriate for the actual LCP resource.
4. The Hero Image Still Has loading=”lazy”
Cause: WordPress core, a theme, or another plugin may be adding the native lazy-loading attribute independently of WP Rocket.
Solution: Inspect the generated HTML and identify which component is adding the attribute. WP Rocket exclusions do not necessarily override every third-party lazy-loading implementation. Resolve the conflict at its source instead of blindly removing loading attributes from every image.
5. Changes Are Not Visible After Saving
Cause: A cached HTML response, CDN cache, server cache, or browser cache is still serving the previous image markup.
Solution: Clear WP Rocket’s cache, purge your CDN and server cache if applicable, and retest using an incognito browser session. If you have changed the image or its template, also clear WP Rocket’s Priority Elements data when necessary.
You might also like:

Conclusion
Lazy loading is an effective WordPress performance optimization, but it should not delay the loading of your most important above-the-fold images. By identifying the actual LCP element and selectively excluding it from WP Rocket’s lazy-loading functionality, you can improve image discovery and avoid unnecessary loading delays.
You can Disable WP Rocket Lazy Load for a hero image through the built-in exclusion field or by adding data-no-lazy="1" directly to its image markup. Keep lazy loading enabled for non-critical images, use eager loading and high fetch priority selectively, and verify your changes using Chrome DevTools and Google PageSpeed Insights. This targeted approach helps maintain an efficient loading strategy without sacrificing the performance benefits of lazy loading across your website.