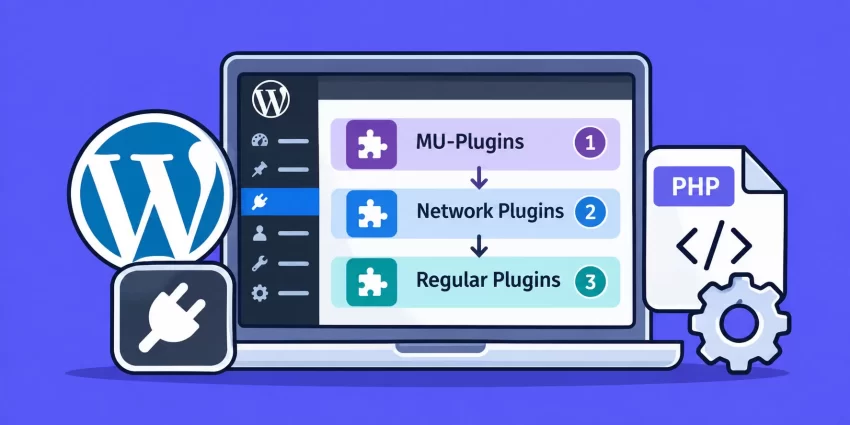
Have you ever encountered plugin conflicts because one plugin initializes before another, causing missing functions, undefined classes, or unexpected behavior? Managing the WordPress Plugin Load Order can be challenging, especially when multiple plugins depend on each other. Fortunately, WordPress provides a powerful mechanism called Must-Use Plugins (MU-Plugins) that allows developers to control the initialization sequence of custom functionality and organize plugin dependencies more reliably.
In this guide, you will learn how WordPress loads plugins, how to control MU-Plugin execution order, and how to coordinate initialization using WordPress hooks. We will also explore practical PHP examples, common mistakes, and troubleshooting techniques to help you build a more predictable WordPress environment.
Prerequisites
Before modifying the plugin loading mechanism, make sure you have the following:
- WordPress 6.0 or later installation.
- PHP 8.0 or later.
- Administrator access to your WordPress installation.
- FTP, SSH, or hosting File Manager access.
- Basic knowledge of PHP and WordPress plugin development.
- A complete backup of your website files and database.
- A staging environment for testing plugin compatibility.
Backup Required
Step 1: Understand How WordPress Loads Plugins
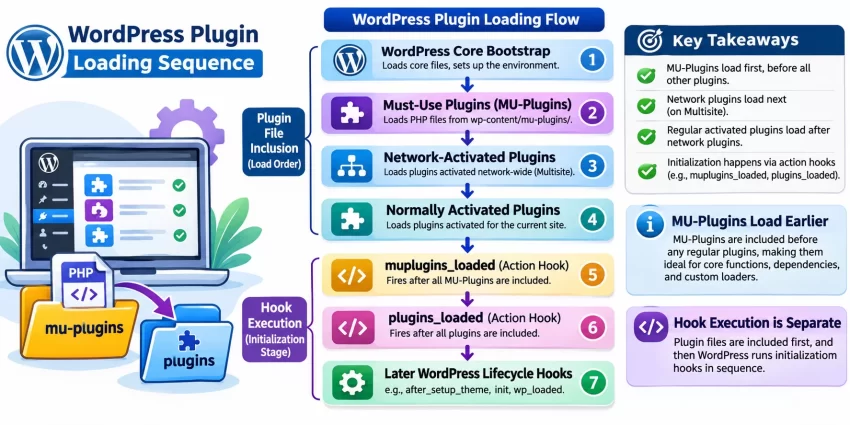
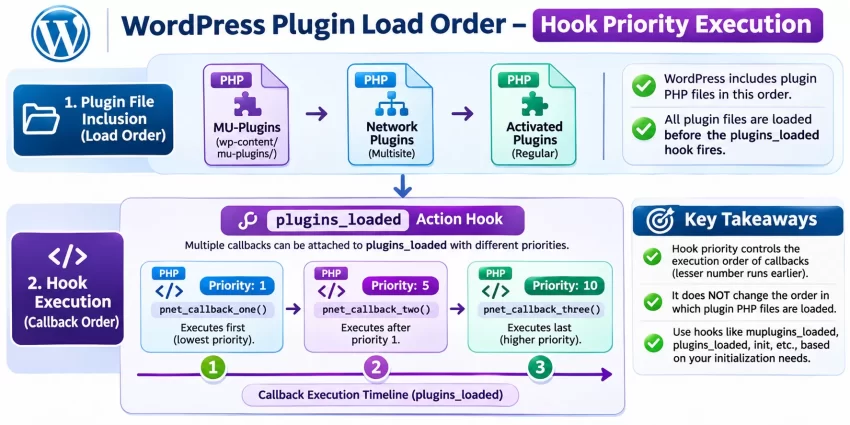
Before changing the WordPress Plugin Load Order, you need to understand the default plugin loading sequence. WordPress does not load every plugin in the same way. It distinguishes between Must-Use Plugins, network-activated plugins, and normally activated plugins.
Understanding these differences is essential because MU-Plugins are loaded automatically before regular plugins. This makes them useful for registering shared functionality, preparing dependencies, and controlling initialization behavior.
1.1 Understand the Default Loading Sequence
WordPress follows a general bootstrap sequence when processing a request. The relevant plugin-loading stages are:
- Must-Use Plugins: WordPress loads PHP files directly inside the
wp-content/mu-plugins/directory. - Network-Activated Plugins: On multisite installations, network-activated plugins are loaded.
- Normally Activated Plugins: WordPress loads plugins activated for the current site.
- Plugin Initialization Hooks: WordPress fires hooks such as
muplugins_loadedandplugins_loadedas the bootstrap progresses.
One important distinction is that plugin files are included before hooks such as plugins_loaded execute. Therefore, controlling a hook’s execution priority is different from controlling the order in which PHP plugin files are included.
1.2 Understand the Role of MU-Plugins
Must-Use Plugins are special WordPress plugins that are automatically loaded from the MU-Plugins directory. Unlike regular plugins, they do not need to be activated through the WordPress dashboard and cannot be deactivated from the standard Plugins screen.
By default, WordPress loads PHP files directly inside the MU-Plugins directory in alphabetical filename order. However, it does not automatically scan subdirectories for additional MU-Plugins. This behavior allows developers to create a custom loader that includes multiple files in a deliberate sequence.
For official technical details, refer to the WordPress Must-Use Plugins documentation.
Step 2: Create the MU-Plugins Directory
The first practical step is creating the directory that WordPress uses to discover Must-Use Plugins. If the directory does not exist, WordPress will not automatically load your custom MU-Plugin files.
2.1 Locate the WordPress Content Directory
Using FTP, SSH, or your hosting File Manager, navigate to your WordPress installation and locate the wp-content directory.
Inside this directory, create a new folder named:
wp-content/mu-plugins/Your directory structure should now look similar to this:
public_html/
├── wp-admin/
├── wp-includes/
├── wp-content/
│   ├── plugins/
│   ├── themes/
│   └── mu-plugins/
│       └── pnet-loader.php
└── wp-config.php
2.2 Create Your First MU-Plugin File
Create a PHP file named pnet-loader.php directly inside the mu-plugins directory. This file will act as the central entry point for loading your custom MU-Plugin components.
Add the following basic code:
<?php
/**
 * Plugin Name: PNET MU Plugin Loader
 * Description: Central loader for custom Must-Use Plugins.
 * Version: 1.0.0
 */

if ( ! defined( 'ABSPATH' ) ) {
    exit;
}

function pnet_mu_plugin_loader_init() {
    // Custom MU-Plugin initialization will go here.
}

pnet_mu_plugin_loader_init();
Save the file and visit your WordPress dashboard. Navigate to Plugins → Must-Use to confirm that WordPress recognizes the loader.
Pro Tip
Step 3: Organize MU-Plugin Files into a Structured Directory
As your custom functionality grows, putting everything inside one PHP file becomes difficult to maintain. A better approach is to organize individual components into a dedicated subdirectory and use a central loader to include them in the required order.
3.1 Create a Structured Directory
Inside wp-content/mu-plugins/, create a directory named pnet. Place each custom component in a separate PHP file.
For example, your directory structure could look like this:
wp-content/
└── mu-plugins/
    ├── pnet-loader.php
    └── pnet/
        ├── 01-core-functions.php
        ├── 02-database.php
        ├── 03-api-handler.php
        ├── 04-custom-post-types.php
        └── 05-frontend.php
This structure separates functionality into manageable modules. You can also use descriptive filenames to make the intended loading sequence immediately understandable.
3.2 Understand Why Subdirectories Need a Loader
WordPress does not recursively discover PHP files inside the pnet directory. Therefore, creating the files alone will not make them execute. The root-level pnet-loader.php file must explicitly include them.
This approach gives you control over the order in which your custom MU-Plugin components are included, without modifying WordPress core files or manually changing regular plugin activation records.
You might also like: WordPress enqueue scripts and styles: Best Practices for Developers (2026)
Step 4: Control MU-Plugin Loading Order with a Custom Loader
Now that your directory structure is ready, you can implement a central loader that includes each component in a specific sequence. This is the most straightforward way to establish a predictable loading order for your own MU-Plugin modules.
4.1 Define the Loading Sequence
Open pnet-loader.php and replace its existing contents with the following implementation:
<?php
/**
 * Plugin Name: PNET MU Plugin Loader
 * Description: Controls the loading sequence of custom MU-Plugin components.
 * Version: 1.0.0
 */

if ( ! defined( 'ABSPATH' ) ) {
    exit;
}

/**
 * Load custom MU-Plugin components in a defined order.
 */
function pnet_load_mu_plugin_components() {

    $pnet_plugin_directory = __DIR__ . '/pnet/';

    $pnet_plugin_files = array(
        '01-core-functions.php',
        '02-database.php',
        '03-api-handler.php',
        '04-custom-post-types.php',
        '05-frontend.php',
    );

    foreach ( $pnet_plugin_files as $pnet_plugin_file ) {

        $pnet_file_path = $pnet_plugin_directory . $pnet_plugin_file;

        if ( is_readable( $pnet_file_path ) ) {
            require_once $pnet_file_path;
        }
    }
}

pnet_load_mu_plugin_components();
Here, the $pnet_plugin_files array defines the exact sequence in which your custom components are included. PHP executes each require_once statement sequentially, ensuring that previously included files are available to subsequent files.
4.2 Understand Dependency-Based Loading
Consider a situation where your database component depends on a helper function declared in 01-core-functions.php. If the database file loads first, PHP may encounter an undefined function error.
By including the core functions file first, you ensure that its declarations are available when the database component is loaded. You can apply the same principle to API handlers, custom post types, and frontend functionality.
Best Practice
4.3 Add Missing-File Validation
The previous loader skips files that are missing or unreadable. For a development environment, you may also want to log missing files so that configuration problems do not go unnoticed.
Replace the loop in the previous example with this version if you need additional diagnostics:
foreach ( $pnet_plugin_files as $pnet_plugin_file ) {

    $pnet_file_path = $pnet_plugin_directory . $pnet_plugin_file;

    if ( ! is_readable( $pnet_file_path ) ) {

        error_log(
            'PNET MU Loader: Missing or unreadable file - ' .
            $pnet_plugin_file
        );

        continue;
    }

    require_once $pnet_file_path;
}
Make sure WordPress debugging is configured appropriately before relying on PHP error logs during development.
You might also like:
Step 5: Control Plugin Initialization Using WordPress Hooks
Controlling file inclusion is only one part of plugin execution. In many situations, you do not need to change the actual file loading sequence. Instead, you need to make sure that a particular initialization task runs before another task.
WordPress provides an action hook system that allows developers to control callback execution order using priority values. Lower priority numbers execute earlier than higher priority numbers for callbacks attached to the same hook.
5.1 Understand Hook Priority
Consider the following example:
<?php

function pnet_initialize_database() {
    // Initialize database functionality.
}

function pnet_initialize_api() {
    // Initialize API functionality.
}

add_action(
    'plugins_loaded',
    'pnet_initialize_database',
    5
);

add_action(
    'plugins_loaded',
    'pnet_initialize_api',
    10
);
In this example, the database initialization callback executes before the API initialization callback because its priority is lower. Both callbacks execute during the plugins_loaded action.
For reference, explore the official WordPress Actions documentation and the add_action() reference.
5.2 Choose the Appropriate Lifecycle Hook
Different initialization tasks belong at different stages of the WordPress bootstrap process. Selecting the appropriate hook is just as important as choosing its priority.
- muplugins_loaded: Runs after all discovered MU-Plugin files have been included.
- plugins_loaded: Runs after MU-Plugins and normally loaded plugins have been included.
- after_setup_theme: Runs after the active theme is loaded.
- init: Suitable for registering custom post types, taxonomies, and other initialization tasks.
- wp_loaded: Runs after WordPress, plugins, and the theme have loaded.
For example, if a custom post type depends on functionality provided by another plugin, you can register it during the init action after the necessary plugin files have been loaded.
5.3 Avoid Using Hook Priorities to Solve File Inclusion Problems
One common misconception is that assigning a lower priority to a callback makes its plugin file load earlier. This is incorrect. Hook priorities only control the execution order of callbacks attached to the same hook; they do not change the order in which WordPress includes plugin PHP files.
If a dependency must exist before another plugin file is included, changing the plugins_loaded priority will not solve the problem. You must use a compatible plugin dependency mechanism, an appropriate integration point, or restructure the code so that dependent functionality executes at the correct lifecycle stage.
Step 6: Manage Dependencies Between Regular Plugins
Sometimes the issue is not with your own MU-Plugin components but with dependencies between independently maintained WordPress plugins. For example, a custom integration plugin may require WooCommerce or another plugin to be installed and active.
In such cases, use the dependency mechanisms supported by WordPress rather than manually including another plugin’s main PHP file through an MU-Plugin loader.
6.1 Use the Requires Plugins Header
WordPress 6.5 introduced the Requires Plugins plugin header, which allows developers to declare dependencies on other WordPress.org plugins.
For example, if your plugin depends on WooCommerce, you can add the following header:
<?php
/**
 * Plugin Name: PNET WooCommerce Integration
 * Description: Custom integration with WooCommerce.
 * Version: 1.0.0
 * Requires at least: 6.5
 * Requires PHP: 8.0
 * Requires Plugins: woocommerce
 */
The dependency declaration uses the plugin slug, not its display name. WordPress can use this information to prevent activation when a required plugin is unavailable or inactive.
However, dependency declarations should not be treated as a universal mechanism for controlling arbitrary PHP file inclusion order or initialization timing. Your integration should still use appropriate WordPress hooks and APIs.
Read the official Plugin Header Requirements documentation for additional information.
6.2 Check Whether a Required Plugin Is Available
For optional integrations or environments where a dependency may not always be installed, check whether the required plugin functionality is available before registering integration callbacks.
The following example checks for WooCommerce before registering a custom integration:
<?php

function pnet_initialize_woocommerce_integration() {

    if ( ! class_exists( 'WooCommerce' ) ) {
        return;
    }

    // Register WooCommerce-dependent functionality here.
    add_action(
        'woocommerce_init',
        'pnet_register_woocommerce_features'
    );
}

function pnet_register_woocommerce_features() {

    // Initialize custom WooCommerce features.
}

add_action(
    'plugins_loaded',
    'pnet_initialize_woocommerce_integration',
    20
);
This approach avoids fatal errors when WooCommerce is unavailable. The priority of 20 controls when your integration callback runs relative to other callbacks on plugins_loaded; it does not force WooCommerce’s main PHP file to load at that priority.
You might also like:
Step 7: Verify and Test the Plugin Loading Order
After implementing your loader and initialization callbacks, verify that the components are included in the intended sequence. Testing is particularly important when multiple plugins depend on shared functions, database tables, or registered services.
7.1 Add Temporary Debug Logging
You can use PHP’s error_log() function to record when each component is included. Add a log statement near the beginning of each MU-Plugin component.
For example, inside 01-core-functions.php:
<?php

error_log(
    'PNET MU Loader: Core functions loaded.'
);
Inside 02-database.php:
<?php

error_log(
    'PNET MU Loader: Database component loaded.'
);
After refreshing your WordPress website, inspect the PHP error log. The messages should appear in the same order as the files are included by your loader.
7.2 Verify Hook Execution Order
You can also log when individual initialization callbacks execute. This helps distinguish between PHP file inclusion and the later execution of WordPress action callbacks.
<?php

function pnet_log_initialization_order() {

    error_log(
        'PNET: plugins_loaded callback executed.'
    );
}

add_action(
    'plugins_loaded',
    'pnet_log_initialization_order',
    10
);
For more advanced debugging, consider using Query Monitor. It helps developers inspect WordPress hooks, queries, PHP errors, and other execution details.
7.3 Test on a Staging Environment
Test your implementation with the same plugin configuration used on your production website. Confirm that the dependent functions exist when required, database initialization succeeds, custom post types register correctly, and frontend functionality works as expected.
Also test the website with the required dependency disabled. Your integration should fail gracefully rather than producing a fatal error or an inaccessible WordPress dashboard.
Common Errors and Troubleshooting
Even with a structured loader, incorrect file paths, missing dependencies, and initialization timing problems can cause unexpected behavior. The following are some common problems developers encounter while configuring the WordPress Plugin Load Order.
1. MU-Plugin Is Not Appearing in the Dashboard
Problem: Your custom MU-Plugin does not appear under Plugins → Must-Use.
Solution: Verify that the PHP file is located directly inside wp-content/mu-plugins/. WordPress does not automatically discover PHP files stored only in nested subdirectories. Also check file permissions and ensure that the file has a valid PHP opening tag.
2. Call to Undefined Function Error
Problem: PHP reports an undefined function when a dependent component executes.
Solution: Check the loader array and ensure that the file declaring the required function is included first. If the function belongs to a regular plugin, make sure your integration runs after that plugin has been loaded and initialized appropriately.
3. Class Not Found Error
Problem: A dependent component attempts to instantiate a class that has not been declared.
Solution: Verify the class file’s inclusion order and namespace. If the class belongs to another plugin, confirm that the dependency is active and that its class is available before attempting instantiation.
4. MU-Plugin Files Load in an Unexpected Order
Problem: Multiple MU-Plugin files are executing in an order different from what you expected.
Solution: Remember that WordPress loads root-level MU-Plugin PHP files alphabetically. If you have multiple independent root-level MU-Plugins, use descriptive filename prefixes or consolidate your custom modules behind a single loader. Check for other root-level MU-Plugins that may execute independently of your loader.
5. Plugin Initialization Runs Too Early
Problem: A callback executes before the required plugin functionality is ready.
Solution: Move the dependent initialization to an appropriate lifecycle hook, such as plugins_loaded, init, or a plugin-specific initialization action. Choose the hook based on when the required API becomes available.
6. Changes to the Loader Cause a Fatal PHP Error
Problem: The website displays a critical error after modifying the MU-Plugin loader.
Solution: Use FTP or your hosting File Manager to rename or temporarily move the problematic loader file. Check the PHP error log for syntax errors, missing files, or duplicate declarations. Correct the issue before restoring the loader.
Important
Conclusion
Managing plugin dependencies is an important part of building reliable WordPress applications. Although WordPress does not provide a universal mechanism for rearranging every regular plugin’s PHP file inclusion sequence, MU-Plugins offer a practical way to organize and control your own custom components.
By creating a central MU-Plugin loader, defining an explicit file inclusion sequence, using appropriate WordPress lifecycle hooks, and declaring plugin dependencies correctly, you can avoid many initialization conflicts and make your custom development environment easier to maintain.
Remember that the best approach to controlling the WordPress Plugin Load Order is to distinguish between file inclusion and callback execution. Use a custom loader for your own MU-Plugin modules, WordPress hooks for initialization timing, and supported dependency declarations for regular plugins.