We have all been there. You spend hours crafting the perfect article, selecting high-definition visuals, and hitting publish, only to find your page loads at a snail’s pace. In the world of web performance, every millisecond counts. If your site takes too long to render, visitors bounce, and Google takes notice. This is where the ability to Lazy Load Images in WordPress becomes your secret weapon.
Images are often the heaviest assets on any webpage. Loading them all at once—even the ones at the very bottom of the footer—wastes bandwidth and slows down the “First Contentful Paint” (FCP). By implementing lazy loading, you ensure that media files only load when they are about to enter the user’s viewport.
While the WordPress repository is flooded with optimization plugins, they often come with bloat, aggressive upsells, or conflicting scripts. As developers, we know that the cleanest solution is often the one we code ourselves. In this guide for PixelNet, I will show you exactly how to implement this efficiently using pure PHP and JavaScript, keeping your site lightweight and lightning-fast.
Mechanics of Lazy Load Images in WordPress
Before we dive into the code, it is essential to understand what is happening under the hood when we decide to Lazy Load Images in WordPress manually. Traditionally, when a browser loads a page, it fetches every resource defined in the HTML immediately. If you have a gallery of 50 images, the browser tries to download all 50 simultaneously, clogging the network thread.
Lazy loading defers this initialization. Instead of the src attribute calling the image file immediately, we use a placeholder or a data attribute (like data-src). A script—or the browser’s native engine—watches the user’s scroll position. When an image is about to appear on the screen, the data attribute is swapped into the src attribute, triggering the download.
Why “Without Plugins” is the Superior Choice
You might ask, “Why not just install a plugin?” It is a valid question. However, relying on third-party plugins for core functionality can introduce technical debt. A plugin might load 50KB of jQuery libraries you do not need, or it might break after a major core update. By coding this yourself, you maintain full control over the execution logic. You ensure that the script is only running where it is needed, and you reduce the number of external requests your server has to handle.
Furthermore, mastering how to Lazy Load Images in WordPress via code gives you granular control. You can exclude specific images (like your logo or above-the-fold hero banner) to avoid Layout Shifts (CLS), a crucial Core Web Vitals metric.
You might also like:

Method 1: Leveraging Native Browser Lazy Loading (PHP)
Since version 5.5, WordPress has included native support for lazy loading by adding the loading="lazy" attribute to images. However, this implementation is sometimes imperfect. It might miss images added via widgets, hardcoded in theme files, or injected by shortcodes. To ensure we completely Lazy Load Images in WordPress, we need to enforce this attribute globally across our content.
We can utilize the wp_get_attachment_image_attributes filter. This function allows us to modify the HTML attributes of images generated by WordPress before they are rendered.
Here is a robust code snippet to ensure that every attachment image gets the lazy attribute. Open your theme’s functions.php file and add the following:
function pnet_enforce_native_lazy_loading( $attr, $attachment, $size ) {
    // Check if the attribute is already set to avoid conflicts
    if ( ! isset( $attr['loading'] ) ) {
        $attr['loading'] = 'lazy';
    }
    return $attr;
}
add_filter( 'wp_get_attachment_image_attributes', 'pnet_enforce_native_lazy_loading', 10, 3 );
This snippet interacts with the core wp_get_attachment_image_attributes function. By adding this filter, we are explicitly telling WordPress that whenever it retrieves an image attachment, it must include the browser-level instruction to delay loading.
Handling Content Images and iFrames
The previous filter handles theme images (like thumbnails). But what about images and iFrames (like YouTube embeds) inside your post content? We need to filter the_content to inject the attribute dynamically. This is critical because standard oEmbeds often pull in heavy resources immediately.
We will use PHP’s str_replace or preg_replace to find image tags and append our loading attribute.
function pnet_lazy_load_content_images( $content ) {
    // Only run this on single posts or pages to save processing power on archives
    if ( ! is_singular() ) {
        return $content;
    }

    // Add loading="lazy" to all img tags that lack it
    $content = preg_replace(
        '/<img(?![^>]+loading=)([^>]+)>/i',
        '<img loading="lazy" $1>',
        $content
    );

    // Add loading="lazy" to all iframe tags that lack it
    $content = preg_replace(
        '/<iframe(?![^>]+loading=)([^>]+)>/i',
        '<iframe loading="lazy" $1>',
        $content
    );

    return $content;
}
add_filter( 'the_content', 'pnet_lazy_load_content_images' );
This function scans your blog post content before it is displayed. If it finds an <img> or <iframe> tag without the loading attribute, it adds it. This ensures that even if you forget to select “lazy load” in a block setting, the code has your back.
Must Read: Easily Display Related Posts in WordPress: Boost Engagement Without Bloat
Method 2: The JavaScript Intersection Observer (Advanced Control)
Native lazy loading is great, but it relies on browser support. While support is high, some older browsers or specific mobile contexts might ignore it. Furthermore, native loading offers less control over the “threshold”—the distance from the viewport at which the image starts loading. If you want images to load 500px before they appear (to ensure the user never sees a blank space), you need JavaScript.
To truly Lazy Load Images in WordPress with professional precision, we can use the Intersection Observer API. This method involves two steps: modifying the HTML to prevent initial loading, and adding a small script to trigger the load.
Step 1: Modifying the HTML Output
We need to swap the src attribute with data-src. This prevents the browser from downloading the image immediately. We will use a unique class, pnet-lazy, to target these images.
function pnet_prepare_images_for_js( $content ) {
    if ( ! is_singular() ) {
        return $content;
    }

    // Regex to find images and swap src for data-src
    // Also adds a 'pnet-lazy' class and a placeholder src
    $content = preg_replace_callback(
        '/<img([^>]+)src=["\']([^"\']+)["\']([^>]*)>/i',
        function( $matches ) {
            // Check if specifically excluded (optional class check could go here)

            // Reconstruct the tag
            // $matches[1] = attributes before src
            // $matches[2] = the actual image URL
            // $matches[3] = attributes after src

            $placeholder = 'data:image/gif;base64,R0lGODlhAQABAIAAAAAAAP///yH5BAEAAAAALAAAAAABAAEAAAIBRAA7'; // Transparent 1x1 pixel

            return '<img' . $matches[1] . 'src="' . $placeholder . '" data-src="' . $matches[2] . '" class="pnet-lazy"' . $matches[3] . '>';
        },
        $content
    );

    return $content;
}
add_filter( 'the_content', 'pnet_prepare_images_for_js' );
Step 2: The JavaScript Magic
Now that our images are “primed,” we need a script to bring them to life. We will queue a small JavaScript file that sets up the observer. This script is lightweight and far more efficient than the event-listener scroll events used in the past.
document.addEventListener("DOMContentLoaded", function() {
    var lazyImages = [].slice.call(document.querySelectorAll("img.pnet-lazy"));

    if ("IntersectionObserver" in window) {
        let lazyImageObserver = new IntersectionObserver(function(entries, observer) {
            entries.forEach(function(entry) {
                if (entry.isIntersecting) {
                    let lazyImage = entry.target;
                    lazyImage.src = lazyImage.dataset.src;

                    // If srcset exists, swap that too
                    if (lazyImage.dataset.srcset) {
                        lazyImage.srcset = lazyImage.dataset.srcset;
                    }

                    lazyImage.classList.remove("pnet-lazy");
                    lazyImage.classList.add("pnet-loaded");
                    lazyImageObserver.unobserve(lazyImage);
                }
            });
        });

        lazyImages.forEach(function(lazyImage) {
            lazyImageObserver.observe(lazyImage);
        });
    } else {
        // Fallback for very old browsers: load all images immediately
        lazyImages.forEach(function(lazyImage) {
            lazyImage.src = lazyImage.dataset.src;
        });
    }
});
This script checks if the pnet-lazy image is intersecting with the visible area. Once it is, it moves the URL from data-src back to src, and the image appears. We also add a pnet-loaded class, which you can use in CSS to add a nice fade-in animation effect.
You might also like:
Optimizing for Cumulative Layout Shift (CLS)
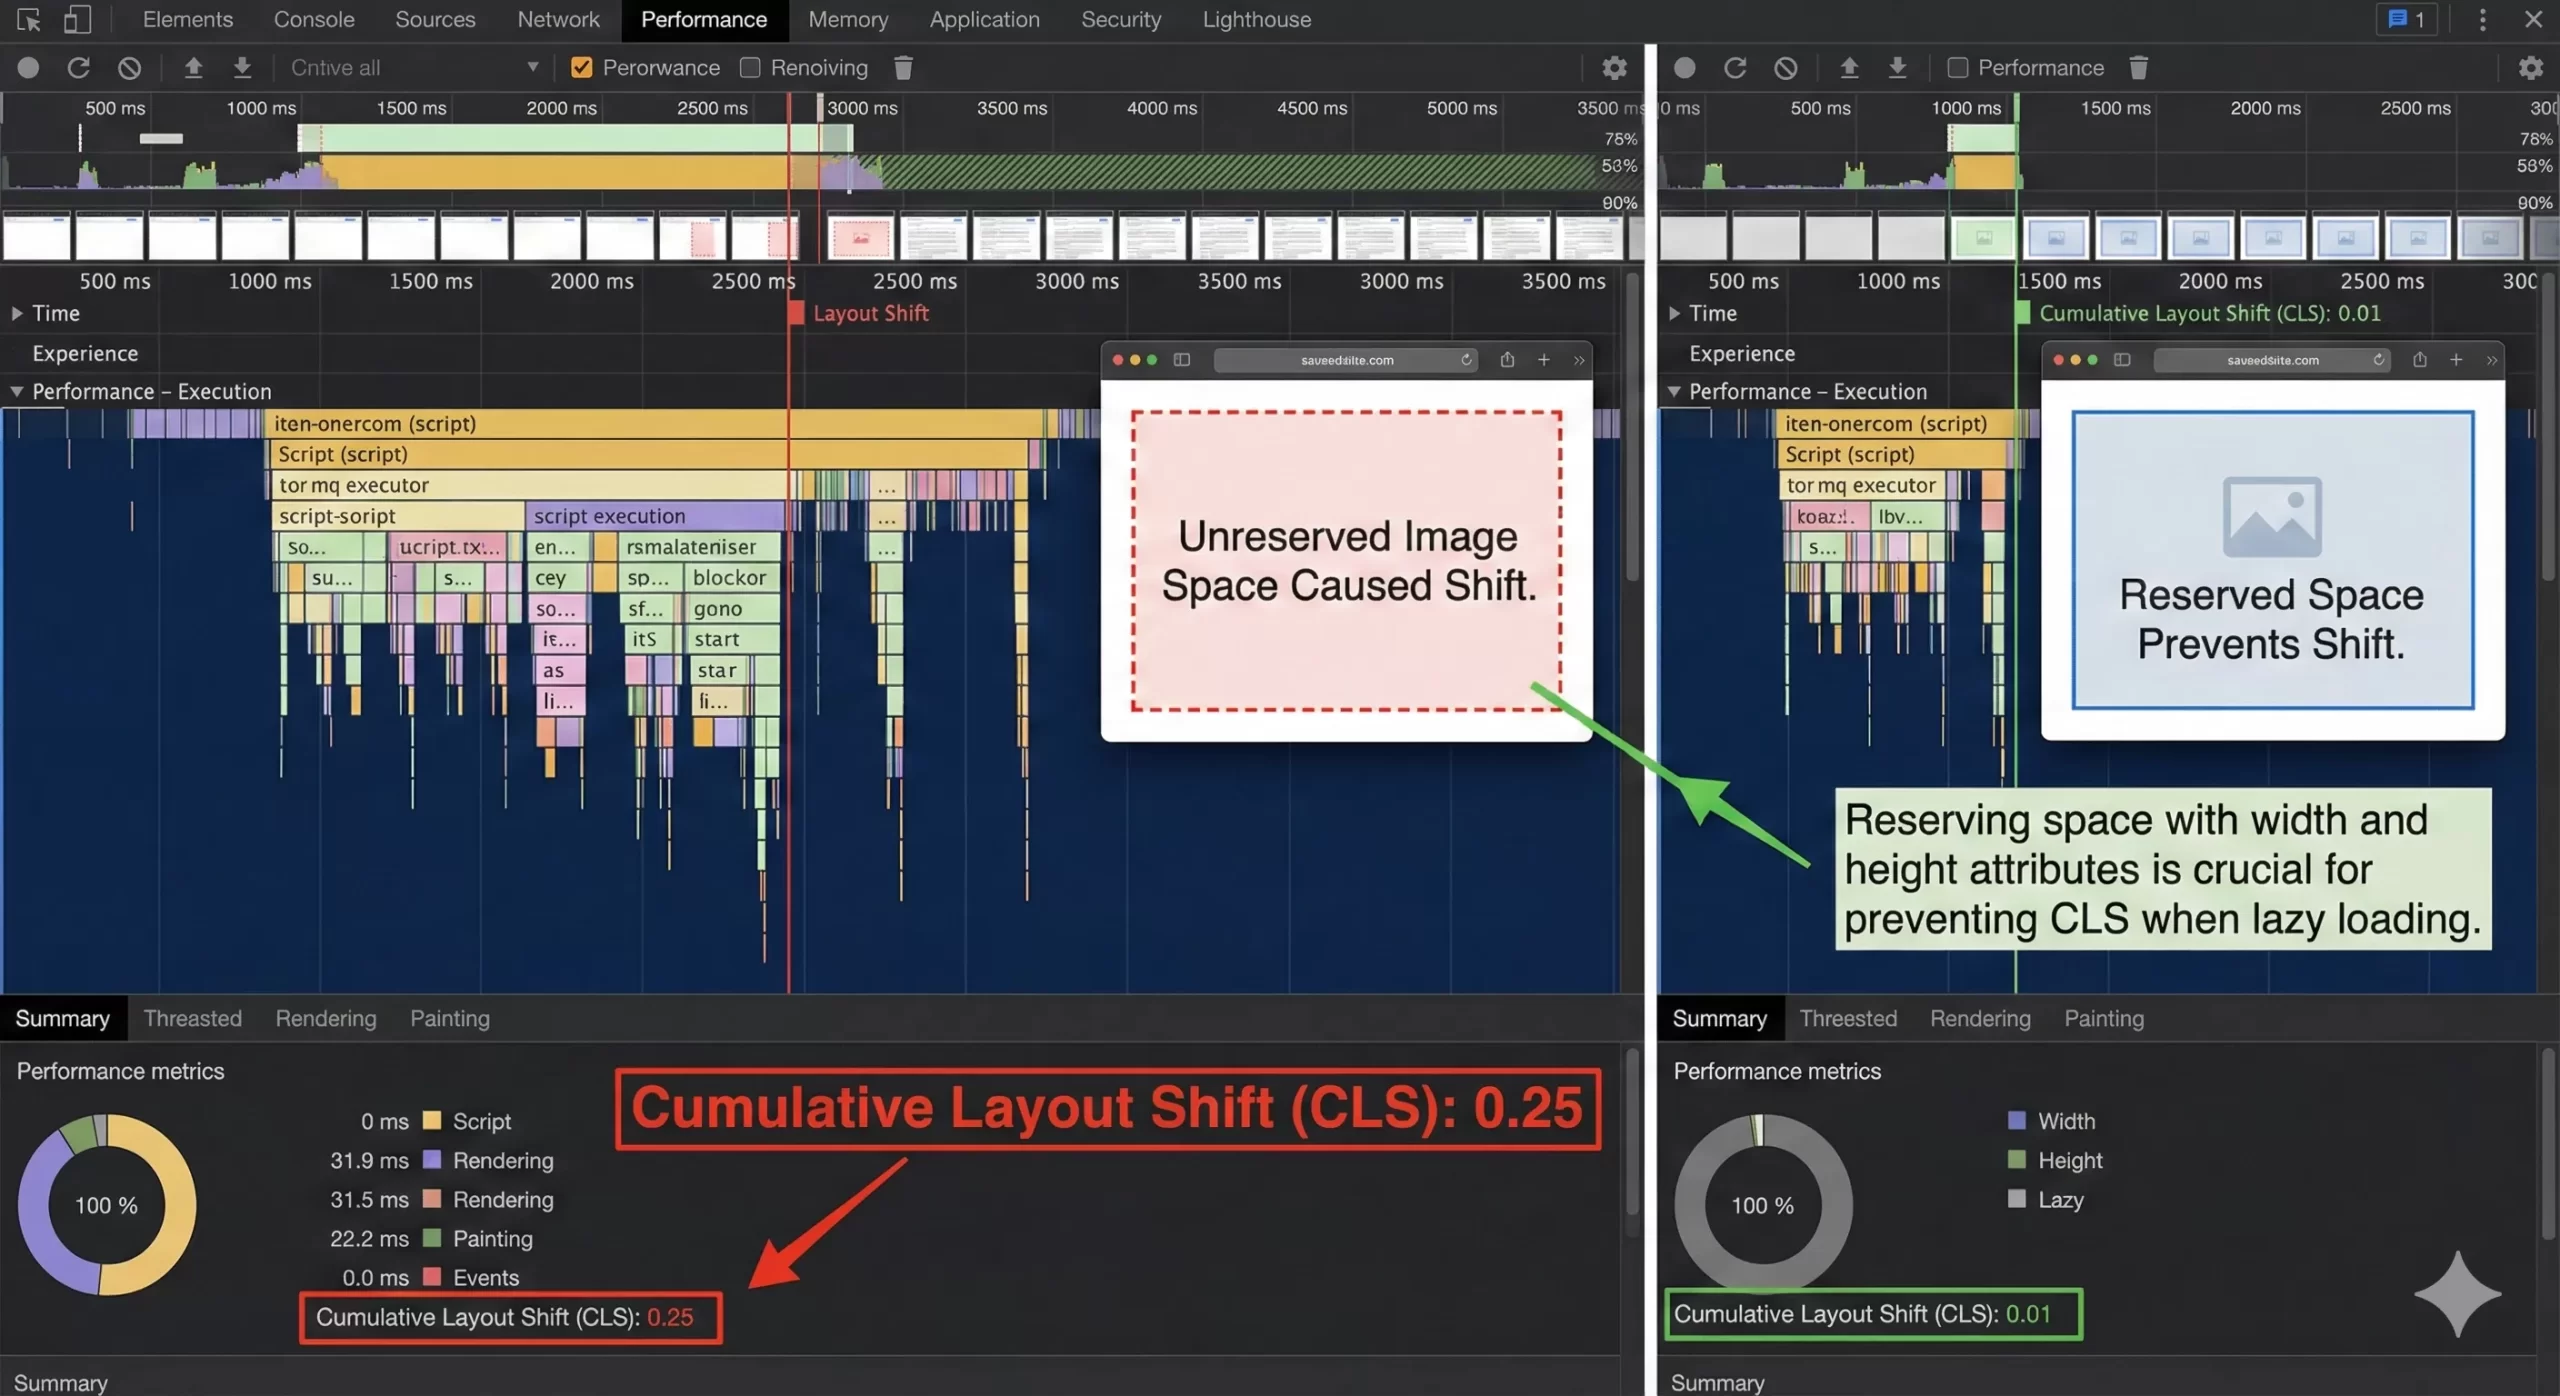
One common pitfall when you Lazy Load Images in WordPress is the dreaded layout shift. If an image loads after the text around it has rendered, the text might “jump” down to make room for the image. This is a poor user experience and a negative ranking factor for Google.
To prevent this, you must ensure your images have width and height attributes defined in the HTML. Alternatively, you can use CSS aspect-ratio boxes. The code snippets provided above preserve existing attributes, so as long as your media library adds dimensions (which WordPress does by default), you should be safe.
Testing Your Implementation
After implementing the code, you need to verify that it is actually working. Do not just look at the page; the images might load so fast you cannot tell the difference. You need to use Developer Tools.
1. Open your website in Chrome or Firefox.
2. Right-click and select Inspect.
3. Go to the Network tab.
4. Reload the page.
5. Filter by Img.
Initially, you should only see the images that are visible at the top of the page. As you scroll down, watch the Network tab. You should see new image requests appearing in real-time as you scroll. If you see this, congratulations! You have successfully managed to Lazy Load Images in WordPress without a single plugin.
Common Issues and Troubleshooting
While this process is straightforward, you might encounter a few hiccups. If images are not appearing at all, check your JavaScript console for errors. It is often due to a syntax error in the JS file or a conflict with a caching plugin that is also trying to minify your scripts.
Another issue is “above the fold” lazy loading. You generally do not want to lazy load the very first image on your post (like the featured image). Delaying the main image can hurt your Largest Contentful Paint (LCP) score. To fix this, you can modify the PHP function to skip the first image in the content array, or manually add a class like skip-lazy to your featured images.
Conclusion
Speed is no longer a luxury; it is a necessity. By taking the time to manually implement these features, you ensure your WordPress site remains lean, efficient, and Google-friendly. You have stripped away the reliance on heavy external plugins and gained a deeper understanding of how your theme handles media.
Whether you choose the simple native attribute method or the robust Intersection Observer method, the goal remains the same: deliver content to your users as fast as possible. When you take the steps to Lazy Load Images in WordPress correctly, you are investing in the long-term health and ranking potential of your website. Now, go ahead and implement this on your dev site, run your speed tests, and watch those scores climb!