
Running a successful eCommerce store often involves a delicate balancing act between maximizing sales and managing inventory distribution. A common scenario store owners face is the need to restrict the number of items a single customer can buy. whether you are launching a high-demand limited edition product, running a “loss leader” promotion, or simply trying to prevent scalpers from wiping out your stock, the ability to limit product quantity per user is essential. Without a mechanism to limit product quantity per user, your store is vulnerable to bulk buyers who damage the experience for your genuine customers.
Unfortunately, standard WooCommerce installations do not provide a granular setting to define a strict “Max Quantity” cap on a per-product basis. While there are dozens of plugins available, they often come with bloat, subscription fees, or unnecessary features. In this guide, we will solve this problem using a lightweight, code-first approach. We will create a custom solution that allows you to easily limit product quantity per user directly from the native product data tab, ensuring a seamless workflow for store managers and a fair shopping experience for customers.
Prerequisites
This is a technical implementation that involves modifying core theme files. Ensure your environment meets the following criteria before proceeding:
- WordPress 6.2+: Ensure you are running a recent version of WordPress.
- WooCommerce 8.0+: The hooks used in this guide are standard, but recent versions ensure compatibility.
- PHP 7.4 or 8.0+: Recommended for optimal performance and security.
- FTP/SFTP Access: To edit the
functions.phpfile or create a custom plugin. - Code Editor: VS Code or Sublime Text is recommended over the WordPress file editor.
- Backup Strategy: A complete backup of your site database and files.
Backup Required
functions.php without a backup can lead to critical errors. We recommend using a strictly isolated staging environment for testing.Step 1: Add Custom Limit Field to Product Settings
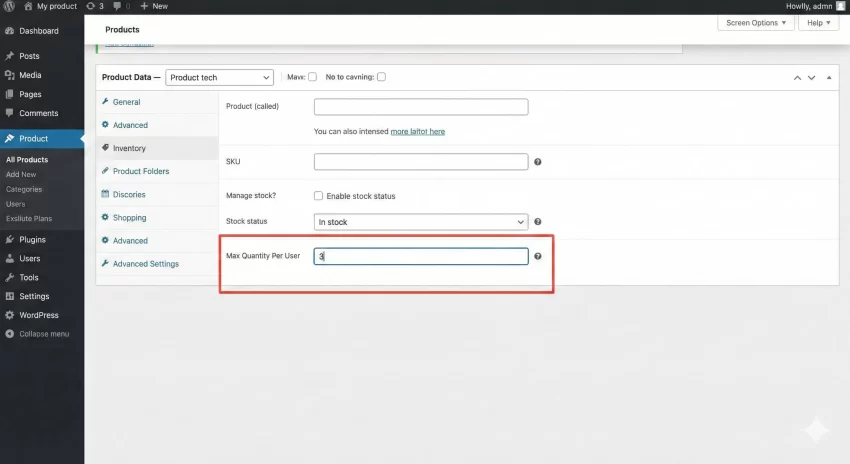
To effectively limit product quantity per user, we first need a user interface (UI) where the store administrator can define the limit. Hardcoding a limit (e.g., “max 5 items”) is bad practice because it applies globally to every product. Instead, we want a flexible system where Product A can have a limit of 2, while Product B has no limit at all.
We will achieve this by hooking into the WooCommerce “Product Data” metabox. Specifically, we will target the woocommerce_product_options_inventory_product_data action hook to inject a numeric input field right inside the “Inventory” tab. This keeps the UI native and intuitive for the shop manager.
Injecting the Input Field
The code below utilizes the woocommerce_wp_text_input() helper function. This is the standard way to add fields in WooCommerce, ensuring that our new input looks and feels exactly like the default stock management fields.
/**
 * Add "Max Quantity" input field to the Inventory tab in Product Data.
 *
 * @return void
 */
function pnet_add_max_quantity_field() {
    echo '<div class="options_group">';

    woocommerce_wp_text_input( array(
        'id'          => '_pnet_max_qty',
        'label'       => __( 'Max Quantity Per User', 'pnet-domain' ),
        'placeholder' => 'e.g., 3',
        'desc_tip'    => 'true',
        'description' => __( 'Enter the maximum number of items a single user can purchase per order. Leave blank for no limit.', 'pnet-domain' ),
        'type'        => 'number',
        'custom_attributes' => array(
            'step' => '1',
            'min'  => '1',
        ),
    ) );

    echo '</div>';
}
add_action( 'woocommerce_product_options_inventory_product_data', 'pnet_add_max_quantity_field' );
Once you add this code to your theme’s functions file, navigate to any product edit screen and click on the “Inventory” tab. You will see the new field.
Saving the Custom Field Data
Displaying the field is only the first half of the task. We must also sanitize and save the value when the product is updated or published. We will use the woocommerce_process_product_meta hook to handle the saving process. The data will be stored in the wp_postmeta table, allowing us to retrieve it easily later using get_post_meta().
/**
 * Save the "Max Quantity" field value to post meta.
 *
 * @param int $post_id The ID of the product being saved.
 * @return void
 */
function pnet_save_max_quantity_field( $post_id ) {
    // Check if our specific field was posted
    $max_qty = isset( $_POST['_pnet_max_qty'] ) ? sanitize_text_field( $_POST['_pnet_max_qty'] ) : '';

    if ( '' !== $max_qty ) {
        // Update the meta field if a value exists
        update_post_meta( $post_id, '_pnet_max_qty', esc_attr( $max_qty ) );
    } else {
        // Clean up the database by removing the key if the user cleared the field
        delete_post_meta( $post_id, '_pnet_max_qty' );
    }
}
add_action( 'woocommerce_process_product_meta', 'pnet_save_max_quantity_field' );
Pro Tip
delete_post_meta when a custom field is empty. This prevents your database from filling up with empty rows, keeping your query performance high as your store grows.You might also like:

Step 2: Validate “Add to Cart” Actions
Now that we have stored the limit, we need to enforce it. The most critical point of enforcement is the moment a customer clicks the “Add to Cart” button. We need to intercept this action, calculate the total quantity, and block it if it exceeds our threshold. This is the core logic to limit product quantity per user.
We will use the woocommerce_add_to_cart_validation filter. This filter provides access to the product ID and the quantity being added. If we return false from this function, WooCommerce will halt the process and display an error message to the user.
Checking Cart Contents Against the Limit
The logic is slightly complex because we cannot just check the quantity being added. We must also check the quantity already in the cart. For example, if the limit is 5, and the user has 3 in the cart, they should only be allowed to add 2 more. If they try to add 3, the validation must fail.
/**
 * Validate Add to Cart action against the custom Max Quantity limit.
 *
 * @param bool $passed Validation status (true/false).
 * @param int $product_id The product ID being added.
 * @param int $quantity The quantity being added in this specific action.
 * @return bool
 */
function pnet_validate_add_to_cart_limit( $passed, $product_id, $quantity ) {

    // 1. Retrieve the Max Limit we set in Step 1
    $max_limit = get_post_meta( $product_id, '_pnet_max_qty', true );

    // If no limit is set, or limit is 0, we skip validation
    if ( empty( $max_limit ) || $max_limit <= 0 ) {
        return $passed;
    }

    $max_limit = intval( $max_limit );
    $current_cart_count = 0;

    // 2. Iterate through the current cart to count existing items of this product
    foreach ( WC()->cart->get_cart() as $cart_item_key => $cart_item ) {
        // We check for matching Product IDs or Variation IDs
        if ( $cart_item['product_id'] == $product_id || ( isset( $cart_item['variation_id'] ) && $cart_item['variation_id'] == $product_id ) ) {
            $current_cart_count += $cart_item['quantity'];
        }
    }

    // 3. Calculate the total potential quantity (Existing + New)
    $total_quantity = $current_cart_count + $quantity;

    // 4. Validate and trigger error if limit is exceeded
    if ( $total_quantity > $max_limit ) {
        $passed = false;

        // Fetch product title for a better user error message
        $product_title = get_the_title( $product_id );

        $message = sprintf(
            __( 'Sorry, you can only purchase a maximum of %d units of "%s". You currently have %d in your cart.', 'pnet-domain' ),
            $max_limit,
            $product_title,
            $current_cart_count
        );

        // Use wc_add_notice to display the error bubble
        wc_add_notice( $message, 'error' );
    }

    return $passed;
}
add_filter( 'woocommerce_add_to_cart_validation', 'pnet_validate_add_to_cart_limit', 10, 3 );
This code ensures that no matter how many times a user clicks “Add to Cart,” they can never accumulate more than the allowed amount. This effectively secures the first entry point to limit product quantity per user.
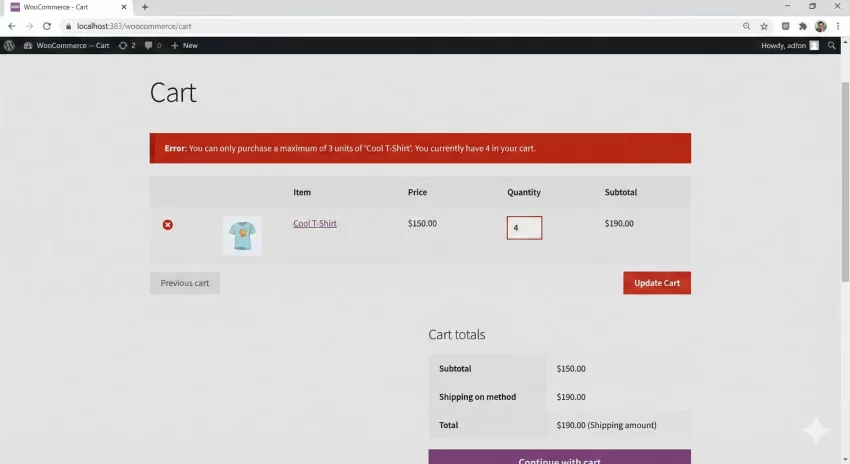
Step 3: Restrict Cart Page Quantity Updates
Securing the “Add to Cart” button is not enough. Sophisticated users or those simply browsing the Cart page might try to increase the quantity using the input spinner on the /cart/ page itself. If we do not validate this step, a user could add 1 item (passing step 2 validation) and then change that 1 to 50 on the cart page.
To plug this hole and securely limit product quantity per user, we use the woocommerce_update_cart_validation filter. This hook fires specifically when a user updates quantities in the cart view.
/**
 * Validate Cart Update actions (changing quantity on the cart page).
 *
 * @param bool $passed Validation status.
 * @param string $cart_item_key The unique hash key of the cart item.
 * @param array $values The cart item values.
 * @param int $quantity The new quantity being requested.
 * @return bool
 */
function pnet_validate_cart_update_limit( $passed, $cart_item_key, $values, $quantity ) {

    $product_id = $values['product_id'];
    $max_limit  = get_post_meta( $product_id, '_pnet_max_qty', true );

    // If no limit exists, allow the update immediately
    if ( empty( $max_limit ) || $max_limit <= 0 ) {
        return $passed;
    }

    $max_limit = intval( $max_limit );

    // Check if the requested new quantity exceeds the limit
    if ( $quantity > $max_limit ) {
        $passed = false;

        $product_title = get_the_title( $product_id );

        $message = sprintf(
            __( 'You cannot increase the quantity of "%s" to %d. The maximum allowed per order is %d.', 'pnet-domain' ),
            $product_title,
            $quantity,
            $max_limit
        );

        wc_add_notice( $message, 'error' );
    }

    return $passed;
}
add_filter( 'woocommerce_update_cart_validation', 'pnet_validate_cart_update_limit', 10, 4 );
Intermediate
You might also like:

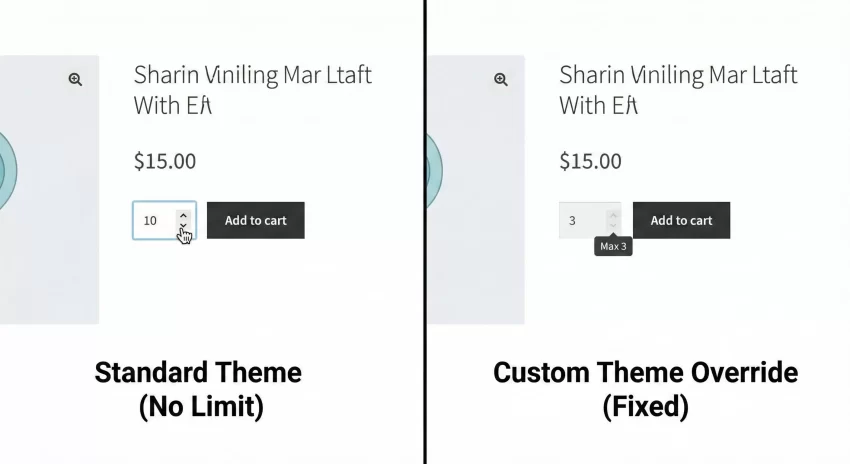
Step 4: Optimize Frontend Input Fields
While server-side validation is necessary for security, it is poor User Experience (UX) to let a user select “10” and then yell at them with an error message. It is much better to prevent them from selecting “10” in the first place. We can achieve this by modifying the HTML output of the quantity input field.
WooCommerce provides the woocommerce_quantity_input_args filter, which allows us to inject attributes like min, max, and step into the quantity input box. By setting the max attribute to our custom limit, the browser’s native spinner will stop allowing increments once the limit is reached.
/**
 * Set the "max" HTML attribute on the quantity input field.
 *
 * @param array $args The input arguments (min, max, step, value).
 * @param object $product The product object.
 * @return array
 */
function pnet_limit_quantity_input_args( $args, $product ) {

    // Safety check: ensure product object is valid
    if ( ! is_object( $product ) ) {
        return $args;
    }

    $product_id = $product->get_id();
    $max_limit  = get_post_meta( $product_id, '_pnet_max_qty', true );

    // If a limit is set, apply it to the 'max_value' argument
    if ( ! empty( $max_limit ) && $max_limit > 0 ) {
        $args['max_value'] = intval( $max_limit );

        // Optional: Ensure the current input value doesn't start higher than max
        // This handles edge cases where a limit is lowered after an item is in the cart
        if ( isset( $args['input_value'] ) && $args['input_value'] > $max_limit ) {
            $args['input_value'] = $max_limit;
        }
    }

    return $args;
}
add_filter( 'woocommerce_quantity_input_args', 'pnet_limit_quantity_input_args', 10, 2 );
By implementing this step, you significantly reduce the friction for your customers. They will visually see that they cannot add more items, which implicitly communicates the rule to limit product quantity per user without needing an error message.
Must Read: Boost Profits: How to Set a WooCommerce Minimum Order Amount Easily
Step 5: Handling Variable Products
Variable products (e.g., T-Shirt with sizes S, M, L) add a layer of complexity. The code we have written so far attaches the limit to the Parent Product ID. This is usually the desired behavior: you want to limit product quantity per user to 2 items total, regardless of whether they pick one Small and one Medium.
However, if you wish to apply limits to specific variations (e.g., limit “Blue” to 1 but allow “Red” to 5), you would need to adjust the hook in Step 1 to target woocommerce_product_after_variable_attributes and save the meta against the $variation_id. For most standard use cases, the parent-level limit (which we implemented above) is safer and easier to manage.
Common Errors & Troubleshooting
Even with clean code, WordPress environments can be unpredictable. Here are common issues developers face when trying to limit product quantity per user and how to resolve them.
1. The “Max Quantity” Field Doesn’t Save
If you input a number in the backend, save the product, and the number disappears, the issue is likely in the pnet_save_max_quantity_field function. Verify that you are hooking into woocommerce_process_product_meta. Also, check if you have any caching plugins active (like Redis or Memcached) that might be serving a stale version of the admin page.
2. Validation Doesn’t trigger for Administrators
By default, the code provided applies to all users, including admins. If you find the validation isn’t working for you while testing, ensure you haven’t wrapped the validation logic in a if ( ! current_user_can('administrator') ) check. If you want to exempt admins, you can add that check explicitly.
3. Theme Overrides
If the Frontend UI Step (Step 4) isn’t working and the spinner goes past your limit, your theme might be overriding the standard WooCommerce quantity input template. Check your theme folder for /woocommerce/global/quantity-input.php. If your theme has hardcoded the input field without using the standard $args array, the filter woocommerce_quantity_input_args will not work. You may need to edit that template file manually to respect the max value.
Conclusion
Controlling inventory flow is crucial for high-demand stores. By implementing the steps above, you have created a robust system to limit product quantity per user that is superior to many paid plugins. You now have a custom backend setting, server-side validation for security, and frontend integration for a better user experience.
This code-based approach keeps your site lightweight and gives you full control over the logic. Remember to always test these changes on a staging site before pushing them to your live store.