
If you have ever built a custom client portal or a comprehensive lead generation system, you know that consistent cross-browser UI is critical. The default HTML5 date input behaves unpredictably across different browsers, often ruining a polished design. To fix this, implementing a robust contact form 7 datepicker powered by jQuery UI is the industry standard solution. This guide will walk you through replacing the native, inconsistent browser date inputs with a clean, fully customizable jQuery UI calendar, ensuring flawless user experience on any device.
Implementing a proper contact form 7 datepicker requires loading the necessary core WordPress scripts, modifying your form syntax to bypass default browser behaviors, and writing a clean initialization script to bind the calendar interface. Let’s dive into the technical execution.
For Developers
Prerequisites
- WordPress 6.0 or higher installed.
- Contact Form 7 plugin active and functioning.
- Access to your child theme’s
functions.phpor a custom functionality plugin. - Basic understanding of WordPress hook architecture.
- A backup of your current site state.
Step 1: Enqueue jQuery UI Assets
WordPress bundles jQuery UI within its core, but it does not load it on the front end by default to save bandwidth. To build our contact form 7 datepicker, we must specifically tell WordPress to enqueue the jquery-ui-datepicker dependency. We also need to load a CSS theme so the calendar does not render as an unstyled list of numbers.
Registering the Core Scripts
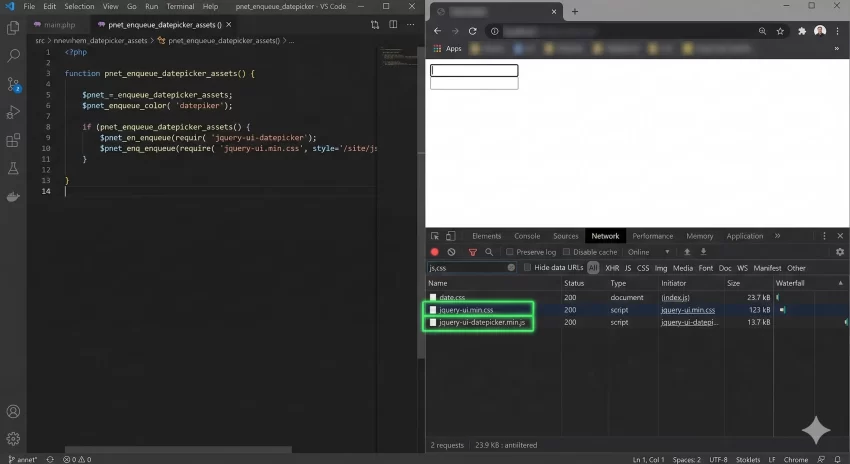
We will use the standard wp_enqueue_script function to securely load the required files. Open your child theme’s functions.php and add the following code snippet. This ensures the contact form 7 datepicker core functionality is available before our custom initialization script runs.
function pnet_enqueue_datepicker_assets() {
    // Enqueue the core jQuery UI datepicker script bundled with WordPress
    wp_enqueue_script('jquery-ui-datepicker');

    // Enqueue a standard jQuery UI CSS theme (Smoothness) from a CDN
    wp_enqueue_style(
        'jquery-ui-css',
        'https://cdnjs.cloudflare.com/ajax/libs/jqueryui/1.13.2/themes/smoothness/jquery-ui.min.css',
        array(),
        '1.13.2'
    );

    // Enqueue our custom initialization script
    wp_enqueue_script(
        'pnet-cf7-datepicker-init',
        get_stylesheet_directory_uri() . '/js/cf7-datepicker.js',
        array('jquery', 'jquery-ui-datepicker'),
        '1.0.0',
        true
    );
}
add_action('wp_enqueue_scripts', 'pnet_enqueue_datepicker_assets');
Choosing a CSS Theme
In the code above, we loaded the ‘Smoothness’ theme from a CDN. You can easily swap this out for other official jQuery UI themes (like Base, UI-Lightness, or Redmond) by changing the CDN URL, or you can enqueue your own custom CSS file if your contact form 7 datepicker needs to match your site’s specific dark theme or branding constraints.
You might also like: Frustrated by File Limits? How to Increase WordPress Maximum Upload Size Easily
Step 2: Configure the Contact Form 7 Field
One of the most common mistakes developers make when creating a contact form 7 datepicker is using the native [date] tag provided by the CF7 generator. If you use [date], mobile browsers and modern desktop browsers will force their native HTML5 UI over your jQuery UI calendar, creating a disastrous, overlapping dual-calendar interface.
Avoiding the Default Date Tag
Instead of the [date] tag, we must use a standard text input field and attach a specific ID or Class to it. This tells the browser to treat it as a standard text field, preventing the native HTML5 calendar from firing, while giving our jQuery script a specific DOM element to target for the contact form 7 datepicker injection.
Setting Up the Text Field
Navigate to your WordPress dashboard, go to Contact -> Contact Forms, and edit your target form. Insert the following standard text tag where you want your calendar to appear:
<label> Select your preferred date
    [text* pnet-appointment-date id:pnet-datepicker class:pnet-date-input placeholder "YYYY-MM-DD"]
</label>
Crucial Configuration
Step 3: Initialize the Datepicker via JavaScript
With the scripts loaded and the HTML structure prepared, we need to bind the jQuery UI widget to our text field. This is where the actual contact form 7 datepicker comes to life.
Writing the Initialization Script
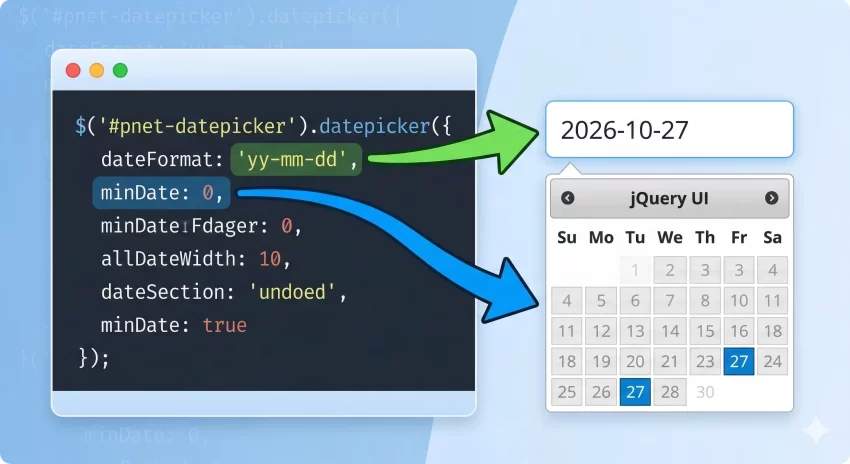
Create a new file in your child theme at /js/cf7-datepicker.js (matching the path we enqueued in Step 1). Inside this file, we will initiate the calendar and apply essential configurations like the date format and restricting past dates. Check the official jQuery UI API documentation for more advanced parameter tuning.
jQuery(document).ready(function($) {
    // Initialize the contact form 7 datepicker
    function pnet_init_datepicker() {
        $('#pnet-datepicker').datepicker({
            dateFormat: 'yy-mm-dd', // Standard database-friendly format
            minDate: 0,             // Prevent selection of past dates
            changeMonth: true,      // Allow month navigation via dropdown
            changeYear: true        // Allow year navigation via dropdown
        });
    }

    // Run on initial page load
    pnet_init_datepicker();
});
Handling CF7 AJAX Events
Contact Form 7 uses AJAX for form submissions. If a user submits the form and it fails validation (e.g., they missed a required field), CF7 dynamically replaces the form DOM elements. This will strip the contact form 7 datepicker binding, leaving a dead text field. We must re-initialize the script after CF7 AJAX events.
jQuery(document).ready(function($) {
    function pnet_init_datepicker() {
        $('#pnet-datepicker').removeClass('hasDatepicker').datepicker({
            dateFormat: 'yy-mm-dd',
            minDate: 0
        });
    }

    pnet_init_datepicker();

    // Re-initialize after Contact Form 7 DOM manipulation
    document.addEventListener('wpcf7invalid', function() {
        pnet_init_datepicker();
    }, false);

    document.addEventListener('wpcf7mailsent', function() {
        pnet_init_datepicker();
    }, false);
});
Common Errors and Troubleshooting
Even with careful execution, implementing a contact form 7 datepicker can run into environment-specific issues. Here are the most common problems and their solutions.
Why is my datepicker showing behind my site header?
This is a standard CSS z-index conflict. Your site header or modal likely has a higher z-index than the jQuery UI calendar widget. To fix this, add the following to your custom CSS to force the contact form 7 datepicker to the front: #ui-datepicker-div { z-index: 9999 !important; }.
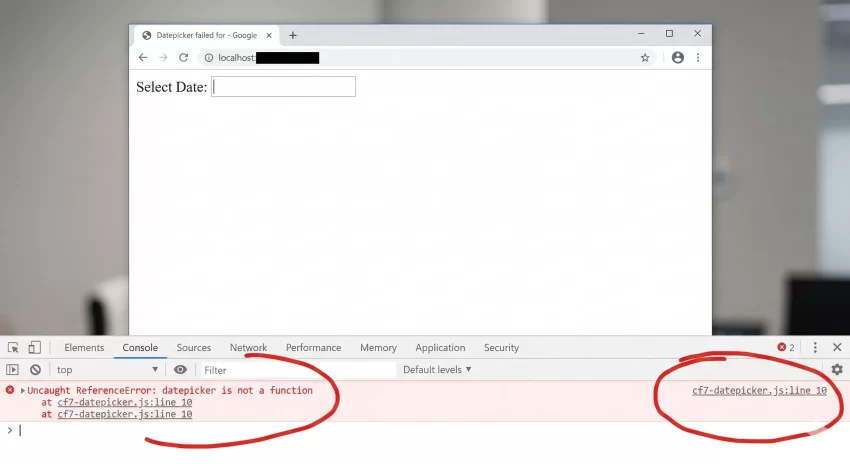
Why is the calendar not appearing when I click the input field?
This usually means a JavaScript error is halting execution, or jQuery UI was not enqueued properly. Open your browser console (F12) and look for “Uncaught ReferenceError: jQuery is not defined” or “datepicker is not a function”. Ensure your script depends on array('jquery', 'jquery-ui-datepicker') as shown in Step 1.
Why does the calendar disappear after a failed form submission?
As mentioned in Step 3, CF7 rebuilds the form on AJAX validation failure. You must hook into the wpcf7invalid and wpcf7spam DOM events to re-trigger your initialization function, ensuring the contact form 7 datepicker remains functional.
You might also like: Designing WordPress Dark Mode: The Ultimate Developer Guide
Conclusion
By bypassing the restrictive native HTML5 date inputs and explicitly enqueuing standard WordPress core libraries, you can establish a highly reliable, cross-browser compatible interface for your users. The combination of a standard text field in CF7, the right PHP enqueue actions, and careful JavaScript event delegation guarantees your solution survives AJAX form submissions and theme reloads.
Implementing a proper contact form 7 datepicker is a fundamental skill for custom WordPress development. It eliminates data-entry friction, maintains the integrity of your form styling, and ensures that whether your visitor is on a vintage desktop or a modern smartphone, their scheduling experience remains completely flawless.


