When running a membership site, online store, or a multi-author blog, the default dashboard routing is rarely what you want. Managing a custom WordPress login redirect strategy is crucial for delivering a tailored user experience. Instead of forcing customers, subscribers, and contributors into the same generic backend interface, you can route them to specific pages that matter to them. This guide will walk you through the precise steps to intercept the authentication process and send users precisely where they need to go, based entirely on their assigned capabilities and roles.
Creating a dynamic WordPress login redirect not only improves your website’s professionalism but also secures your backend by keeping lower-level users out of the admin dashboard. In this comprehensive technical tutorial, we will explore the native hooks provided by the core software, write secure PHP logic, and handle edge cases to ensure a flawless experience.
Audience
Prerequisites for Custom User Routing
Before diving into the codebase to configure your WordPress login redirect, you must ensure your environment is prepared. Writing custom logic that hooks into the authentication flow can temporarily lock you out of your site if a syntax error occurs. Ensure you meet the following requirements:
- PHP 8.0 or higher for optimal performance and strict typing compatibility.
- A complete backup of your website files and database.
- Access to a staging environment for safe testing.
- FTP/SFTP access or a reliable File Manager to recover from fatal errors.
- An active Child Theme or a custom site-specific plugin for adding custom snippets.
Step 1: Understanding the Core Filter Hook
To implement a dynamic WordPress login redirect, you must become intimately familiar with the login_redirect filter. This specific hook fires immediately after a user successfully authenticates but before the server sends the HTTP location header to the browser. By hooking into this filter, developers can override the default destination.
The Anatomy of the Hook
The core software provides three parameters to any function hooked to this filter. Understanding these parameters is the foundation of building a flawless WordPress login redirect.
$redirect_to: (string) The requested redirect destination URL passed as a query parameter.$request: (string) The URL the user was attempting to reach before being prompted to authenticate.$user: (WP_User|WP_Error) A WP_User object if authentication was successful, or a WP_Error object if it failed.
For official documentation on this hook, refer to the WordPress Code Reference for login_redirect.
Step 2: Preparing Your Custom Code Environment
When adding a custom WordPress login redirect, you should never edit core files. Furthermore, adding complex logic to your parent theme’s functions.php file is highly discouraged, as your code will be wiped out during the next theme update.
Choosing Between Child Themes and Plugins
The safest approach is to use a custom, site-specific plugin or a properly configured child theme. For functionality that pertains strictly to the operation of the site rather than its visual presentation, a custom plugin is the preferred architectural pattern. This ensures that your WordPress login redirect logic remains active even if you redesign your website and switch themes.
Backup Required
You might also like: Effortless Guide: How to Enable WordPress Maintenance Mode (Plugin vs. Code)
Step 3: Writing the Base Redirect Function
Now we will draft the foundational skeleton for our WordPress login redirect. We will create a function, hook it to the correct filter, and establish the boilerplate logic to check if the user object is valid before proceeding with any role checks.
The Boilerplate Setup
In this sub-step, we define the PHP function pnet_custom_login_redirect and attach it using the standard add_filter method. Notice that we request all three available parameters by setting the accepted arguments integer to 3.
/**
 * Base logic for custom user routing.
 */
function pnet_custom_login_redirect( $redirect_to, $request, $user ) {
    // 1. Check for basic errors. If the user object is actually an error, abort.
    if ( isset( $user->errors ) || is_wp_error( $user ) ) {
        return $redirect_to;
    }

    // 2. Base fallback URL (if no roles match later)
    $fallback_url = home_url();

    return $fallback_url;
}
add_filter( 'login_redirect', 'pnet_custom_login_redirect', 10, 3 );
This simple WordPress login redirect ensures that if there are any login errors (like a wrong password), we do not attempt to redirect them to a custom dashboard. Instead, we let the core software handle the error display naturally.
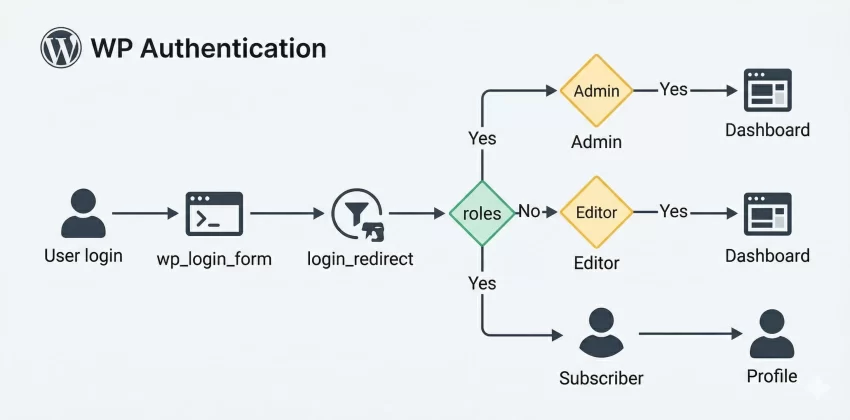
Step 4: Implementing Role-Based Logic
This is the core of our WordPress login redirect tutorial. We need to extract the roles from the user object and conditionally route the user based on those capabilities. The WP_User object contains a property called roles, which is an array of role slugs assigned to the user.
Evaluating the User Object
Users can have multiple roles, but typically, we want to route them based on their primary or highest capability role. We will use standard PHP array checking functions to determine the destination URL. If you are unfamiliar with the user object structure, you can study the WP_User Class documentation.
The Complete Routing Snippet
Here is the fully fleshed-out code for your WordPress login redirect, handling Administrators, WooCommerce Customers, and standard Subscribers.
/**
 * Role-based routing logic.
 */
function pnet_role_based_login_redirect( $redirect_to, $request, $user ) {
    // Bail if there's an authentication error
    if ( isset( $user->errors ) || is_wp_error( $user ) ) {
        return $redirect_to;
    }

    // Ensure the user has roles assigned
    if ( empty( $user->roles ) || ! is_array( $user->roles ) ) {
        return home_url();
    }

    // Check if user is an Administrator
    if ( in_array( 'administrator', $user->roles, true ) ) {
        // Send admins straight to the backend
        return admin_url();
    }

    // Check if user is a WooCommerce Customer
    if ( in_array( 'customer', $user->roles, true ) ) {
        // Route to the custom WooCommerce account endpoint
        if ( function_exists( 'wc_get_page_permalink' ) ) {
            return wc_get_page_permalink( 'myaccount' );
        }
    }

    // Check if user is a standard Subscriber
    if ( in_array( 'subscriber', $user->roles, true ) ) {
        // Route to a custom front-end dashboard
        return site_url( '/member-dashboard/' );
    }

    // Fallback for all other roles
    return home_url();
}
add_filter( 'login_redirect', 'pnet_role_based_login_redirect', 10, 3 );
Pro Tip
home_url(), site_url(), or admin_url() rather than hardcoding absolute URLs. This ensures your code continues to work seamlessly if you migrate the site from a staging environment to production. Step 5: Handling Edge Cases and Fallbacks
An effective WordPress login redirect script must account for edge cases. What happens if a user is logging in during a WooCommerce checkout process? What if they were trying to access a specific restricted post and were prompted to log in? In those cases, you might want to honor the $request parameter rather than blindly enforcing the role-based route.
Respecting the Original Request URL
To improve user experience, we can modify our WordPress login redirect to check if the user was attempting to reach a specific page. If the $request variable is populated with a non-admin URL, we can send them back there instead of the generic role dashboard.
/**
 * Advanced routing respecting original requests.
 */
function pnet_advanced_login_redirect( $redirect_to, $request, $user ) {
    if ( isset( $user->errors ) || is_wp_error( $user ) ) {
        return $redirect_to;
    }

    // If there was a specific frontend request, honor it.
    // Ensure we aren't just redirecting back to the default wp-admin or wp-login page.
    $parsed_request = wp_parse_url( $request );
    if ( ! empty( $request ) && isset( $parsed_request['path'] ) ) {
        if ( ! str_contains( $parsed_request['path'], 'wp-admin' ) && ! str_contains( $parsed_request['path'], 'wp-login' ) ) {
            return $request;
        }
    }

    // Proceed with normal role-based logic if no valid request was found
    if ( in_array( 'administrator', $user->roles, true ) ) {
        return admin_url();
    }

    return home_url( '/welcome/' );
}
add_filter( 'login_redirect', 'pnet_advanced_login_redirect', 99, 3 );
Intermediate
99 in the add_filter function. We use a high priority to ensure our custom WordPress login redirect overrides any default routing set by third-party plugins that might be trying to hook into the exact same process. You might also like: Designing WordPress Dark Mode: The Ultimate Developer Guide
Troubleshooting Common Errors
Implementing a custom WordPress login redirect is usually straightforward, but server environments and plugin conflicts can introduce challenges. Here is a comprehensive FAQ addressing the most common issues developers face.
Why is my redirect loop occurring?
A redirect loop happens when your WordPress login redirect sends a user to a page that immediately requires authentication again, or redirects them back to the login page. Ensure the destination URL (e.g., your custom member dashboard) is publicly accessible to authenticated users and does not contain restrictive logic that triggers another authentication check.
Why am I getting a White Screen of Death (WSOD)?
The WSOD is typically caused by a PHP fatal error in your custom WordPress login redirect code. This could be a missing semicolon, an unclosed bracket, or calling a function that doesn’t exist (like calling WooCommerce functions when WooCommerce is deactivated). Always check your server’s error_log file to pinpoint the exact line of code causing the failure.
Why is the redirect completely ignored?
If your code seems perfect but the WordPress login redirect isn’t triggering, it is likely a priority issue. Another plugin (like a security plugin or a membership plugin) is hooking into login_redirect at a later priority and overriding your destination. Try increasing your hook priority from 10 to 99 or even 999.
Does server caching affect the redirect?
Yes. Aggressive page caching or object caching can sometimes interfere with the authentication session setup. If you are experiencing inconsistent routing behavior, temporarily purge your server cache (Redis/Memcached) and exclude the login and redirect destination pages from your caching plugin’s rules.
Conclusion
Taking control over your authentication flow is one of the most impactful upgrades you can make for your users. By correctly utilizing the native filter hooks, checking the capabilities tied to the user object, and safely defining dynamic destination URLs, you eliminate the clunky default experience and replace it with a professional, streamlined journey.
Whether you are routing administrators to the backend, sending shoppers to their order history, or directing subscribers to premium content, mastering the custom WordPress login redirect ensures your platform feels cohesive, secure, and user-friendly. Always test your scripts on staging, watch out for plugin conflicts, and ensure your fallbacks are securely in place.


