
WordPress-generated emails can arrive with a generic sender name and an address that does not match your site, making legitimate notifications harder for recipients to recognize. You can Change WordPress Email Sender Name and set a matching sender address with the wp_mail_from_name and wp_mail_from filters. This guide uses a small site-specific plugin, so the customization stays separate from your theme and is straightforward to reverse.
These filters change the sender details WordPress supplies for messages sent through its mail API; they do not configure SMTP delivery or guarantee that messages reach the inbox. Before you begin, choose an address on your domain that your hosting provider or mail service authorizes for sending. Have a test mailbox ready so you can check the received sender details after adding the code.
- A WordPress site with file access and permission to add a plugin.
- PHP 8.0 or later, or a version supported by your installed WordPress release.
- A verified, authorized email address on your site domain for notifications.
- A current site backup and, when available, a staging environment.
- A test mailbox and a way to inspect the received message details.
Step 1: Understand Which Sender Details You Are Changing
A WordPress email has two sender details that are easy to confuse. The wp_mail_from_name filter controls the display name recipients see, such as Example Site Notifications. The wp_mail_from filter controls the sender email address, such as notifications@example.com. To Change WordPress Email Sender Name and align the address with your brand, you will set both values in the next steps.
These filters apply to messages sent through WordPress mail functions, including messages generated by core and plugins that use the WordPress mail API. They set the sender details WordPress passes along; they do not configure SMTP delivery, authenticate your domain, or guarantee inbox placement. An SMTP plugin, hosting mail system, sending provider, or recipient system may modify or replace the final message headers.
Use an address your mail provider authorizes for sending, then verify the message received by a test mailbox. WordPress documents the wp_mail_from filter and its expected email-address value. Treat the display name and address as separate settings: changing one does not automatically change the other.
Step 2: Create a Small Site-Specific Plugin
Keep this customization in a small site-specific plugin rather than adding it to a parent theme. Theme updates can replace edited theme files, and changing themes can disable theme-based code. A plugin keeps email behavior independent of presentation; a child theme can also work, but it ties the customization to that theme.
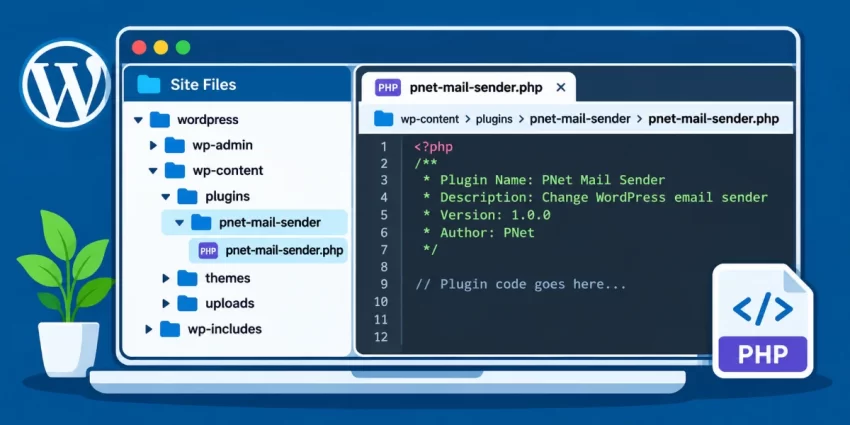
Create the directory wp-content/plugins/pnet-mail-sender/, then create pnet-mail-sender.php inside it. Use your hosting file manager, SFTP, or another trusted file-editing method. Add this valid plugin scaffold and save the file:
<?php
/**
 * Plugin Name: PNet Mail Sender
 * Description: Site-specific sender settings for WordPress mail.
 * Version: 1.0.0
 * Requires PHP: 8.0
 */

if (!defined('ABSPATH')) {
    exit;
}

function pnet_mail_sender_init() {
    // Sender filters will be registered here in the next step.
}
add_action('plugins_loaded', 'pnet_mail_sender_init');
The guard prevents the file from running outside WordPress. The prefixed initialization function provides a clear place for this plugin’s setup; the next step will add the sender filters there. Do not paste a second plugin header or duplicate the function when adding that code.
In the WordPress dashboard, open Plugins, locate PNet Mail Sender, and select Activate. If it does not appear, confirm the directory and PHP filename are in the correct location and that the plugin header is saved at the top of the file. Once active, the plugin can remain in place when you change themes.
You might also like:

Step 3: Add the Sender Name and Address Filters
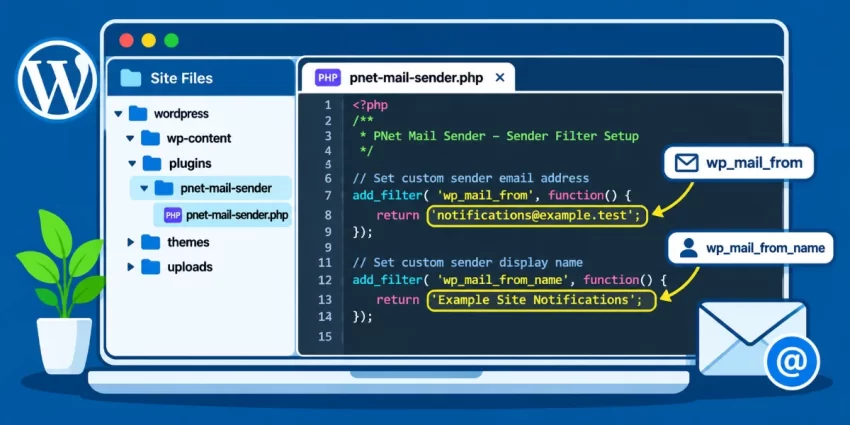
Open wp-content/plugins/pnet-mail-sender/pnet-mail-sender.php and replace the scaffold contents with the complete plugin below. This keeps the plugin header and initialization function in one place; do not add a second header or duplicate these callbacks elsewhere.
<?php
/**
 * Plugin Name: PNet Mail Sender
 * Description: Site-specific sender settings for WordPress mail.
 * Version: 1.0.0
 * Requires PHP: 8.0
 */

if (!defined('ABSPATH')) {
    exit;
}

function pnet_mail_sender_from($from_email) {
    return 'notifications@example.com';
}

function pnet_mail_sender_from_name($from_name) {
    return 'Example Site Notifications';
}

function pnet_mail_sender_init() {
    add_filter('wp_mail_from', 'pnet_mail_sender_from');
    add_filter('wp_mail_from_name', 'pnet_mail_sender_from_name');
}
add_action('plugins_loaded', 'pnet_mail_sender_init');
Replace notifications@example.com with an address on your domain that your host or sending provider authorizes. Replace Example Site Notifications with the plain-text name recipients should recognize. The first callback supplies the sender address through wp_mail_from; the second supplies the display name through wp_mail_from_name. Save the file and confirm the plugin remains active.
Email Delivery Note
Did you know: You can use WordPress Plugin Load Order to control the execution sequence of custom WordPress components, resolve plugin dependency conflicts, and build a more predictable initialization process without modifying WordPress core files.
Step 4: Test a WordPress Email and Inspect Its Headers
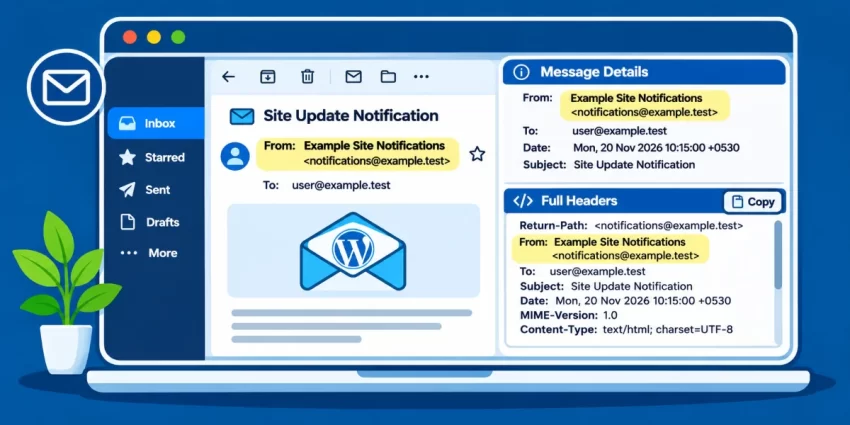
With the site-specific plugin active, send a test message from staging if available. Use a WordPress feature that sends email, such as a password reset, or a trusted mail-testing plugin. Send it to an inbox you can inspect. Check the visible sender name and address: they should match the display name and authorized domain address configured in the filters.
If your email client shows only a name or hides the address, open the message details or select the option to view the original message and full headers. Find the From header and confirm it contains the expected display name and address. Do not confuse it with Reply-To, which controls where replies go, or Return-Path, which is associated with mail delivery. If the headers differ, the sending provider or another plugin may be rewriting them.
For critical notifications, test more than one mailbox provider and confirm the message arrives as expected at each. A successful header check confirms the sender values made it into the received message; it does not by itself prove that domain authentication or inbox placement is correct.
Test Safely
You might also like:

Step 5: Adjust the Values or Remove the Customization
To update the sender name or address later, open wp-content/plugins/pnet-mail-sender/pnet-mail-sender.php and change the matching return value in its callback. For example, edit the address returned by pnet_mail_sender_from() to change the sender address, or edit the value returned by pnet_mail_sender_from_name() to change the display name. Save the file, then send another test email and inspect its From header to confirm the new value.
To undo the customization, deactivate PNet Mail Sender from the WordPress dashboard, or remove both filter registrations and their callback functions from the plugin. Then send a test message to verify that WordPress or your mail provider now supplies the expected sender details. Keep a backup of the original file until you have confirmed the change works.
Avoid registering competing sender callbacks in both the plugin and a theme. Multiple filters may run in sequence, making the final sender value difficult to predict and troubleshoot. Keep one source of control for these settings, and check any mail-related plugins if the received headers do not match the values in your callback.
You might also like:
Common Errors: Diagnose Sender Changes That Do Not Appear
If the sender details still look wrong, troubleshoot the path from WordPress to the recipient rather than assuming the filter code is the only cause. Check the received message details and headers, because an email client may hide part of the sender information.
Neither Sender Value Changes
Confirm that the site-specific plugin is active and that its PHP file is saved in the correct plugin directory. Check the PHP error log for syntax errors; do not enable public error display on a live site. Verify that both wp_mail_from and wp_mail_from_name filters are registered, and send a message through a WordPress feature that uses the WordPress mail API. A message sent directly by another service will not necessarily run these filters.
Only the Name or Address Changes
Each value has its own filter. If the display name is unchanged, check the callback registered with wp_mail_from_name. If the address is unchanged, check the callback registered with wp_mail_from. Confirm that each callback returns the intended value and that the relevant filter registration is present.
The Received Address Is Different
Inspect the full headers, then review your SMTP plugin, hosting mail configuration, and sending provider settings. These services can override sender headers. Also search the site code and mail-related plugins for duplicate callbacks on either filter; competing callbacks can make the final value difficult to predict.
Messages Are Rejected or Go to Spam
Use an address the host or sending provider authorizes, and verify domain authentication with that provider. Sender filters do not configure SMTP credentials, SPF, DKIM, or DMARC, and cannot fix delivery reputation or guarantee inbox placement. If the issue persists, review provider logs and the server PHP error log, keeping errors private from visitors.
Conclusion: Keep WordPress Sender Identity Clear and Testable
WordPress provides separate filters for the two sender details: wp_mail_from sets the email address, while wp_mail_from_name sets the display name. Registering both callbacks in a small site-specific plugin keeps this behavior independent of your theme, makes the settings easy to maintain, and gives you a straightforward way to reverse the change.
Choose an address on your domain that your host or sending provider authorizes, and use a clear name recipients will recognize. After activating or editing the plugin, send a test message and inspect its received From header—not only the name shown in the inbox. If a mail plugin or provider rewrites the sender, investigate those settings and check for duplicate filters before changing the callback values again.
Remember that setting message headers is not the same as configuring delivery. SMTP credentials, SPF, DKIM, and DMARC must be handled with the relevant hosting or mail provider when required. With an authorized sender identity and a simple header check, you can Change WordPress Email Sender Name while keeping the result clear, testable, and easy to undo.