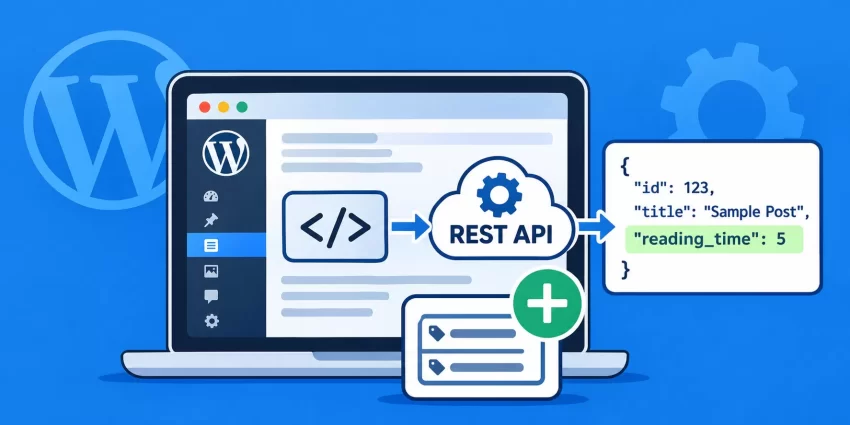
WordPress REST API responses often contain standard post information such as the title, content, excerpt, author, and publication date, but they may not include the additional metadata your application needs. This can become a limitation when building headless WordPress websites, custom Gutenberg integrations, mobile applications, or third-party services. Fortunately, you can extend the API without modifying WordPress core. In this guide, you will learn how to add WordPress REST API Custom Fields to JSON responses using native WordPress functions, including register_rest_field() and register_meta(). We will also cover practical examples, security considerations, testing, and common errors.
WordPress provides a flexible REST API architecture that allows developers to customize the data exposed by different endpoints. Instead of creating an entirely new endpoint or modifying existing core files, you can register additional fields and control how their values are retrieved, validated, and exposed to external applications.
Whether you need to expose custom post metadata, product information, calculated values, or application-specific data, implementing WordPress REST API Custom Fields is a straightforward process when you understand the available registration methods.
Step 1: Understand How WordPress REST API Custom Fields Work
Before implementing WordPress REST API Custom Fields, it is important to understand how WordPress structures its REST API responses. WordPress uses JSON (JavaScript Object Notation) to exchange information between the website and external applications. For example, requesting a published post through the WordPress REST API returns structured information about that post.
A standard post endpoint looks like this:
https://example.com/wp-json/wp/v2/posts/123
A typical response contains information similar to the following:
{
  "id": 123,
  "date": "2026-11-04T08:30:00",
  "slug": "wordpress-rest-api-guide",
  "status": "publish",
  "type": "post",
  "title": {
    "rendered": "WordPress REST API Guide"
  },
  "content": {
    "rendered": "<p>Example post content.</p>"
  },
  "excerpt": {
    "rendered": "<p>Example excerpt.</p>"
  }
}
Notice that the response does not automatically contain every custom field or piece of metadata stored against the post. If your application needs additional information, you must explicitly register that data for REST API access.
Why Add Custom Fields to JSON Responses?
There are several practical situations where WordPress REST API Custom Fields become useful:
- Headless WordPress: Expose additional post information to React, Next.js, Vue, or other frontend frameworks.
- Mobile applications: Provide custom information without requiring additional API requests.
- WooCommerce integrations: Expose application-specific product information where appropriate.
- Custom post types: Return additional information associated with portfolios, events, directories, or other content types.
- Third-party integrations: Make selected WordPress metadata available to external services.
- Custom frontend features: Return reading time, content ratings, author information, or other calculated values.
The important point is that WordPress REST API Custom Fields allow you to extend existing responses while keeping the standard WordPress endpoint structure intact.
You might also like:

Step 2: Prepare Your WordPress Development Environment
Before modifying REST API responses, make sure your development environment is ready. The implementation uses native WordPress PHP functions, so you do not need an additional plugin or external library.
Prerequisites
- WordPress 6.0 or later recommended.
- PHP 8.0 or later recommended.
- Basic knowledge of PHP and WordPress hooks.
- Access to your theme’s functions.php file or a site-specific plugin.
- REST API access enabled on your WordPress installation.
- A custom field or metadata value to expose through the API.
- A staging environment or complete website backup.
- REST API testing access through a browser, Postman, or cURL.
Where Should You Add the PHP Code?
You can implement WordPress REST API Custom Fields inside your active theme’s functions.php file. However, this is not always the best approach. If you change your theme, the customization may stop working.
For functionality that should remain available regardless of the active theme, create a site-specific plugin. This keeps your REST API modifications separate from presentation-related code and makes maintenance easier.
Pro Tip
You might also like:
Step 3: Create a Custom Field for Your WordPress Post
To understand how WordPress REST API Custom Fields work, let’s start with a practical example. Suppose you are building a custom frontend and want to display the estimated reading time for every blog post.
We will use a custom post meta key named _pnet_reading_time. WordPress stores this value in the post metadata table, and we will expose it through the REST API.
Create a Custom Field Using Post Meta
You can create a custom field manually using the WordPress post editor, a custom metabox, or the update_post_meta() function. For this example, we will use a small PHP function that saves a reading-time value against a post.
Add the following code to your site-specific plugin or functions.php file:
function pnet_save_reading_time($post_id) {

    if (defined('DOING_AUTOSAVE') && DOING_AUTOSAVE) {
        return;
    }

    if (wp_is_post_revision($post_id)) {
        return;
    }

    if (!current_user_can('edit_post', $post_id)) {
        return;
    }

    $word_count = str_word_count(
        wp_strip_all_tags(
            get_post_field('post_content', $post_id)
        )
    );

    $reading_time = max(1, (int) ceil($word_count / 200));

    update_post_meta(
        $post_id,
        '_pnet_reading_time',
        $reading_time
    );
}

add_action(
    'save_post_post',
    'pnet_save_reading_time',
    20,
    1
);
This function calculates the approximate reading time whenever a post is saved. It assumes an average reading speed of 200 words per minute and stores the result as post metadata.
The function also checks for autosaves, revisions, and editing permissions. These checks help prevent unnecessary metadata updates and inappropriate processing during post-saving operations.
Now, when you save or update a post, WordPress will store the calculated reading time under the _pnet_reading_time metadata key.
Important
You might also like: UpdraftPlus Premium Review: Is It Worth The Money?
Step 4: Register a Custom REST API Field Using register_rest_field()
The register_rest_field() function is one of the most flexible ways to add WordPress REST API Custom Fields to an existing REST API response. It allows you to define a custom field, specify how its value is retrieved, and optionally define how the value is updated.
Unlike modifying the underlying database structure, this method extends the JSON response dynamically. It is particularly useful when you want to expose calculated information, combine multiple metadata values, or return data from a custom processing function.
Understand the register_rest_field() Function
The function accepts three primary arguments:
- Object type: The post type or REST API object type where the field should appear.
- Attribute name: The name of the additional field in the JSON response.
- Arguments: An array containing callbacks and schema information.
The most commonly used arguments are:
get_callback– Retrieves the custom field value.update_callback– Processes updates submitted through the REST API.schema– Describes the expected data type and other field properties.
Register the Reading Time Field
Let’s expose the reading-time metadata created in the previous step. Add the following code to your plugin or theme:
function pnet_register_reading_time_rest_field() {

    register_rest_field(
        'post',
        'reading_time',
        array(
            'get_callback' => 'pnet_get_reading_time_rest_field',
            'schema' => array(
                'description' => 'Estimated reading time in minutes.',
                'type' => 'integer',
                'context' => array('view', 'edit'),
                'readonly' => true,
            ),
        )
    );
}

add_action(
    'rest_api_init',
    'pnet_register_reading_time_rest_field'
);

function pnet_get_reading_time_rest_field(
    $object,
    $field_name,
    $request
) {

    $reading_time = get_post_meta(
        $object['id'],
        '_pnet_reading_time',
        true
    );

    return $reading_time !== ''
        ? (int) $reading_time
        : 1;
}
Let’s understand the important parts of this implementation.
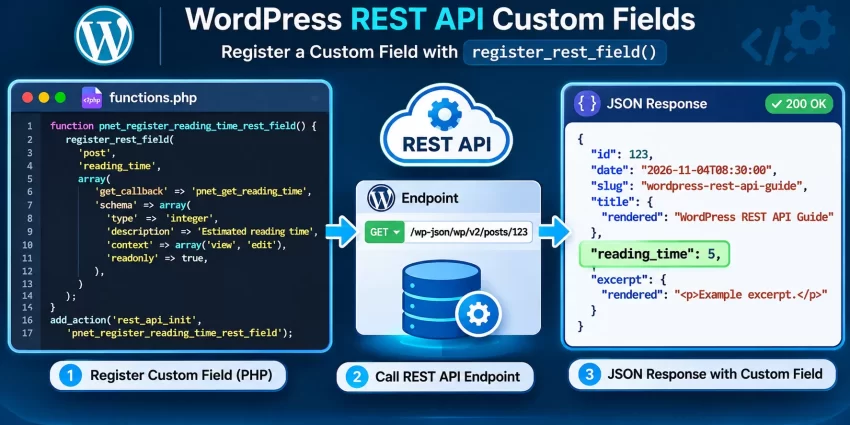
First, register_rest_field() registers a field named reading_time for the standard WordPress post type. The get_callback argument points to our custom retrieval function, which reads the metadata associated with the current post.
The schema declares the field as an integer and marks it as read-only. This is important because the example is designed to calculate reading time automatically rather than allow external applications to overwrite it.
Once registered, the field becomes part of the post JSON response.
Example JSON Response
After implementing WordPress REST API Custom Fields, visit the following endpoint:
https://example.com/wp-json/wp/v2/posts/123
Your response will now contain an additional property:
{
  "id": 123,
  "slug": "wordpress-rest-api-guide",
  "title": {
    "rendered": "WordPress REST API Guide"
  },
  "reading_time": 5
}
The reading_time property is now available alongside the standard WordPress post fields. Your frontend application can retrieve it without making a separate request for post metadata.
Pro Tip
Step 5: Register Metadata Using register_meta()
Another native method for exposing WordPress REST API Custom Fields is register_meta(). Unlike register_rest_field(), which adds a field through a custom callback, register_meta() registers metadata with WordPress and can make it available through the REST API’s metadata structure.
This approach is especially useful when you already store information using WordPress post metadata and want to expose that information in a standardized way.
Register Existing Post Metadata
For this example, we will register a metadata field called pnet_subtitle. The field will be associated with standard WordPress posts and exposed through the REST API.
function pnet_register_subtitle_meta() {

    register_post_meta(
        'post',
        'pnet_subtitle',
        array(
            'type' => 'string',
            'single' => true,
            'show_in_rest' => true,
            'sanitize_callback' => 'sanitize_text_field',
            'auth_callback' => function() {
                return current_user_can('edit_posts');
            },
        )
    );
}

add_action(
    'init',
    'pnet_register_subtitle_meta'
);
Here, register_post_meta() registers metadata specifically for the post post type. It is a post-specific wrapper around the broader register_meta() API.
The show_in_rest argument is set to true, allowing the metadata to appear in the REST API response. The single argument specifies that the field stores one value rather than an array of values.
We have also included a sanitization callback and an authorization callback. The sanitization callback ensures that incoming values are treated as plain text, while the authorization callback restricts access according to the current user’s capabilities.
Enable the Custom Field in the REST API
After registering the metadata, save a value against a post:
update_post_meta(
    123,
    'pnet_subtitle',
    'A practical guide for WordPress developers'
);
Now request the post through the REST API:
https://example.com/wp-json/wp/v2/posts/123
You should find the registered metadata inside the meta property:
{
  "id": 123,
  "title": {
    "rendered": "WordPress REST API Guide"
  },
  "meta": {
    "pnet_subtitle": "A practical guide for WordPress developers"
  }
}
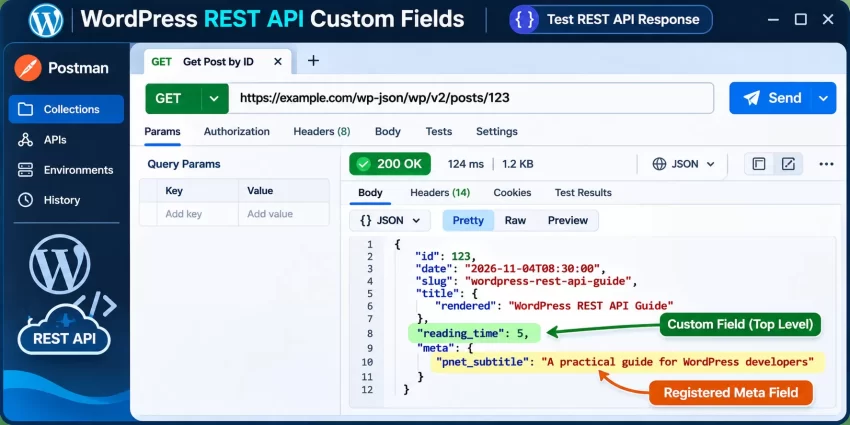
This is an important distinction between the two WordPress REST API Custom Fields methods. register_rest_field() adds a top-level response property, whereas registered metadata normally appears inside the meta object.
Pro Tip
Step 6: Add Custom Fields to Custom Post Types
WordPress REST API Custom Fields are not limited to standard blog posts. You can register additional fields for custom post types, provided the post type is properly registered with REST API support.
For example, imagine that your website contains a custom post type called portfolio. You want to expose an additional field named project_url in the REST API response.
Enable REST API Support for the Custom Post Type
When registering a custom post type, make sure the show_in_rest argument is enabled.
function pnet_register_portfolio_post_type() {

    register_post_type(
        'portfolio',
        array(
            'labels' => array(
                'name' => 'Portfolio',
                'singular_name' => 'Portfolio Item',
            ),
            'public' => true,
            'show_in_rest' => true,
            'supports' => array(
                'title',
                'editor',
                'thumbnail',
                'custom-fields',
            ),
            'has_archive' => true,
        )
    );
}

add_action(
    'init',
    'pnet_register_portfolio_post_type'
);
The show_in_rest argument enables REST API support for this post type. Without it, the standard custom post type endpoint will not be available through the WordPress REST API.
Register a Custom Field for the Portfolio Post Type
Now register the additional field using register_rest_field().
function pnet_register_portfolio_rest_field() {

    register_rest_field(
        'portfolio',
        'project_url',
        array(
            'get_callback' => 'pnet_get_portfolio_project_url',
            'schema' => array(
                'description' => 'External project URL.',
                'type' => 'string',
                'format' => 'uri',
                'context' => array('view', 'edit'),
                'readonly' => true,
            ),
        )
    );
}

add_action(
    'rest_api_init',
    'pnet_register_portfolio_rest_field'
);

function pnet_get_portfolio_project_url(
    $object,
    $field_name,
    $request
) {

    return esc_url_raw(
        get_post_meta(
            $object['id'],
            '_pnet_project_url',
            true
        )
    );
}
In this example, the field is registered specifically for the portfolio post type. The callback retrieves the project URL from the post metadata and returns it as a string.
Your custom post type endpoint will now include the additional property:
https://example.com/wp-json/wp/v2/portfolio/123
Example response:
{
  "id": 123,
  "type": "portfolio",
  "title": {
    "rendered": "Website Development Project"
  },
  "project_url": "https://example-client.com"
}
This makes WordPress REST API Custom Fields particularly useful for websites that use multiple content types and need different JSON structures for each application.
You might also like:

Step 7: Test and Verify Your Custom REST API Fields
After registering WordPress REST API Custom Fields, you should verify that the additional properties appear correctly in the JSON response. Testing is essential because a registration error, incorrect callback, missing metadata value, or permission restriction can prevent the field from appearing as expected.
Test Using Your Browser
For a public post, open the following URL in your browser:
https://example.com/wp-json/wp/v2/posts/123Replace the domain and post ID with your actual website information. Search the JSON response for the custom field name, such as reading_time or meta.
Test Using cURL
You can also use cURL to retrieve the REST API response directly from your terminal.
curl -X GET \
"https://example.com/wp-json/wp/v2/posts/123" \
-H "Accept: application/json"
For endpoints that require authentication, use an appropriately configured authentication method rather than exposing credentials in shared scripts or logs.
Test Using Postman
Postman is useful when you are testing multiple REST API endpoints or working with authenticated requests. Create a new GET request, enter your post endpoint URL, and click Send.
Check the response body and confirm that the custom properties are returned with the expected data types and values.
Verify the Response Context
WordPress REST API fields can have different visibility depending on their registered schema and the current request context. For example, a field intended for public display should be registered with the appropriate view context.
When testing, check both anonymous requests and authenticated requests. A field that is available to an administrator may not necessarily be available to a public visitor.
Step 8: Follow REST API Security Best Practices
Adding WordPress REST API Custom Fields increases the amount of information your website exposes to external applications. Therefore, you should carefully evaluate which information is safe to publish and which information must remain private.
Never Expose Sensitive Metadata
Do not expose private information such as internal administrative notes, API keys, authentication tokens, private customer information, or confidential business data. A metadata key being available in the WordPress database does not mean it should be publicly accessible.
Use Proper Authorization Checks
If your custom field contains private or editable information, implement an appropriate permission callback or authorization check. Do not assume that hiding a field in the frontend provides security.
For registered metadata, use an authorization callback that checks the appropriate capability for the specific object. For custom REST API fields with update callbacks, validate the requester’s permissions before accepting changes.
Validate and Sanitize Incoming Data
Whenever an external application submits information to WordPress, validate its structure and sanitize it before saving. For example, use sanitize_text_field() for plain text, absint() for positive integer IDs, and esc_url_raw() for URLs.
Define an Appropriate Schema
Always define the expected data type of your custom field. A properly configured schema helps WordPress understand the structure of the response and the values accepted by the endpoint.
For more information, refer to the official WordPress documentation on modifying REST API responses and the REST API Schema documentation.
Security Warning
Common Errors When Adding Custom REST API Fields
Even though WordPress REST API Custom Fields are relatively straightforward to implement, developers sometimes encounter issues when registering fields or retrieving metadata. The following troubleshooting guide covers common problems and their solutions.
1. Custom Field Does Not Appear in the JSON Response
Possible cause: The registration function is not being executed, the field is registered for the wrong post type, or the registration hook is incorrect.
Solution: Make sure register_rest_field() runs during the rest_api_init action. Also verify that the first argument matches the REST API object type, such as post or portfolio.
2. Custom Field Returns an Empty Value
Possible cause: The metadata does not exist, the metadata key is incorrect, or the callback is retrieving the wrong post ID.
Solution: Check the metadata using get_post_meta() and confirm that the correct key is being used. Also verify that the callback accesses the post ID from the supplied REST API object.
3. Registered Metadata Does Not Appear Under the Meta Object
Possible cause: The metadata has not been registered with REST API support.
Solution: Use register_post_meta() with show_in_rest set to true. Make sure the metadata registration is executed during the init action.
4. Custom Post Type REST API Endpoint Returns a 404 Error
Possible cause: The custom post type does not have REST API support enabled.
Solution: Add 'show_in_rest' => true to the register_post_type() arguments. Also confirm that you are using the correct REST API base route and that the post type is registered correctly.
5. Custom Field Is Available to Administrators but Not Public Visitors
Possible cause: The field schema uses a restricted context, or its authorization callback prevents public access.
Solution: Review the field’s schema context and authorization logic. If the data is intended to be public, configure the appropriate view context and ensure the field does not require authentication unnecessarily.
6. REST API Returns an Invalid Data Type
Possible cause: The callback returns a string when the schema expects an integer, or the metadata value has not been converted into the expected type.
Solution: Cast the returned value appropriately. For example, use (int) for integer fields and (string) for string fields. Keep the registered schema consistent with the returned data.
Conclusion
Modifying WordPress REST API responses is an effective way to make your website’s data more useful to external applications, custom frontends, and third-party integrations. Instead of creating separate endpoints or modifying WordPress core files, you can use native functions to extend existing JSON responses.
As demonstrated in this tutorial, register_rest_field() is an excellent choice when you need custom response properties, calculated values, or advanced retrieval logic. On the other hand, register_post_meta() is generally the better option when you want to expose existing post metadata through the standard meta object.
By implementing WordPress REST API Custom Fields with appropriate schemas, sanitization, and authorization checks, you can build cleaner integrations while maintaining compatibility with WordPress core functionality. Always test your changes against the relevant endpoints and review your security settings before deploying them to a live website.
With these techniques, you can confidently customize WordPress REST API responses and provide exactly the data your applications need.