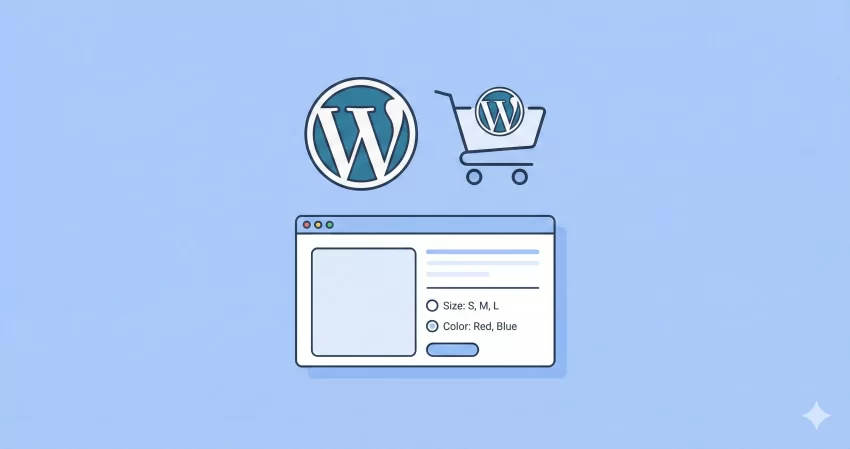
If you run a variable product store, you already know the struggle: the default dropdown menus in WooCommerce are functional, but they aren’t exactly user-friendly. They hide options behind a click, forcing customers to work harder just to see what is available. That is why many store owners look for ways to implement WooCommerce variation radio buttons instead.
By default, WooCommerce saves space by tucking variations into select boxes. While this keeps the page clean, it often kills conversion rates. Customers prefer to see all their choices—like colors, sizes, or materials—at a glance. Switching to radio buttons reduces friction, makes the buying process smoother, and gives your product pages a modern, app-like feel.
In this guide, we will walk through exactly how to replace those clunky dropdowns with clean, visible WooCommerce variation radio buttons using custom code. We will skip the heavy plugins and use a lightweight solution to keep your site fast. Whether you are a developer or a store owner comfortable with copy-pasting code, this tutorial on WooCommerce variation radio buttons is for you.
Why You Should Ditch Dropdowns for Radio Buttons
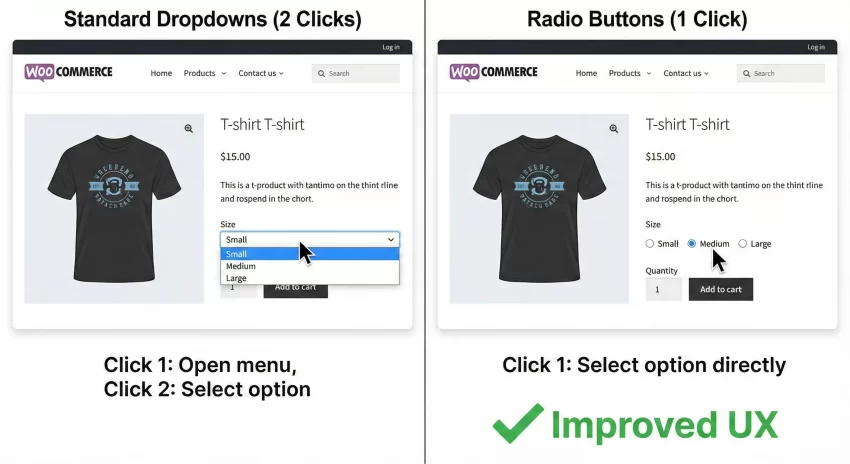
Think about the last time you shopped on Amazon or a major fashion retailer. Did you have to click a dropdown to see if a shirt came in “Medium”? Probably not. You likely saw a row of clickable boxes. That is the industry standard for a reason. Dropdowns require two clicks to make a selection: one to open the menu and one to select the option. Radio buttons require only one.
Furthermore, dropdowns hide “Out of Stock” information until the user actually interacts with the menu. With open WooCommerce variation radio buttons, you can style unavailable items to look disabled or crossed out immediately, saving your customer frustration. Improving this single element of your UI can have a measurable impact on your bounce rates.
Performance vs. Plugins
There are plenty of plugins that handle “variation swatches,” but they often come with bloat. They might load heavy JavaScript files, extra CSS, and slow down your product page load times. By implementing WooCommerce variation radio buttons programmatically, you ensure that your site runs only the exact code it needs. This is crucial for maintaining a high Core Web Vitals score.
Prerequisites Before We Begin
Before editing your theme files, always ensure you have a backup of your site. We will be adding code to your child theme’s functions.php file. If you are not using a child theme, I highly recommend creating one or using a plugin like “Code Snippets” to manage these modifications safely. The best option is using a Site Specific plugin, that way you ensure the customization stays even if you changed your store’s theme.
You might also like:

Step 1: The Logic Behind the Change
WooCommerce uses a specifically standardized structure to generate variable product forms. To change the dropdown into radio buttons, we generally have two paths: overriding the template files or using hooks to modify the HTML output.
For this guide, we will hook into the variation rendering process. We need to intercept the HTML that WooCommerce generates for the variable.php template. While you could copy the variable.php file to your child theme and edit it, using hooks is often cleaner and prevents issues when WooCommerce updates in the future.
Tip: Boost Sales: How to Display WooCommerce Discount Percentage Easily
Step 2: The Custom Code Implementation
Below is the complete code snippet to implement WooCommerce variation radio buttons. This script creates a custom function that modifies how attributes are displayed. We are using the prefix pnet_ to ensure no conflicts with other plugins or themes.
We will be utilizing the wc_dropdown_variation_attribute_options filter. This powerful WordPress filter allows us to change the HTML output of the variation selector entirely.
/**
 * Display WooCommerce Variations as Radio Buttons
 * Author: PixelNet
 */

// 1. Disable the default JS for variations (optional, but recommended for custom styling)
// Note: Depending on your theme, you might need to keep the default JS and just style on top of it.
// For this tutorial, we will focus on the PHP output.

add_filter( 'woocommerce_dropdown_variation_attribute_options_html', 'pnet_variation_radio_buttons', 20, 2 );

function pnet_variation_radio_buttons( $html, $args ) {

    // Get the arguments passed by WooCommerce
    $args = wp_parse_args( apply_filters( 'woocommerce_dropdown_variation_attribute_options_args', $args ), array(
        'options'          => false,
        'attribute'        => false,
        'product'          => false,
        'selected'         => false,
        'name'             => '',
        'id'               => '',
        'class'            => '',
        'show_option_none' => __( 'Choose an option', 'woocommerce' ),
    ) );

    if ( false === $args['selected'] && $args['attribute'] && $args['product'] instanceof WC_Product ) {
        $selected_key = 'attribute_' . sanitize_title( $args['attribute'] );
        $args['selected'] = isset( $_REQUEST[ $selected_key ] ) ? wc_clean( $_REQUEST[ $selected_key ] ) : $args['product']->get_variation_default_attribute( $args['attribute'] );
    }

    $options               = $args['options'];
    $product               = $args['product'];
    $attribute             = $args['attribute'];
    $name                  = $args['name'] ? $args['name'] : 'attribute_' . sanitize_title( $attribute );
    $id                    = $args['id'] ? $args['id'] : sanitize_title( $attribute );
    $class                 = $args['class'];
    $show_option_none      = (bool) $args['show_option_none'];
    $show_option_none_text = $args['show_option_none'] ? $args['show_option_none'] : __( 'Choose an option', 'woocommerce' );

    if ( empty( $options ) && ! empty( $product ) && ! empty( $attribute ) ) {
        $attributes = $product->get_variation_attributes();
        $options    = $attributes[ $attribute ];
    }

    // Start generating our Radio Button HTML
    $html = '<div class="pnet-variation-radios">';

    if ( ! empty( $options ) ) {
        if ( $product && taxonomy_exists( $attribute ) ) {
            // Get terms if this is a taxonomy - safer
            $terms = wc_get_product_terms( $product->get_id(), $attribute, array( 'fields' => 'all' ) );

            foreach ( $terms as $term ) {
                if ( in_array( $term->slug, $options, true ) ) {
                    $checked = checked( $args['selected'], $term->slug, false );
                    $html .= '<label class="pnet-radio-label">';
                    $html .= '<input type="radio" name="' . esc_attr( $name ) . '" value="' . esc_attr( $term->slug ) . '" ' . $checked . '>';
                    $html .= '<span class="pnet-radio-term">' . esc_html( apply_filters( 'woocommerce_variation_option_name', $term->name ) ) . '</span>';
                    $html .= '</label>';
                }
            }
        } else {
            // Custom attributes (not taxonomies)
            foreach ( $options as $option ) {
                // This handles custom attributes added directly to the product
                $checked = checked( $args['selected'], $option, false );
                $html .= '<label class="pnet-radio-label">';
                $html .= '<input type="radio" name="' . esc_attr( $name ) . '" value="' . esc_attr( $option ) . '" ' . $checked . '>';
                $html .= '<span class="pnet-radio-term">' . esc_html( apply_filters( 'woocommerce_variation_option_name', $option ) ) . '</span>';
                $html .= '</label>';
            }
        }
    }

    $html .= '</div>';

    return $html;
}
Note: This code assumes standard variable products. If you use complex plugins that alter product types, you may need to adjust the logic.
You might also like:
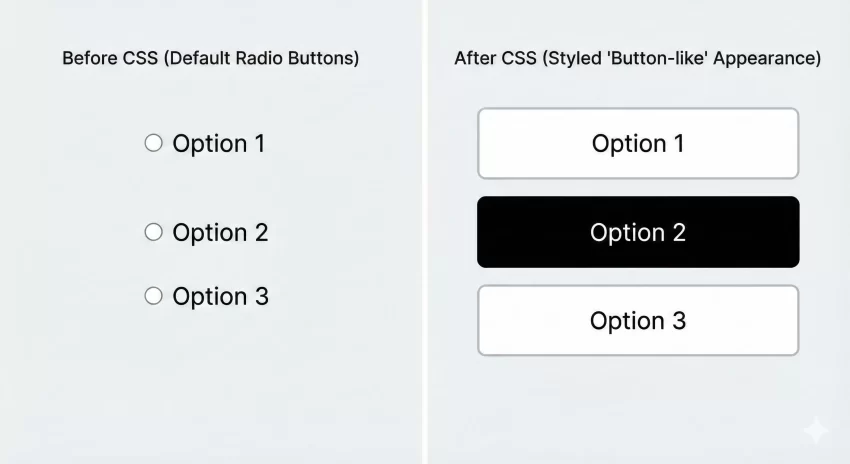
Step 3: Styling the Radios with CSS
Right now, if you save that code, you will likely see standard browser radio buttons. They work, but they are ugly. We want them to look like buttons. Add the following CSS to your child theme’s style.css file or the Customizer “Additional CSS” section.
/* Container for the radios */
.pnet-variation-radios {
    display: flex;
    flex-wrap: wrap;
    gap: 10px;
    margin-bottom: 15px;
}

/* Hide the actual radio circle input */
.pnet-variation-radios input[type="radio"] {
    display: none;
}

/* Style the label to look like a button */
.pnet-radio-label {
    cursor: pointer;
    border: 1px solid #ccc;
    padding: 8px 16px;
    background: #fff;
    transition: all 0.3s ease;
    border-radius: 4px;
}

/* Style the span text inside */
.pnet-radio-term {
    font-size: 14px;
    font-weight: 500;
}

/* Selected State */
.pnet-variation-radios input[type="radio"]:checked + .pnet-radio-term {
    color: #fff;
}

.pnet-variation-radios input[type="radio"]:checked + span {
    /* You can target the parent label via JS for better styling,
       but for pure CSS, we style the span or use :has selector if supported */
}

/* Advanced: Using :checked to style the label immediately following the hidden input
   Note: This requires the input to be inside the label as per our HTML structure.
*/
.pnet-radio-label:has(input:checked) {
    background-color: #000; /* Change to your brand color */
    border-color: #000;
    color: #fff;
}
Troubleshooting Common Issues
Implementing WooCommerce variation radio buttons is usually straightforward, but every theme is different. Here are common hurdles you might face.
1. The “Add to Cart” Button Stays Grey
WooCommerce relies on JavaScript to detect when a variation is selected. If you change the HTML structure too drastically, the default JS script (add-to-cart-variation.js) might not recognize the selection. Ensure your radio inputs have the correct name attribute matching the original select box (usually attribute_pa_color, etc.). Our code above handles this dynamically.
2. CSS Conflicts
If your WooCommerce variation radio buttons look squashed or invisible, your theme might be overriding label styles. Use your browser’s “Inspect Element” tool to see if display: block or other properties are interfering with the .pnet-radio-label class.
3. Mobile Responsiveness
Radio buttons take up more screen real estate than dropdowns. If you have a product with 50 variations, a dropdown is actually better. However, for products with 3-5 options, radio buttons are superior. Check your mobile view to ensure the buttons wrap correctly to the next line without breaking the layout.
Advanced Customization: Adding Color Swatches
Once you have the basic radio buttons working, you might want to turn them into color swatches. This essentially involves the same logic but requires CSS that looks at the specific attribute value. For example, if the value is “Red,” you inject a background color of red.
To do this programmatically, you would modify the PHP function pnet_variation_radio_buttons to check if ( $attribute == 'pa_color' ). Inside that check, you can output inline styles or specific classes like class="pnet-swatch-red". While this is more complex, it offers total control without the overhead of a massive swatch plugin.
Conclusion
Optimizing your product pages is an ongoing process, but switching to WooCommerce variation radio buttons is one of the quickest wins for User Experience. It respects your customer’s time by making choices obvious and accessible. By using the code provided above, you have a lightweight, customizable solution that removes the need for expensive or bloated plugins.
If you implement WooCommerce variation radio buttons on your site, keep an eye on your conversion metrics. You will likely find that reducing the clicks to the cart leads to more completed checkouts. Happy coding!