
Every store owner eventually faces a unique requirement that standard product options can’t satisfy. You might need to let customers enter a name for engraving, specify a custom color code, or provide specific delivery instructions for a single item. The default variation system is great for fixed choices, but it falls short when you need open-ended input. The solution is to WooCommerce add custom field functionality directly to your product pages programmatically.
In this technical guide, we will solve the problem of limited product data collection by building a robust, secure, and lightweight solution. Instead of relying on bloated plugins that slow down your site, we will write a clean snippet to inject a “Personalization” text field, validate the input, pass it through the cart, and save it permanently to the order admin. By the end of this tutorial, you will have complete control over how you WooCommerce add custom field inputs to any product.
Prerequisites & Setup
Before modifying your theme files, ensure your environment meets the necessary standards. Direct code modifications should always be handled with care to prevent downtime.
- PHP 7.4 or higher (PHP 8.0+ recommended for better performance).
- Access to your theme’s
functions.phpfile or a site-specific plugin. - A child theme installed and active (to preserve changes during updates).
- A full backup of your site database and files.
- Basic familiarity with WooCommerce hooks and filters.
Backup Required
functions.php can take your site offline immediately. Step 1: Display the Input Field on the Product Page
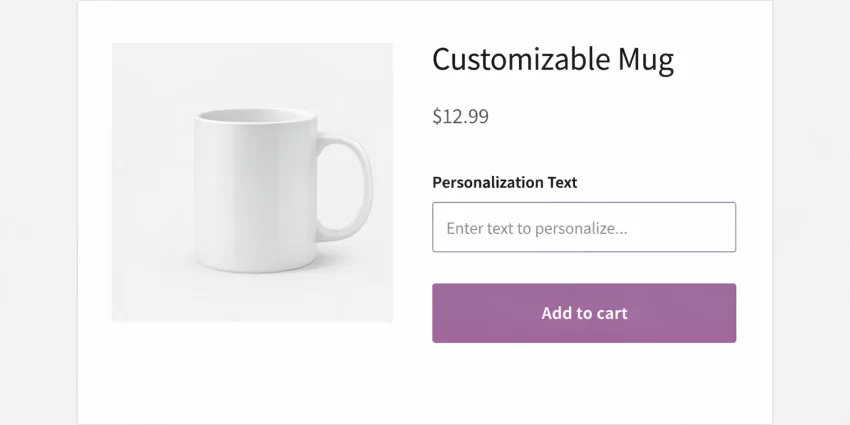
The first step in our journey to WooCommerce add custom field capability is the frontend display. We need to inject HTML directly into the product page form. WooCommerce provides specific action hooks that allow us to insert content inside the “Add to Cart” form, ensuring the new field is submitted alongside the product ID and quantity.
We will use the woocommerce_before_add_to_cart_button hook. This places our field just above the “Add to Cart” button, which is the standard UX convention for personalization options. This ensures the user sees the field before they commit to the purchase.
Rendering the HTML Input
We will create a function that outputs a standard HTML text input. To make this robust, we will wrap it in a div for styling and add a label. We also need to ensure unique IDs for accessibility.
/**
 * Display the custom text field on the product page.
 */
function pnet_display_personalization_field() {
    echo '<div class="pnet-personalization-field-wrapper" style="margin-bottom: 15px;">';
    echo '<label for="pnet_personalization_text" style="display:block; margin-bottom: 5px;">Personalization Text:</label>';
    echo '<input type="text" id="pnet_personalization_text" name="pnet_personalization_text" placeholder="Enter name or text here..." style="width: 100%; padding: 8px;" value="">';
    echo '</div>';
}
add_action( 'woocommerce_before_add_to_cart_button', 'pnet_display_personalization_field' );
In the code above, the name attribute pnet_personalization_text is critical. This is the key we will use to retrieve the data in the $_POST array in subsequent steps. Styling is kept inline for simplicity here, but you should move CSS to your stylesheet in a production environment.
You might also like: How to Display WooCommerce Sale Percentage on Products: 3 Easy Steps
Step 2: Validate the Input Data
Allowing users to submit empty or malicious data is a bad practice. When you WooCommerce add custom field elements, you must ensure the data meets your requirements before an item is added to the cart. If the field is mandatory, we need to stop the “Add to Cart” process if the user leaves it blank.
We leverage the woocommerce_add_to_cart_validation filter. This filter allows us to check the posted data and return false (which halts the process) if our criteria aren’t met. We will also add a standard WooCommerce error notice to inform the user why the action failed.
/**
 * Validate the custom field data before adding to cart.
 *
 * @param bool $passed Validation status.
 * @param int $product_id The product ID being added.
 * @param int $quantity The quantity being added.
 * @return bool
 */
function pnet_validate_personalization_field( $passed, $product_id, $quantity ) {
    // Check if the field is empty
    if ( empty( $_POST['pnet_personalization_text'] ) ) {
        wc_add_notice( __( 'Please enter your personalization text before adding to cart.', 'pnet-domain' ), 'error' );
        $passed = false;
    }
    return $passed;
}
add_filter( 'woocommerce_add_to_cart_validation', 'pnet_validate_personalization_field', 10, 3 );
Pro Tip
Step 3: Save Data to the Cart Session
Once validation passes, the product is added to the cart. However, by default, WooCommerce only stores the product ID and quantity. It does not know about our custom text. We need to manually interrupt the cart data creation process to inject our custom value into the cart item session.
We use the woocommerce_add_cart_item_data filter. This hook gives us access to the cart item array, allowing us to append new key-value pairs. This data will persist as the user navigates the site, ensuring their personalization text isn’t lost.
Sanitization and Storage
Security is paramount. Never save raw user input. We use sanitize_text_field() to clean the input before adding it to the cart object. This prevents Cross-Site Scripting (XSS) attacks.
/**
 * Add custom field data to the cart item data.
 *
 * @param array $cart_item_data The current cart item data.
 * @param int $product_id The product ID.
 * @param int $variation_id The variation ID.
 * @return array
 */
function pnet_add_custom_field_data_to_cart( $cart_item_data, $product_id, $variation_id ) {
    if ( isset( $_POST['pnet_personalization_text'] ) ) {
        $cart_item_data['pnet_personalization_text'] = sanitize_text_field( $_POST['pnet_personalization_text'] );
    }
    return $cart_item_data;
}
add_filter( 'woocommerce_add_cart_item_data', 'pnet_add_custom_field_data_to_cart', 10, 3 );
Step 4: Display Field in Cart and Checkout
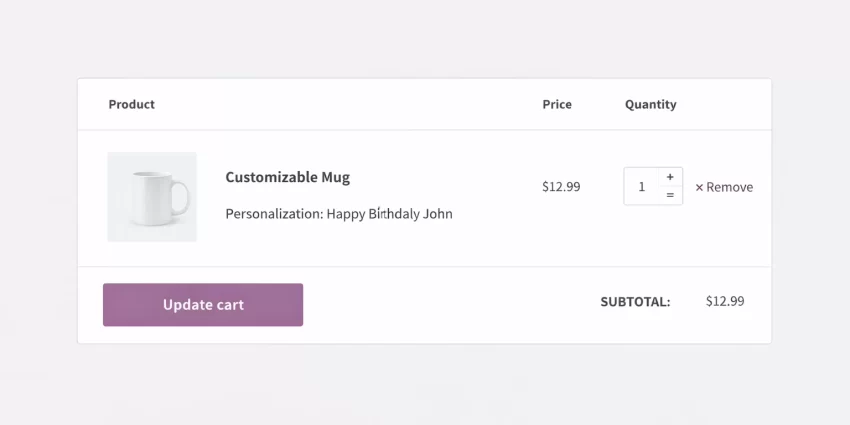
At this stage, the data is technically in the backend session, but the customer cannot see it. If they view their cart, the product looks standard. To complete the user experience when you WooCommerce add custom field inputs, you must render this data in the cart table and the checkout summary.
The woocommerce_get_item_data filter allows us to modify the key-value pairs displayed under the product title in the cart. We check if our specific key exists in the cart item, and if so, we format it for display.
/**
 * Display the custom data in the cart and checkout pages.
 *
 * @param array $item_data The item data array.
 * @param array $cart_item The cart item object.
 * @return array
 */
function pnet_display_custom_field_in_cart( $item_data, $cart_item ) {
    if ( isset( $cart_item['pnet_personalization_text'] ) ) {
        $item_data[] = array(
            'key'     => __( 'Personalization', 'pnet-domain' ),
            'value'   => wc_clean( $cart_item['pnet_personalization_text'] ),
            'display' => '',
        );
    }
    return $item_data;
}
add_filter( 'woocommerce_get_item_data', 'pnet_display_custom_field_in_cart', 10, 2 );
Note the use of wc_clean. While we sanitized on input, double-checking output security is a robust development habit.
You might also like: Empty WooCommerce Cart Programmatically: The Ultimate Guide (2026) [Solved]
Step 5: Save Data to the Order Line Item
This is the most critical step for store owners. If the data stays in the cart but doesn’t transfer to the Order object upon checkout, the information is lost forever. We must hook into the order creation process to permanently save this metadata to the database.
The action woocommerce_checkout_create_order_line_item is triggered when the user clicks “Place Order”. It provides access to the $item object (which will be saved to the database) and the $cart_item_values (which holds our temporary session data). We simply map one to the other.
/**
 * Add custom data to order line items.
 *
 * @param WC_Order_Item_Product $item The order item object.
 * @param string $cart_item_key The cart item key.
 * @param array $values The cart item values.
 * @param WC_Order $order The order object.
 */
function pnet_add_custom_data_to_order( $item, $cart_item_key, $values, $order ) {
    if ( isset( $values['pnet_personalization_text'] ) ) {
        $item->add_meta_data(
            __( 'Personalization', 'pnet-domain' ),
            $values['pnet_personalization_text'],
            true
        );
    }
}
add_action( 'woocommerce_checkout_create_order_line_item', 'pnet_add_custom_data_to_order', 10, 4 );
For Developers
add_meta_data is set to true. This ensures the meta key is unique, though in this context, it primarily signals that this is a distinct piece of data attached to this specific line item. Step 6: Display Custom Field in Admin Order Panel
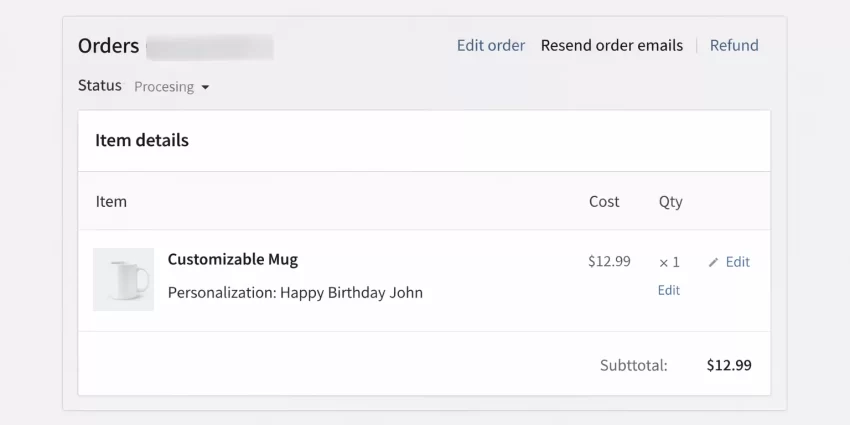
The final piece of the puzzle is visibility for the store administrator. When you view an order in the WordPress dashboard (WooCommerce > Orders), you need to see this personalization text clearly so you can fulfill the order correctly.
Fortunately, because we used the standard add_meta_data method in the previous step, WooCommerce automatically handles the display in the backend! Since WooCommerce 3.0+, order item meta is rendered automatically in the order items table. No extra code is strictly required for basic visibility.
However, if you wanted to customize how it looks or place it elsewhere, you could use hooks like woocommerce_admin_order_data_after_order_details. For this guide, the native behavior generated by Step 5 is sufficient and cleaner.
Troubleshooting Common Errors
Even seasoned developers encounter hiccups when manipulating checkout flows. Here are the most common issues when you attempt to WooCommerce add custom field functionality.
Data Not Saving to Order
If the field appears in the cart but disappears after checkout, the issue is likely in Step 5. Ensure you are using the correct hook woocommerce_checkout_create_order_line_item. Older tutorials might reference deprecated hooks like woocommerce_add_order_item_meta, which should be avoided in modern WooCommerce versions.
Validation Loop (Can’t Add to Cart)
If you cannot add the item to the cart even when text is entered, check your isset() or empty() logic in Step 2. Ensure the HTML input name attribute in Step 1 exactly matches the key you are checking in the PHP validation function.
Caching Issues
Sometimes, aggressive page caching can serve a cached version of the product page without the nonce or form data. If the field behaves erratically, try excluding product pages from your caching plugin or clearing the cache.
Summary
In this guide, we have walked through the complete lifecycle of a custom product field. You learned how to WooCommerce add custom field elements to the frontend, validate them for data integrity, carry them through the cart session, and finally persist them into the order database.
By using this programmatic approach, you avoid the overhead of heavy plugins and maintain full control over your code structure. This method allows you to scale, adding dropdowns, checkboxes, or file uploads using the same logic structure provided here. Implementing these snippets will give you a customized, professional, and highly functional store tailored to your specific business needs.
You might also like: Build a Stunning WordPress Mega Menu Without Bloated Plugins


